
Every exam in your organization lives in one place: Resources → Exams. From there you create them, reuse them across courses, and export results.
Open it from the left sidebar under Assessment: click Resources, then Exams.
1. Creating an Exam
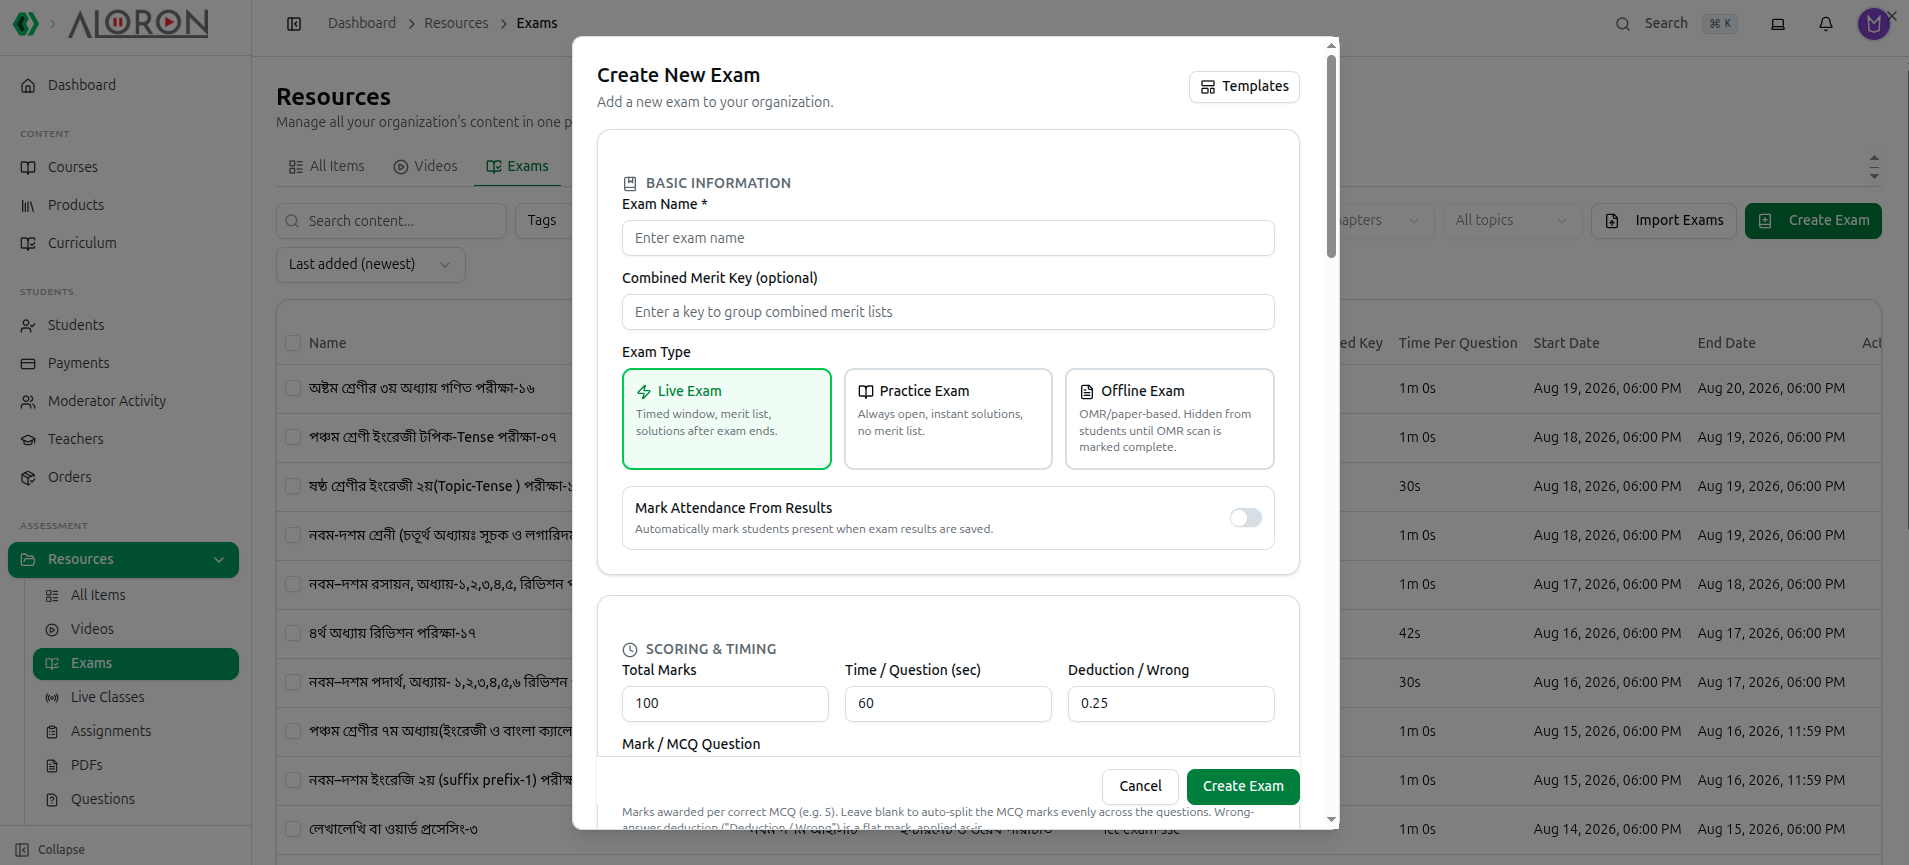
Click Create Exam to open Create New Exam — Add a new exam to your organization. Templates in the corner starts you from a saved configuration instead of a blank form.
Basic Information
- Exam Name (required) — what students see.
- Combined Merit Key (optional) — Enter a key to group combined merit lists. Give several exams the same key and you can publish one merit list across all of them. Leave it blank unless you run a series.
Exam Type — the decision that shapes everything else
| Type | Behaviour |
|---|---|
| Live Exam | Timed window, merit list, solutions after exam ends. The standard graded exam |
| Practice Exam | Always open, instant solutions, no merit list. For self-study — no ranking, no deadline |
| Offline Exam | OMR/paper-based. Hidden from students until OMR scan is marked complete. |
Pick the type deliberately — it is the difference between an assessment and a study aid. A Practice Exam shows answers immediately and never ranks anyone. An Offline Exam stays invisible to students until you have scanned and completed the OMR sheets, so nobody sees a half-marked paper.
Mark Attendance From Results — a toggle: Automatically mark students present when exam results are saved. Useful for offline exams in a hall, where sitting the paper is the attendance record.
Scoring & Timing
- Total Marks — what the exam is out of.
- Time / Question (sec) — seconds per question. The total duration is this multiplied by the question count, which is why the list shows Time Per Question rather than a fixed length.
- Deduction / Wrong — negative marking, as a flat mark per wrong answer, such as 0.25.
- Mark / MCQ Question — marks per correct MCQ. Leave it blank to auto-split the total evenly across the questions, which is what you want unless some questions are worth more.
Click Create Exam.
2. Reading the Exam List
| Column | What it shows |
|---|---|
| Name | The exam name |
| Course | Courses it is attached to, or — if unattached |
| Chapter | Its curriculum chapter |
| Slug | The web-address name |
| Combined Key | A green pill when set, grouping it with other exams |
| Time Per Question | Formatted as 1m 0s or 30s |
| Start Date / End Date | The window, or Not set |
Clicking a row opens the exam's detail page.
Sorting offers six orders: Last added (newest or oldest), Last updated (newest or oldest), and Time per question (high to low or low to high). Page size can be 10, 20, 50 or 100.
3. Row Actions
The three-dot menu on any exam offers:
- View Details — open the exam.
- Get Test Link — opens the student-facing exam in a new tab and copies the link to your clipboard, confirmed by Test link copied to clipboard! This is how you send a direct link to a student.
- Export as JSON — download this one exam as a file.
- Update — edit its settings.
- Delete — remove it.
4. Bulk Actions
Tick several exams and a toolbar appears:
- Export JSON — download the selection as one file, confirmed by N exam(s) exported as JSON.
- Merit List — generate a ranked list from the selected exams.
- Combined Merit — a merit list spanning several exams. Requires at least two — with one selected it is disabled and reads Select at least 2 exams.
5. Deleting — Read This First
Delete on this tab is permanent, and it takes the results with it.
This is the library that owns your exams. Deleting here destroys the exam and every student result attached to it. On the All Items tab, deleting an exam only unlinks it from a module — the exam itself survives.
If you only want an exam off one course, unlink it from All Items instead.
Selections deliberately survive paging, so you can gather exams across several pages before acting. Changing a filter clears the selection — precisely so a hard delete cannot act on rows you can no longer see.
6. Importing Exams
Import Exams restores exams from a JSON export — the counterpart to Export as JSON. Use it to move exams between organizations or to reload a backup.
Troubleshooting
| What you see | What it means |
|---|---|
| No exams match your current filters | Filters are hiding everything. Clear them |
| No exams found | None created yet |
| Combined Merit is greyed out | You have fewer than two exams selected |
| Students cannot see an offline exam | Correct — offline exams stay hidden until the OMR scan is marked complete |
| A practice exam has no merit list | By design. Practice exams never rank students |
| Time Per Question shows but no total duration | Total time is per-question × question count, so it changes as you add questions |
| Your selection vanished | You changed a filter, which clears it as a safeguard before bulk delete |
| Deleting an exam removed results too | Expected on this tab. Use All Items to unlink instead |
Related: Exam Settings · Exam Resources · Question Bank · OMR Processing