
1. Opening the Exams Library
In the left sidebar under Assessment, click Resources, then open the Exams tab. Resources always lands on All Items first; the tabs across the top are All Items, Videos, Exams, Live Classes, Assignments, PDFs, Questions and AI Chats.
The Exams tab is your organization-wide exam list. Every exam you have ever created shows up here, whether or not it has been attached to a course. Use it when you need to find an exam from last term, check which courses an exam is running in, reuse one exam in a second course, or act on many exams at once. Creating an exam from inside a single course is a different flow — this page sits above all your courses.
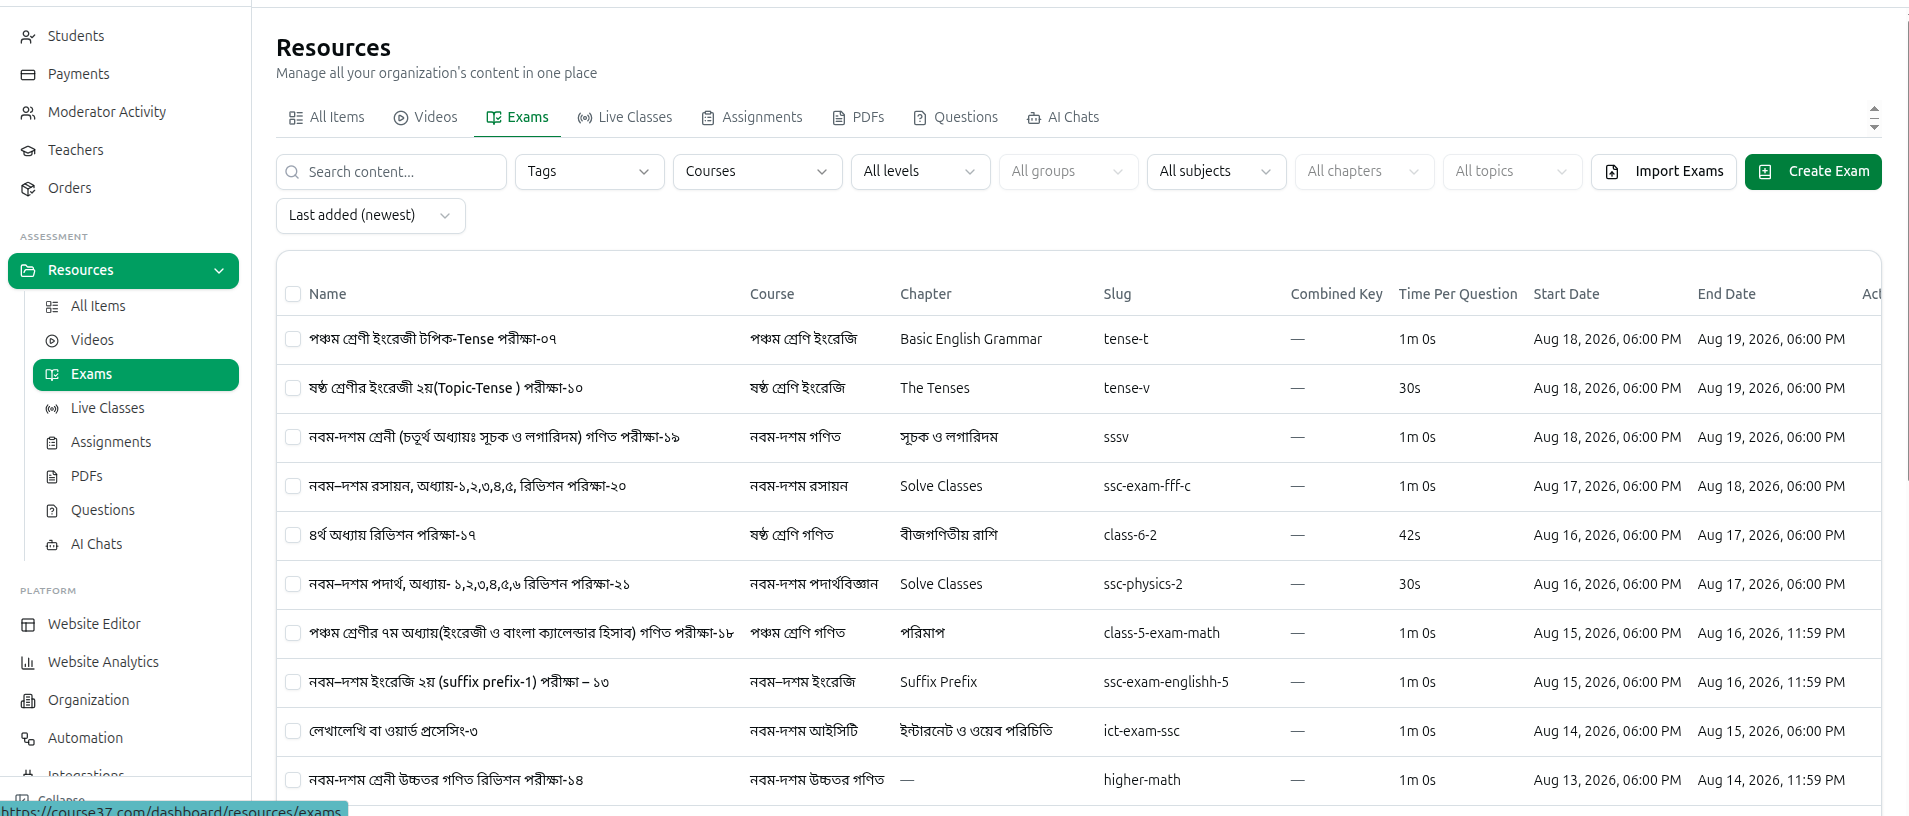
2. The Columns You See
Every row is one exam. Reading the table from left to right:
- Name: the exam title, exactly as students see it.
- Course: every course the exam is currently attached to, separated by commas. A dash (—) means the exam is not attached to any course yet — it exists in your library but no student can reach it through a course.
- Chapter: the primary chapter the exam is filed under, or a dash if none was set.
- Slug: the short web-friendly name used in the exam's link.
- Combined Key: shown as a small green pill when the exam belongs to a combined merit group, otherwise a dash.
- Time Per Question: the per-question timer, shown in minutes and seconds (45s, 1m 30s).
- Start Date and End Date: the exam window, with the date and time. Blank windows read Not set.
- Actions: the ⋮ menu at the right end of each row.
The narrow first column holds a checkbox for selecting rows, which is what turns on the bulk action toolbar described further down.
3. Search, Filters and Sorting
- Type into the Search content... box at the top left. It matches the exam Name and the Slug, and the list refreshes a moment after you stop typing.
- Narrow the list further with the dropdowns beside the search box: Tags, Courses, Level, Group, Subject, Chapter and Topic.
- Choose an order in the sort dropdown on the right of the filter row.
- Click Clear to drop every filter and go back to the full list.
A few things worth knowing about the filters:
- The hierarchy dropdowns cascade. Group only becomes usable after you pick a Level, Chapter after a Subject, and Topic after a Chapter. Picking a higher level clears everything below it.
- Subject has an extra Unassigned choice, which finds exams that were never filed under a subject at all. While Unassigned is selected, Chapter and Topic switch off.
- Tags filters the courses too: once you pick a tag, the Courses dropdown only offers courses carrying that tag.
- The sort dropdown offers Last added (newest), Last added (oldest), Last updated (newest), Last updated (oldest), Time per question (high to low) and Time per question (low to high). New exams first is the default.
- On a phone the dropdowns collapse behind a Filters button that shows a small number badge for how many filters are active.
- If nothing matches you get No exams match your current filters. On a brand new organization you instead get No exams found together with a Create Exam button and a Read Docs button.
At the bottom of the table you get the running count (1–20 of 137), a page-size dropdown offering 10 / page, 20 / page, 50 / page and 100 / page (20 is the default), and the arrow buttons with the current page and the total page count between them (1 / 7). Your filters, sort and page are kept in the page address, so you can bookmark a filtered view or send it to a colleague.
4. How Exam Status Works Here
This tab has no single status column. An exam's real state comes from two things you can read straight off the row: its type and its dates.
- Live Exam: Timed window, merit list, solutions after exam ends. This is the type that depends on the Start Date and End Date columns.
- Practice Exam: Always open, instant solutions, no merit list. Dates are not used.
- Offline Exam: OMR/paper-based. Hidden from students until OMR scan is marked complete. You mark it complete with the OMR Scan Completed switch on the exam's own page, after scanning the answer sheets.
Open an exam and the type is shown as a badge next to its name — Online or Offline · OMR, plus a Practice badge for practice exams. Offline exams also show an OMR Scan Completed switch, with the note Students can now see this exam and their results. once it is on.
So, in plain terms: an exam with a dash in the Course column reaches nobody; a live exam whose Start Date and End Date both read Not set has no window; and an offline exam is invisible to students until its OMR scan is marked complete.
5. Opening an Exam's Detail Page
- Click anywhere on the exam's row, or open the ⋮ menu at the right of the row and choose View Details.
- The detail page opens with the exam name, its type badges, and the Export as JSON and Edit Exam buttons in the top right.
- The Exam Information card shows Exam Name, Slug, Time per Question (minutes), Total Marks, Reduced per Wrong Answer, Start Date and End Date (the two date fields are each labelled with your organization's timezone). As the card says, Double-click any field to edit.
- Below that sit three tabs — Questions, Question Sets and Results & Analysis — plus a Manage Translations button on the Questions tab.
- Back to Exams in the top left brings you straight back to this list.
Everything about actually building the exam — writing and importing questions, arranging question sets and answer keys, printing question papers, grading and reading results — is covered in the Exam System section of this documentation. Treat the Resources Exams tab as the library shelf, and the detail page as the workbench.
6. The Row Menu
Click the ⋮ button at the right end of any row:
- View Details: opens the exam's detail page, exactly like clicking the row.
- Get Test Link: opens the exam on your organization's own student website in a new browser tab and copies that address to your clipboard, ready to paste into a notice or a message group. If your organization has neither a custom domain nor a site address configured, you will see Unable to generate test link instead.
- Export as JSON: downloads a file holding the exam's settings, its questions and its question sets. This is one half of the copy-an-exam trick described below.
- Update: opens the Update Exam form (see the next section).
- Delete: permanently removes the exam. Read the warning box carefully first.
Update Exam covers the settings, not the questions:
- Exam Name, Exam Slug and Exam Order: the title, the web address name, and where the exam sits in a list.
- Combined Merit Key (optional): the key that groups several exams into one combined merit list.
- Exam Type: switch between Live Exam, Practice Exam and Offline Exam.
- Mark Attendance From Results: turns exam results into attendance records.
- Total Marks, Time / Question (sec), Deduction / Wrong and Mark / MCQ Question: the scoring and timing rules. Leaving Mark / MCQ Question blank splits the MCQ marks evenly; after changing it, use Recalculate Scores on the Results tab so existing results catch up.
- Has Written / CQ Section and Has Short Question (SQ) Section: switch these on to allocate Written / CQ Marks and Short Question (SQ) Marks separately.
- Start Date & Time and End Date & Time: the exam window (hidden for offline exams).
- Education Level and Assign to Batches: where the exam is filed, and which batches can reach it. Leave batches empty for organization-wide access.
Click Update Exam to save.
Delete asks Are you absolutely sure? and spells out what goes with the exam: all student results and submitted answers, all active and completed exam sessions, all question sets and answer keys, and OMR processing batch links. Attached PDF instructions are only unlinked, not deleted, and question banks and student accounts are never touched. The confirm button is Delete Exam & All Related Data.
7. Creating and Importing Exams from the Library
Two buttons sit above the table on the right.
Create Exam opens Create New Exam, the same full form used elsewhere: Basic Information (name, combined merit key, exam type, attendance), Scoring & Timing, the Exam Window, Education Level, Preparation PDFs, Additional Subjects & Chapters, Course Assignment and Assign to Batches. A Templates button in the corner of the dialog lets you Save current as template and later Apply those settings to a new exam, so you do not retype the same marks and timings every week. Click Create Exam at the bottom to save. The full field-by-field walkthrough lives in the Exam System section.
Import Exams opens Import Exams from JSON, which rebuilds exams from a file exported out of Course37. As the dialog explains, questions and question sets are recreated in this organization and the education hierarchy is matched by name.
- Choose a tab — Upload file to pick an exported file, Paste JSON to paste the text, or AI Prompt to copy a ready-made prompt you can hand to an AI tool and paste the answer back into Paste JSON.
- Check the preview line, which tells you how many exams and how many questions were found.
- Set the Import Options: Create missing education levels, subjects, chapters and topics, Import question sets and answer keys, and Import question translations.
- Click Import Exam (or Import N Exams) and read the summary, which counts how many exams were imported, how many failed, and how many questions were created.
As the dialog warns, imported exams are always created as brand new copies — nothing existing is overwritten — and question media, student results and course or batch links are not carried over.
8. Reusing One Exam Across Several Courses
There are two genuinely different ways to reuse an exam, and it matters which one you pick.
Share the same exam with another course. Tick the exam, click Copy on the bulk toolbar, and the Copy to another Course dialog opens. Pick a Target Course and a Target Module (with an optional Filter by Tag to shorten the course list), then click Copy 1 Item. For exams this attaches the very same exam to the second course's module — it is one exam living in two places, so edits, questions and student results stay pooled together.
Make a separate duplicate. Use Export as JSON on the exam, then Import Exams and upload that file. This produces an independent exam with its own copy of the questions, which you can then rename, re-time and attach wherever you like without touching the original. Remember that results and course links do not come along.
9. Attaching an Exam to a Course Module
An exam only becomes visible to students through a course module, so an exam showing a dash in the Course column still needs to be attached.
- While creating it: in the Create New Exam form, open the Course Assignment (Optional) section, optionally narrow the list with Filter by Tag, choose Select Course, then tick modules under Assign to Modules. Select all QUIZ modules ticks every quiz-type module at once, and Clear unticks them.
- After creating it: tick the exam in the list and use Copy to attach it to a module without disturbing where it already sits.
- To relocate it: tick the exam and use Move. The Move to another Module dialog lists every module in your organization as Course — Module; pick a Target Module and click Move 1 Item.
Take care with Move when an exam is attached to several courses: it detaches the exam from the first course shown in the Course column and attaches it to the module you picked. Copy is the safer choice when you only mean to add a new home.
10. Bulk Actions
Tick the checkbox on any row, or the checkbox in the table header to tick every exam on the current page. A grey strip then appears above the table showing N selected, followed by the actions:
- Export JSON: downloads all the selected exams as one file, ready to feed straight back into Import Exams.
- Merit List: opens the Merit List Exporter, where the Customize tab controls themes and branding, the Exams tab lets you tick which exams the list covers, Refresh rebuilds the live preview, and Export PDF prints it through your browser's print dialog.
- Combined Merit: opens the Combined Merit List dialog to give the selected exams a shared Combined Merit Key (e.g., test-1, midterm-2025, final-exam), which is what groups them into one merged ranking. Save Combined Key applies it; Clear removes the key from all of them. This action needs at least two exams selected — with fewer, the button is greyed out and hovering it explains Select at least 2 exams.
- Move: moves the selected exams to another module, as described above.
- Copy: attaches the selected exams to another course's module.
- Set Hierarchy: opens Bulk Update Educational Hierarchy to stamp the same Level, Group, Subject, Chapter and Topic onto every selected exam. It overwrites whatever those exams had before.
- Delete: permanently deletes the selected exams along with all of their student results. Note the difference from the All Items tab, where deleting an exam only removes it from its module — on this tab the exam itself is destroyed.
- Clear on the right of the strip drops the selection.
Your selection survives paging, so you can tick a few exams on page one, move to page two and tick more before acting on them together. Changing a filter or the search text clears the selection on purpose, so you never delete exams you can no longer see.