
Edit Exam on an exam's page opens Update Exam — Edit exam details and batch assignments. It holds every setting the create form has, plus a few that only make sense once the exam exists.
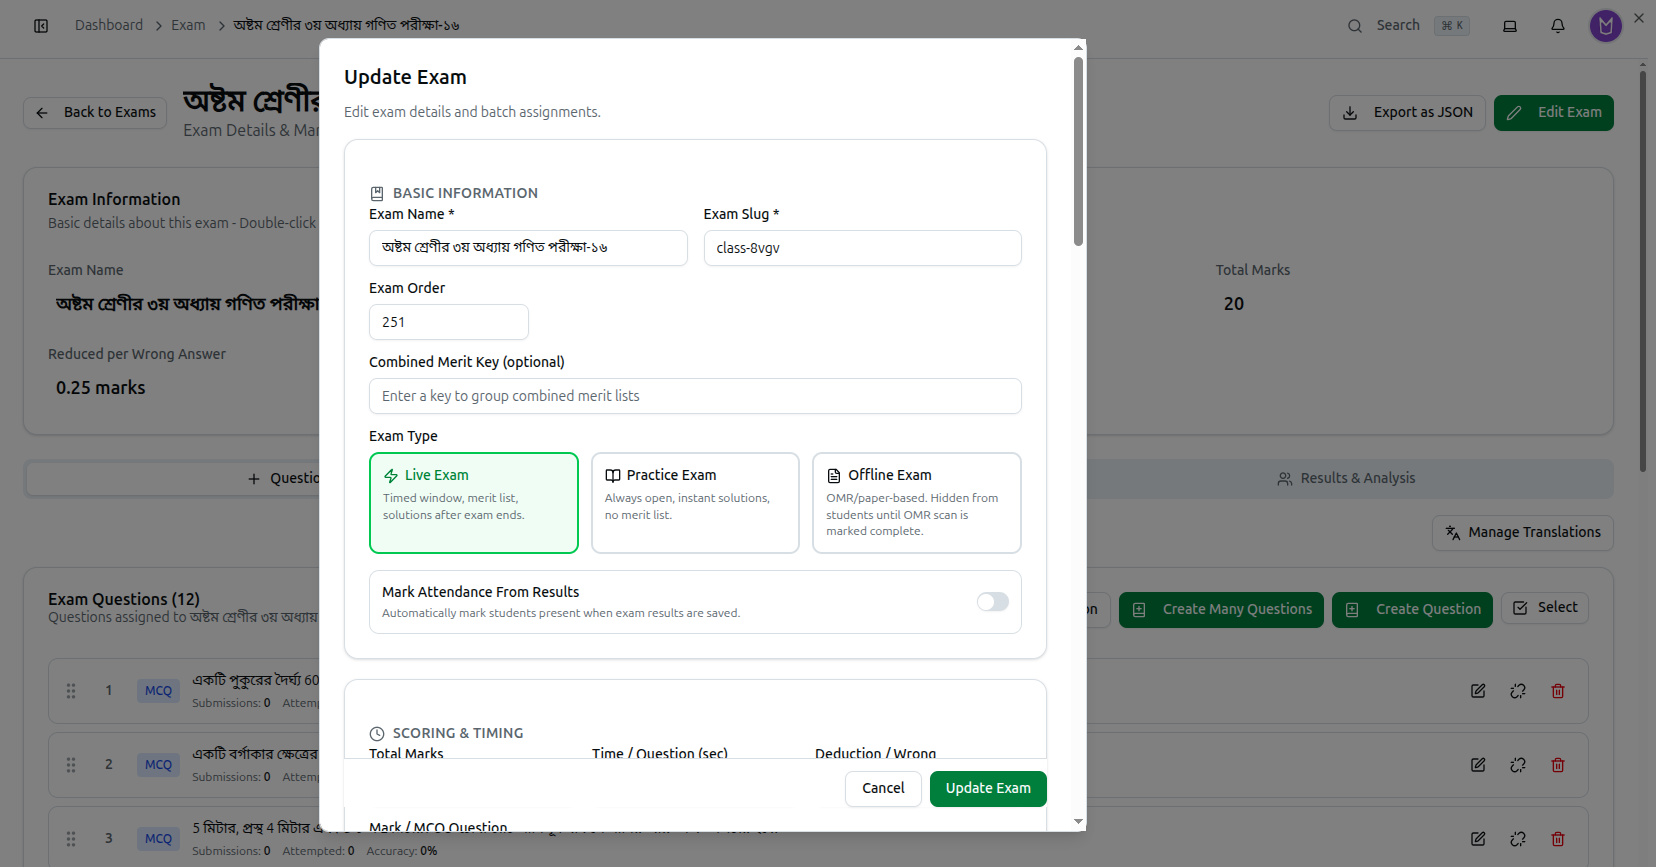
For quick single changes you do not need this form at all — double-click any field in the Exam Information panel behind it.
Basic Information
| Field | What it does |
|---|---|
| Exam Name (required) | What students see |
| Exam Slug (required) | The web-address name. Editable here, read-only on the page behind |
| Exam Order | Position when exams are listed together |
| Combined Merit Key (optional) | Give several exams the same key to publish one merit list across all of them |
Exam Type
The same three choices as when creating, and you can switch between them afterwards:
- Live Exam — Timed window, merit list, solutions after exam ends.
- Practice Exam — Always open, instant solutions, no merit list.
- Offline Exam — OMR/paper-based. Hidden from students until OMR scan is marked complete.
Changing the type changes the exam's behaviour immediately. Switching a live exam to Practice removes its merit list and starts showing answers straight away. Switching to Offline hides it from students until the OMR scan is marked complete. Neither is wrong, but neither is quiet.
Mark Attendance From Results — Automatically mark students present when exam results are saved. Handy for offline exams where sitting the paper is the attendance record.
Answer Format
A second choice, next to Exam Type: Typed / MCQ (the default — students answer in the browser) or Written upload (students write on paper and upload photos or a PDF; you mark it by hand or with AI assistance). Picking Written upload locks Exam Type to Live Exam and requires a Total duration, among other changes.
Full guide: How to Create and Grade Written-Upload Exams
Scoring & Timing
- Total Marks — what the exam is out of.
- Time / Question (sec) — seconds per question; total duration is this × question count.
- Deduction / Wrong — a flat mark removed per wrong answer.
- Mark / MCQ Question — marks per correct MCQ. Leave blank to split the MCQ marks evenly across questions.
- Written / CQ Marks and Short Question (SQ) Marks — the marks carried by written and short-answer sections, for papers that mix MCQ with hand-marked questions.
Changing the marking after students have sat the exam does not fix existing results. The form says so directly: after changing marks per MCQ, use Recalculate Scores on the Results & Analysis tab to update results already recorded. Change the numbers without that step and old and new results are scored differently.
Duration & Proctoring
- Total duration (min) — overrides the time-per-question timer with a single fixed length for the whole exam. Required for a written-upload exam; optional for a standard one.
- Require camera (snapshot proctoring) — students must allow their camera to start; the system captures periodic snapshots, not continuous video.
- Max tab switches — reaching this count auto-submits the exam. Counted server-side.
Written-upload exams add two more fields here — a Question Paper upload and an upload grace period — covered in full in How to Create and Grade Written-Upload Exams.
Assign to Batches
Assign to Batches limits the exam to particular intakes. Assign it to the morning batch and only those students see it.
Leave it unassigned and it applies course-wide. This is the setting to use when two batches sit different papers, or when one batch retakes an exam.
Which Editor to Use
| To change | Use |
|---|---|
| One value — name, marks, a date | Double-click the field in Exam Information |
| Exam type, batches, slug, written/SQ marks | Edit Exam → this dialog |
| Whether students can see an offline exam | The OMR Scan Completed toggle on the exam page |
Troubleshooting
| What you see | What it means |
|---|---|
| Results look inconsistent after changing marks | Run Recalculate Scores on the Results & Analysis tab |
| The merit list disappeared | The exam was switched to Practice, which never ranks students |
| Students lost access after an edit | It was switched to Offline, which hides it until the OMR scan is complete |
| Only some students can see the exam | It is assigned to specific batches under Assign to Batches |
| The slug will not change on the exam page | Slug is read-only there — edit it in this dialog |
| Total duration changed by itself | Duration is per-question × question count, so adding questions lengthens the exam |
Related: Manage & Create Exams · Managing Exams, Questions and Results · Course Batches