
Clicking any exam opens its own page — headed Exam Details & Management — where you set it up, attach questions, build sets and review results.
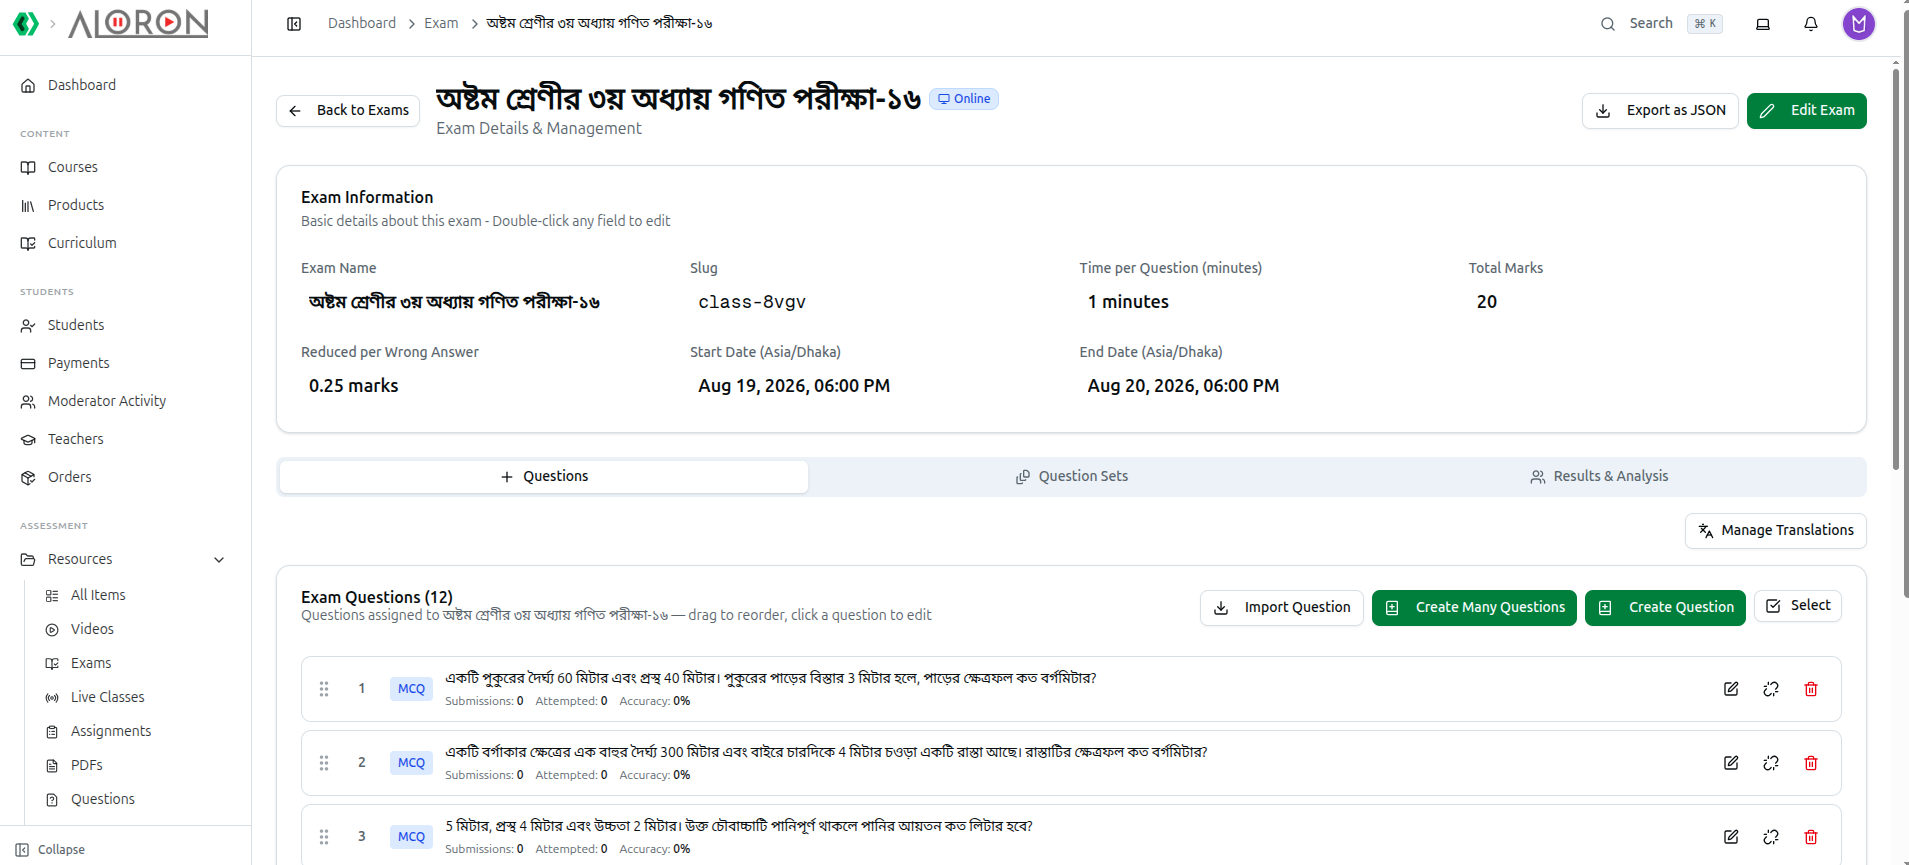
1. The Header
Back to Exams returns to the library.
Beside the exam name sits a badge telling you how it is taken:
- Online (blue) — sat in the browser.
- Offline · OMR (orange) — sat on paper and scanned.
- Practice — added alongside either when it is a practice exam.
Export as JSON downloads the exam — including its question sets and answer keys — in the exact format Import Exams reads back. Edit Exam opens the full settings form.
2. Exam Information — Edit In Place
The panel says Basic details about this exam — Double-click any field to edit. That is the fastest way to change one value without opening the whole form.
| Field | Notes |
|---|---|
| Exam Name | Double-click to rename |
| Slug | Read-only — the web-address name |
| Time per Question (minutes) | Shown as 1 minutes. Total duration is this × question count |
| Total Marks | What the exam is out of |
| Reduced per Wrong Answer | Negative marking, shown as 0.25 marks |
| Start Date / End Date | Labelled with your organization's timezone, such as (Asia/Dhaka) |
Each save confirms with Exam updated successfully. Empty dates read Not set.
The date labels name your timezone for a reason. Times are stored universally and displayed in the timezone set under Organization → Settings. If exam windows open at the wrong hour, that setting is what to check — not the exam.
3. The OMR Scan Toggle — Offline Exams Only
Offline exams show an extra orange panel: OMR Scan Completed.
- Off — Enable after scanning all OMR answer sheets. Students will be able to see this exam once enabled.
- On — Students can now see this exam and their results.
This is the switch that publishes an offline exam. Until you turn it on, students cannot see the exam or their marks — deliberately, so nobody sees a half-scanned result. If teachers report that students are asking where their results are, this toggle is almost always the answer.
The panel does not appear on online exams.
4. The Three Tabs
Questions · Question Sets · Results & Analysis
Each tab keeps its own web address, so you can link straight to one.
5. The Questions Tab
Headed Exam Questions (12) — Questions assigned to [exam name] — drag to reorder, click a question to edit.
Four buttons sit above the list:
- Import Question — bring questions in from a file.
- Create Many Questions — add several at once.
- Create Question — add one.
- Select — switch on checkboxes for bulk work.
Each row shows a drag handle, its number, a type badge such as MCQ, the question text, and three live figures:
Submissions · Attempted · Accuracy
Accuracy is your question-quality report. A question every student gets right is not testing anything; one where accuracy is near zero is usually badly worded rather than hard. Sort your attention by that column after the first sitting.
Drag to reorder sets the sequence students see, and clicking a question opens it for editing.
Manage Translations opens a dialog — Manage translations for questions in this exam without leaving the Questions tab — for running the same exam in more than one language.
6. Question Sets and Results
Question Sets builds shuffled variants of the same exam, so students sitting side by side get different papers, along with the answer key for each.
Results & Analysis holds every student's performance, and is where OMR scans and CSV result files are imported.
Full guides: Question Sets & Answer Keys · OMR Processing & CSV Upload · Printable Question Papers
Troubleshooting
| What you see | What it means |
|---|---|
| Students cannot see an offline exam or its results | OMR Scan Completed is still off |
| No OMR panel on the exam | It is an online exam — the toggle only exists for offline ones |
| Exam opens at the wrong hour | Check the timezone under Organization → Settings, named in the date labels here |
| Double-clicking a field does nothing | Slug is the one read-only field. Use Edit Exam to change other settings |
| A question shows 0% accuracy | Either nobody has attempted it, or the question needs rewriting |
| Question order differs from your paper | Drag rows into order on the Questions tab |
Related: Manage & Create Exams · Question Bank · Exam Settings