Course37 Logo
Payments & Students

How to Manage Payments, Analytics, and Profit Sharing in Course37

A comprehensive, step-by-step guide on managing payment transactions, tracking dues, analyzing revenue trends, and configuring teacher profit shares on the Course37 platform.


Managing the Payments Dashboard

The Payments module in Course37 allows you to monitor all financial transactions, track pending installments, analyze revenue trends, and distribute earnings to instructors. Navigate to this section via the left sidebar: Dashboard > Payments.

The module is divided into four main tabs:

  1. Payments
  2. Due Payments
  3. Analytics
  4. Profit Share

1. Payments Tab: Viewing and Filtering Transactions

This default view allows you to manage and analyze your general payment transactions.

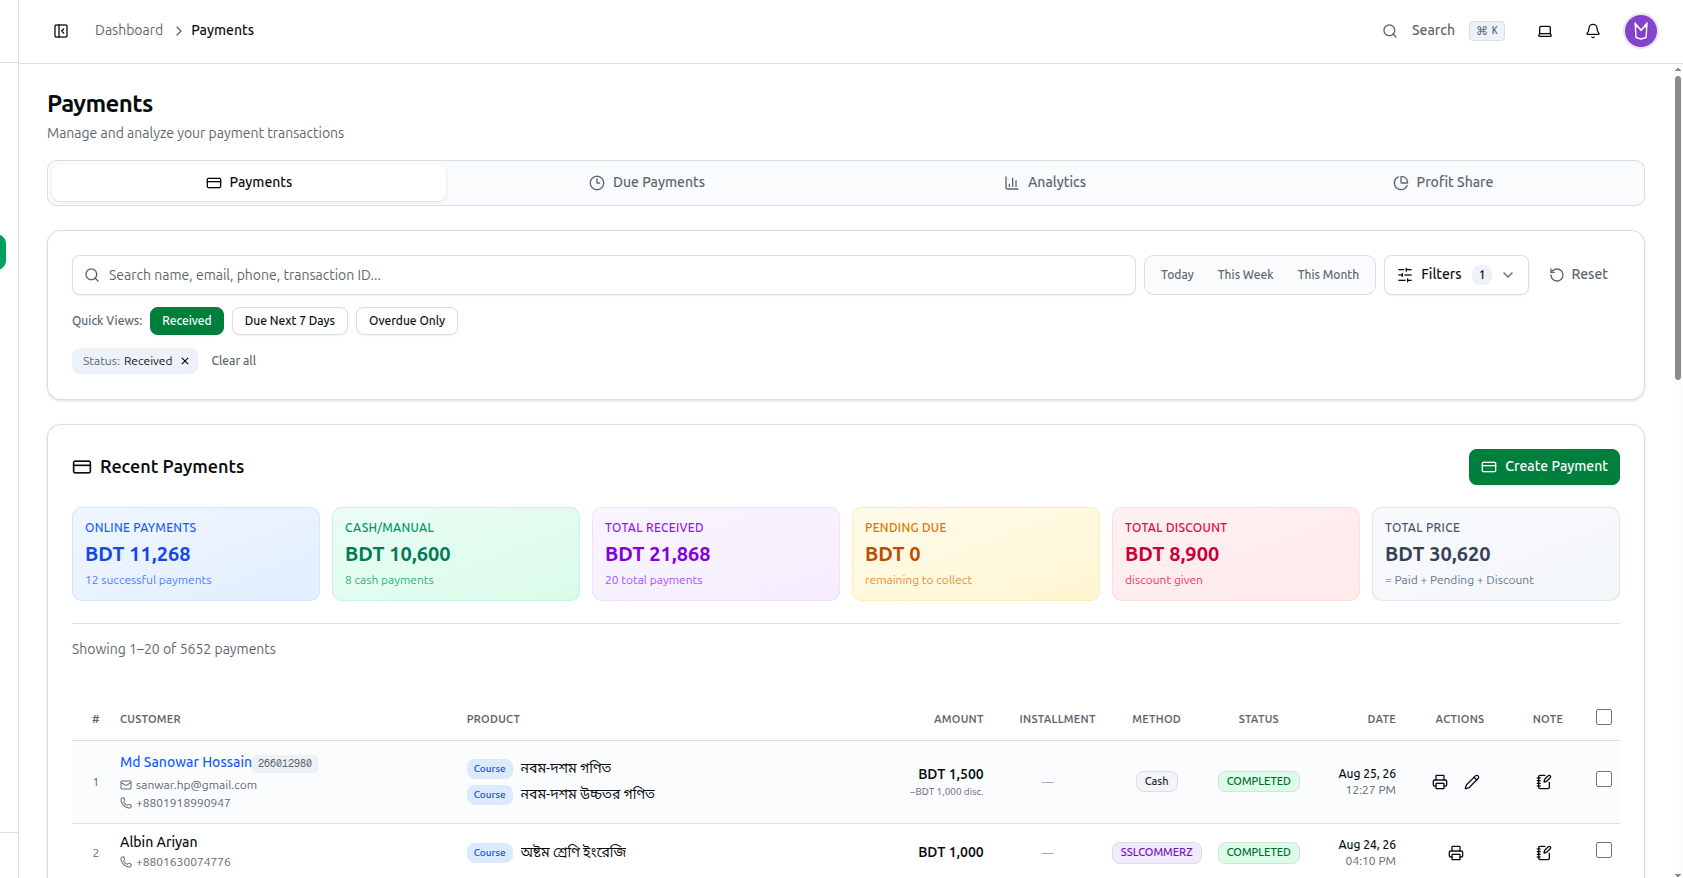
Quick Views & Summary Metrics: At the top of the page, you can use Quick Views to instantly filter by: Received, Due Next 7 Days, or Overdue Only. Below the filters, the system provides six summary cards based on the current view:

  • Online Payments: Total monetary value and count of successful online payments.
  • Cash/Manual: Total monetary value and count of cash payments.
  • Total Received: The combined sum of Online and Cash payments.
  • Pending Due: The remaining amount left to collect.
  • Total Discount: Total discount given across filtered payments.
  • Total Price: The gross expected amount (= Paid + Pending + Discount).

Advanced Filtering: Click the Filters button next to the search bar to open a comprehensive filtering menu. You can narrow down transactions using the following exact parameters:

  • Course Tags: Dropdown to select specific tags.
  • Course: Dropdown to filter by specific courses.
  • Status: Dropdown for payment status (e.g., Received (Completed + Pending)).
  • Payment Method: Filter by gateway or method.
  • Gateway Provider: Filter by specific providers (e.g., bKash, SSLCommerz).
  • Credential Source: Filter by credential origin.
  • Platform Settlement: Filter by settlement status.
  • Type: Filter by transaction type.
  • Follow-up: Filter by follow-up statuses.
  • Education Level: Filter by student education tier.
  • Institution: Search bar to filter by a student's institution.
  • Processed By: Filter by the staff member who processed the payment.
  • Payment Date Range: Select a specific Start date and End date.
  • Installment Due Date: Select a timeframe From and Until.
  • Last Calling Date: Select a timeframe From and Until.

Recent Payments Table: Below the summary cards is the data table showing individual transactions. The columns include: S No., Customer (Name, Email, Phone), Product, Amount, Installment (e.g., 2/2 paid), Method (e.g., bKash, Cash), Status (e.g., COMPLETED), Date, and Action. Under the Action column, you can Print the receipt, Edit the payment, or access a dropdown menu for more options.


2. Due Payments Tab: Tracking Installments

Navigate to the Due Payments tab to specifically view installment dues filtered for pending or overdue items.

  • Functionality: By default, this view applies a Quick View filter for "Due Next 7 Days", displaying upcoming expected payments.
  • Layout: The layout is identical to the main Payments tab, including the summary cards and data table, but restricts the data solely to pending/overdue records based on the active date range.

3. Analytics Tab: Revenue Trends & Breakdowns

The Analytics tab provides a high-level overview of your platform's financial performance over specific periods.

Date & Product Filtering:

  • Quick Date Filters: Today, Yesterday, This Week, This Month, Last 7 Days, Last 30 Days, Last Month, and Clear all.
  • Custom Date Range: A calendar picker to set custom start and end dates.
  • Product Type Dropdown: Filter analytics by Books & Courses (Default), Courses only, or Books only.
  • Further dropdowns allow you to isolate data for specific Courses or Books.

Analytics Summary Cards:

  • Total Revenue: The total income generated in the selected period.
  • Cash Collection: Total collected via manual/cash methods.
  • Online Collection: Total collected via digital gateways.
  • Total Payments: The count of individual payment transactions (showing completed vs. pending breakdown).

Data Visualizations & Tables:

  • Revenue Trends Chart: A graph displaying daily cash vs. online collections. It features toggles to view by Method or Course, and an Export CSV button.
  • Category Analysis Table: Compares payments before vs. during the selected date range. Columns include: Name, Type, Prev. Students, Prev. Revenue, New Students, New Revenue, Total Students, and Total Revenue.
  • Course-wise Breakdown Table: Details revenue per specific course with identical comparison columns to the Category Analysis. Includes a toggle to Show free courses and a column for Enrollment Details.

Exporting Revenue Trends CSV: Clicking the Export CSV button on the Revenue Trends chart opens a modal:

  1. Purpose: Exports daily payment method trends with an extra clearing_period_sum column grouped by weekly clearing periods.
  2. Clearing day: A dropdown to select the start of your clearing week (e.g., Monday).
  3. Click Download CSV to generate the file.

4. Profit Share Tab: Distributing Revenue to Teachers

The Profit Share tab is designed to calculate and distribute revenue among teachers based on predefined percentages.

Profit Share Sub-tabs: Inside this section, there are four sub-navigation links: Dashboard, Configure Shares, Expenses, and Withdrawals.

Step 1: Viewing the Profit Share Dashboard

  • Summary Cards: Displays Total Income, Total Expenses, Distributable (Net amount available to share), and Total Withdrawn.
  • Teacher Balances: A list of configured teachers and their current balances. You can click the link icon to Copy shareable link (a toast notification "Link copied to clipboard" will appear).
  • Empty State: If no shares are set up, the dashboard will display: "No profit share data. Configure teacher shares for courses to see balance calculations" alongside a Configure Shares button.

Step 2: Configuring Teacher Shares To allocate percentages, navigate to the Configure Shares sub-tab.

  1. You will see a list of courses (e.g., "Chemistry Cycle 3 upo"). If unconfigured, it will show "0% allocated".
  2. Click the + Add button next to a course, or the main + Add Share button at the top right.

Step 3: Adding a Teacher Share (Modal) Clicking add triggers the "Add Teacher Share" modal. Follow these steps:

  1. Course: Select the desired course from the dropdown menu.
  2. Teacher: Select the specific teacher from the dropdown menu.
  3. Share Percentage: Enter the percentage of revenue this teacher should receive (e.g., 60 %).
  4. Click Save Share to apply the configuration. The system will now automatically calculate this teacher's balance from future sales of the selected course.
#payments #transactions #due payments #installments #analytics #revenue #profit share #teachers #dashboard