
1. Payments Tab: Viewing and Filtering Transactions
This is the default view when you open Payments — it and Due Payments are the same page, just filtered differently (see Due Payments Tab for that difference).
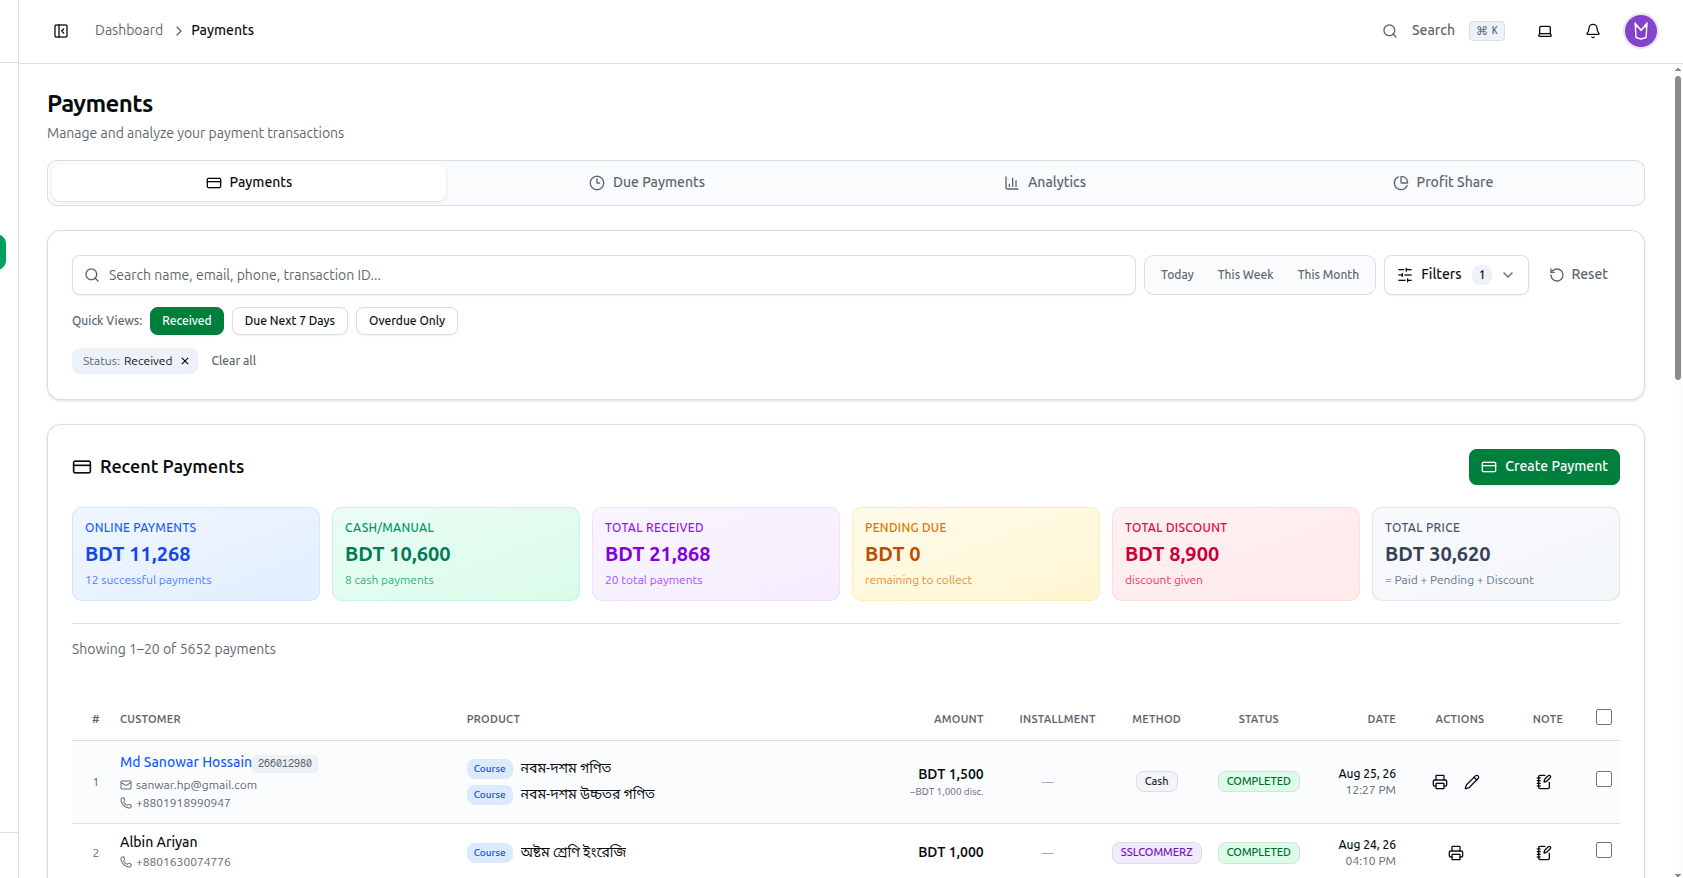
Quick Views filter the list instantly: Received, Due Next 7 Days, or Overdue Only.
Six summary cards reflect whatever Quick View and filters are active:
- Online Payments — total value and count of successful online payments.
- Cash/Manual — total value and count of cash payments.
- Total Received — Online + Cash combined.
- Pending Due — the amount still to collect.
- Total Discount — total discount given across the filtered payments.
- Total Price — the gross expected amount. Its caption normally reads "= Paid + Pending + Discount", but switches to "{total} × course price" whenever a single course is selected in Filters.
2. Advanced Filtering
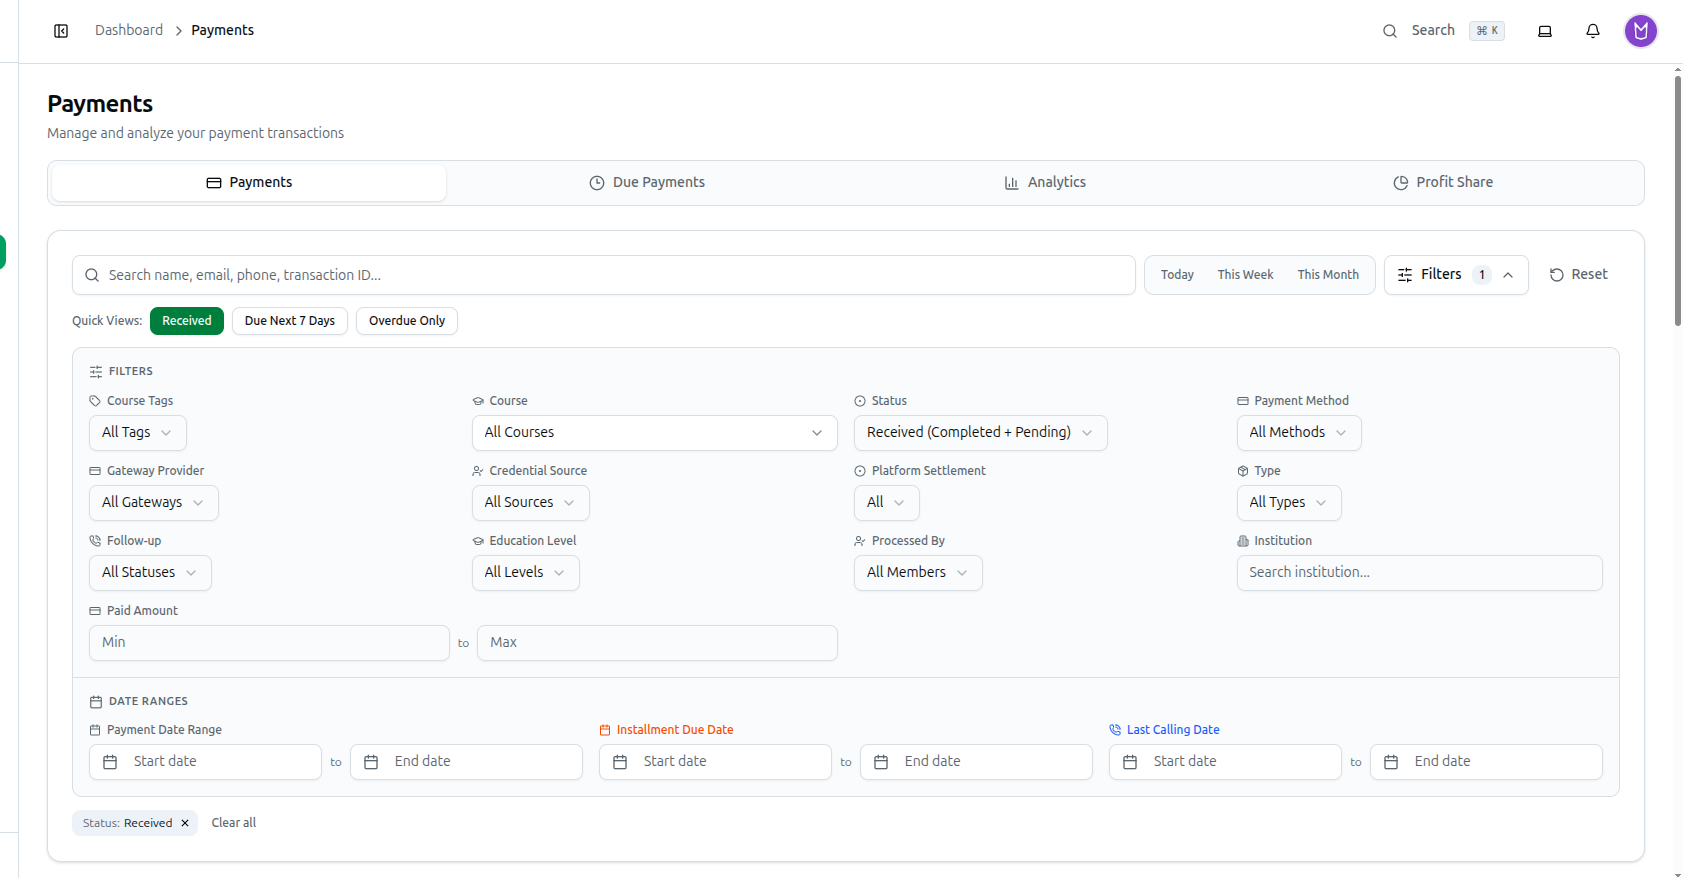
Click Filters next to the search bar. The panel has 15 fields across two groups:
Filters: Course Tags, Course, Status, Payment Method, Gateway Provider, Credential Source, Platform Settlement, Type, Follow-up, Education Level, Processed By, Institution, and Paid Amount (a Min/Max range — easy to miss since it sits at the bottom of this group, but it's there).
Date Ranges: Payment Date Range, Installment Due Date, Last Calling Date.
Credential Source and Platform Settlement are simple two-value switches, not open lists. Credential Source is either Platform or Organization (whose gateway credentials processed the payment). Platform Settlement is either Eligible or Not Eligible for platform-side settlement. Status itself is also a short fixed list: Received (Completed + Pending), Completed, Pending, Failed, Overdue.
3. The Recent Payments Table
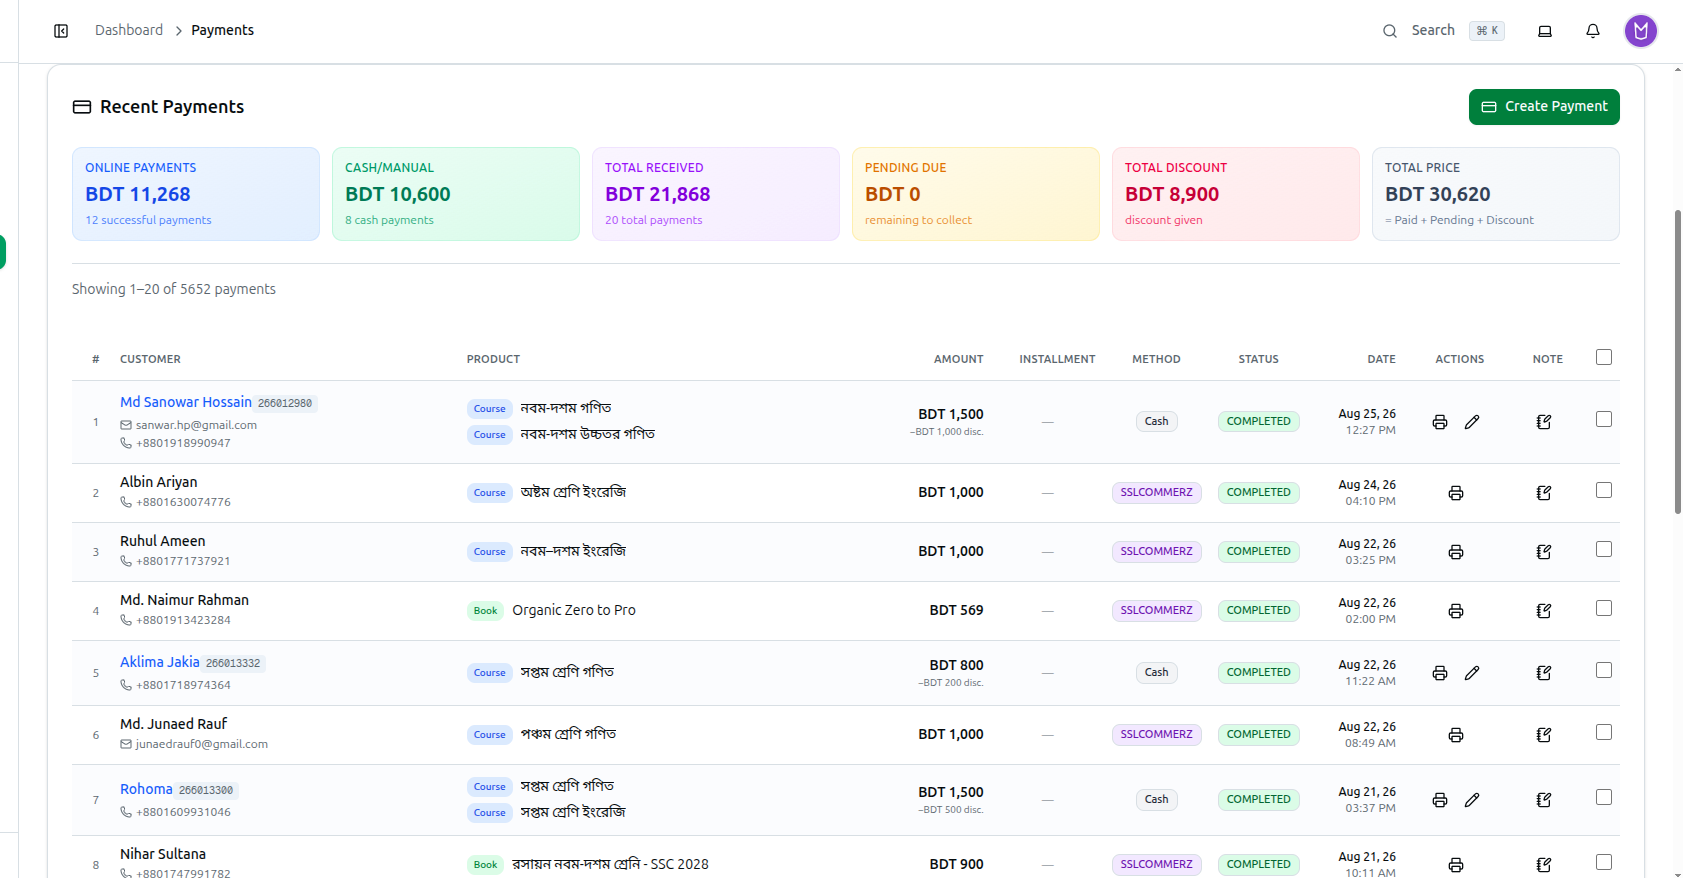
Columns: #, Customer (name, email, phone), Product, Amount, Installment, Method, Status, Date, Actions, Note, plus a selection checkbox.
- Actions holds two icons for most people — this is not a dropdown menu. Print Receipt is always available; the pencil (Edit Payment) only appears on Cash payments, since gateway-processed payments can't be edited directly. Organization owners (and Super Admins) see a third icon — a red Refund Payment icon — on any payment that's eligible for a refund; see Refunding a Payment below.
- Note opens an internal notes dialog for admins. Its tooltip currently reads "Print Receipt" — that's a labeling mistake in the interface, not a second print button; clicking it opens the notes editor.
- Status can sometimes be changed inline, right in the table — this only appears once every installment on that row is already paid but the row hasn't flipped to Completed yet.
- Clicking anywhere else on a row (not the checkbox, Actions, or Note cells) opens a full-screen Payment Details dialog with its own Quick Actions: Add Installment (only offered if the payment has no installments yet), Money Receipt (an admin-facing print), Edit Payment (Cash only, same restriction as the Actions icon), Refund (owners/Super Admins only, on eligible payments — see below), and Track Shipment. Inside the same dialog you'll also find the Follow-up Status selector and the ability to edit or delete individual installments.
4. Refunding a Payment
Refunding is owner-only — the same permission gate as deleting a payment. Moderators and staff with payment access cannot see the Refund icon or button, even if they can otherwise view and manage payments.
A payment can be refunded once it's Completed, or, for an installment plan, once at least one installment has been Paid — a plan with no paid installments yet isn't refundable.
Click the red Refund Payment icon in the Actions column, or the Refund button in a payment's Quick Actions, to open the refund dialog:
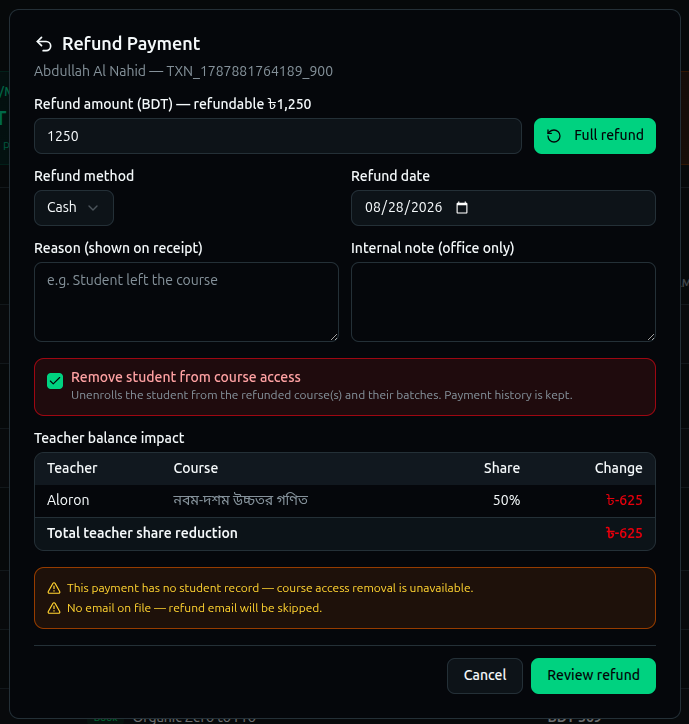
Step 1 — enter the refund
- Refund amount — defaults to the full refundable balance; click Full refund to reset it there. You can't refund more than what's actually still refundable (already-refunded amounts are shown and excluded automatically).
- If the payment covers more than one course, an allocation table lets you split the refund across them individually instead of the default proportional split.
- Refund method — Cash, Bkash, Nagad, Rocket, Bank Transfer, or Other. It doesn't have to match the original payment method.
- Refund date — defaults to today; can't be set in the future.
- Reason — shown on the refund receipt the student sees.
- Internal note — office-only, never printed on any receipt.
- Remove student from course access — checked by default. Unenrolls the student from the refunded course(s) and their batches; their payment history is kept either way. For a multi-course refund, you choose exactly which courses to remove access from.
- Teacher balance impact — shows every teacher whose profit-share balance will shrink because of this refund, by course and percentage, with a running total. If no teacher shares are affected, it says so plainly instead of showing an empty table.
- Any warnings from the server — such as a payment with no linked student record (course access removal unavailable) or no email on file (the refund email will be skipped) — show in an amber banner before you continue.
Step 2 — confirm
Click Review refund to see a plain-language summary: the amount, method and date; how many teacher balances are affected and by how much; whether course access is being removed or kept, and for which courses; and a note that the student will be notified by SMS (and email, if one is on file). Moderator cash-collection balances are never affected by a refund.
A refund is a permanent financial record — there's no separate undo. Check the summary carefully before clicking Confirm refund.
Once confirmed, the payment's detail view gets a red Refunds panel listing every refund made against it — amount, method, date, reason, and whether course access was removed — each with its own Receipt button.
Troubleshooting
| What you see | What it means |
|---|---|
| No pencil/Edit icon on a payment | Only Cash payments can be edited directly from this table; gateway payments (SSLCommerz, bKash, Stripe, etc.) can't |
| No Refund icon or button on a payment | Either you're not the organization owner (or Super Admin) — refunds are owner-only — or the payment isn't refundable yet (it must be Completed, or an installment plan with at least one Paid installment) |
| The Note icon's tooltip says "Print Receipt" | A known labeling bug — it still opens the payment notes dialog, not a second print action |
| Clicking a row does nothing obvious | It actually opened the full-screen Payment Details dialog — check that a modal appeared rather than looking for a per-row dropdown, which doesn't exist here |
| Can't find a Paid Amount filter | It's the last field inside the Filters group, below Institution — not in Date Ranges |
| Total Price caption looks different from what you expected | It switches to "{total} × course price" automatically whenever exactly one course is selected in Filters |
Related: Payments Module Overview · Due Payments Tab · Manage a Student Profile