
The Resources Library
Every video, PDF, exam, assignment and live class your organization owns lives in one shared pool called Resources. Think of it as your whole teaching library on a single screen, rather than a pile of separate uploads buried inside individual courses.
This exists because the same material is rarely used only once. A chapter video recorded for one batch is usually the same video the next batch needs, and last year's exam is worth reusing this year. From Resources you can find any item across every course, see which course and module it currently sits in, and move, copy, re-file or attach it elsewhere — without hunting through courses one at a time or uploading the same file twice.
To open it: in the left sidebar under Assessment, click Resources. You land on All Items, under the heading Resources with the note Manage all your organization's content in one place. The same eight tabs appear both under Resources in the left sidebar and as a row of tabs across the top of the page, so you can switch either way. A ninth sidebar item sits here too — Community — but it isn't a tenth content tab: it opens a separate space for student discussion and moderation. See How to Set Up and Moderate Your Community.
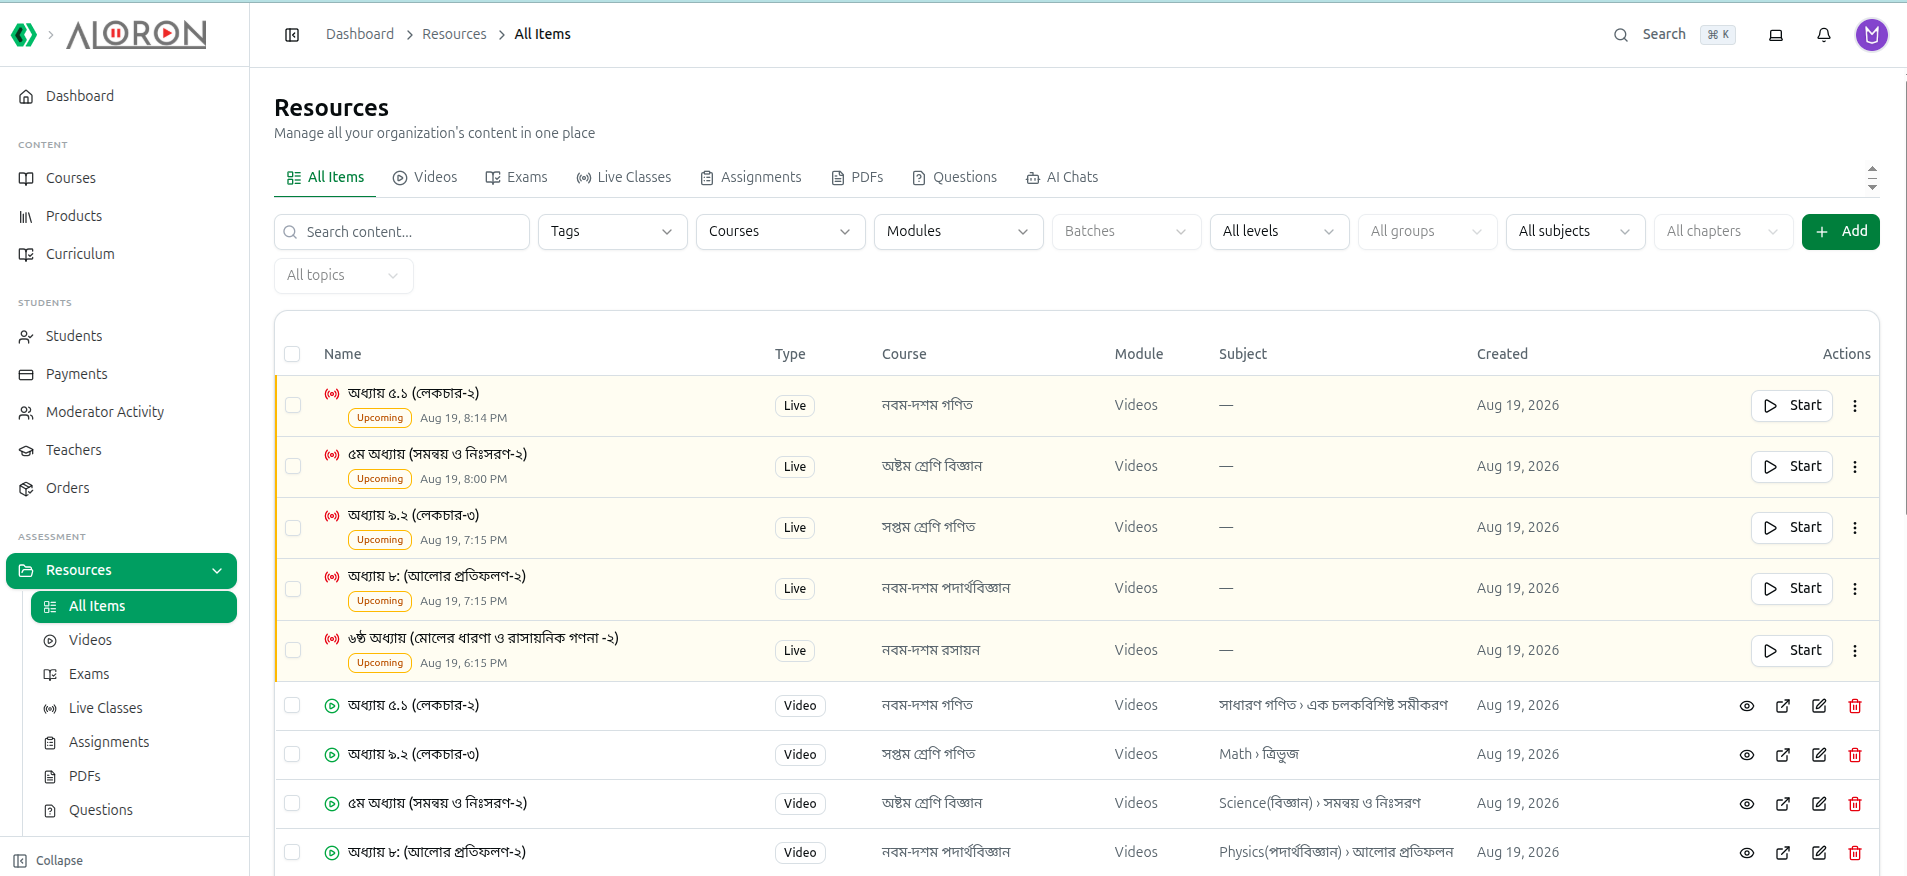
The greyed-out filters are not broken. Batches, All groups and All chapters stay disabled until you choose the parent they depend on — a course, a level and a subject respectively. Pick the parent and they become selectable.
1. The Eight Tabs
- All Items: Everything at once — videos, PDFs, exams, assignments, live classes and embeds — with a Type badge on every row.
- Videos: Only the video lessons in your organization.
- Exams: Every exam in your organization, listed with its Course, Chapter, Slug, Combined Key, Time Per Question, Start Date and End Date.
- Live Classes: Scheduled, running and finished live sessions, ordered so anything LIVE, Starting soon or Upcoming floats to the top of the current page.
- Assignments: Assignments with their Due Date, Marks and Submissions count.
- PDFs: The PDF library, which has its own PDFs and Categories sub-tabs.
- Questions: The question bank — the individual MCQ - Multiple Choice, Short Question and Comprehensive Question items you build exams from.
- AI Chats: Conversations your students have had with the AI tutor, so you can read or delete them.
2. Search and the Curriculum Filter
Every tab except AI Chats shares the same filter row along the top of the page. AI Chats has only its own search box (Search by title, student name, or email).
Start by typing in the Search content... box, then narrow further with the dropdowns. Which dropdowns you see depends on the tab you are on:
- Tags: Limits the list to courses carrying that tag. Picking tags also shortens the Courses and Modules dropdowns to match. Not offered on PDFs or Questions.
- Courses: One or more courses. Changing this resets your module and batch picks. Not offered on Questions.
- Modules: The modules inside the courses you picked. Not offered on Exams or Questions.
- Batches: Greyed out until you pick at least one course, because the batch list is built from the courses you chose. Not offered on Exams or Questions.
- Level, Group, Subject, Chapter and Topic: The curriculum cascade, offered in full on All Items, Videos, Exams and Questions. Each level feeds the next, so Group stays locked until you pick a Level, Chapter stays locked until you pick a Subject, and Topic stays locked until you pick a Chapter; choosing a new Subject clears the Chapter and Topic below it. Every dropdown has an All levels / All groups / All subjects style option to reset just that step, and Subject also offers Unassigned for material that was never filed against a subject. PDFs carries a shortened version — just Subject, Chapter and Topic — and Live Classes and Assignments carry none of it, because those items have no subject, chapter or topic.
Some tabs add their own extra filters:
- Assignments adds a sort dropdown: Last added (newest), Last added (oldest), Due date (soonest), Due date (latest), Name (A-Z), Name (Z-A), Total marks (high to low) and Total marks (low to high).
- Exams adds a different sort dropdown: Last added (newest), Last added (oldest), Last updated (newest), Last updated (oldest), Time per question (high to low) and Time per question (low to high).
- PDFs adds Category and a Type filter with the values Book, Course module, Exam prep and Standalone.
- Questions adds a Type filter (MCQ - Multiple Choice, Short Question, Comprehensive Question) and an Exam filter.
A Clear button appears as soon as any filter is set, and wipes them all. On a phone or narrow screen the dropdowns collapse behind a Filters button that shows a small count of how many are active. Your filters are stored in the page address, so a filtered view can be bookmarked or shared with a colleague.
At the bottom of every list except AI Chats you get the range you are viewing (1-20 of 137), a page-size dropdown offering 10 / page, 20 / page, 50 / page and 100 / page, and arrows to step through pages. AI Chats instead shows which page you are on with Prev and Next buttons.
3. Selecting Rows and Bulk Actions
Tick the checkbox at the left of any row, or the checkbox in the table header to take every row on the current page. A grey strip then appears above the table showing N selected along with the actions you can run:
- Move: Opens Move to another Module. Choose a Target Module from any course in your organization and confirm with Move N Items. The items keep their content but change where they hang.
- Copy: Opens Copy to another Course. Pick a Target Course and Target Module (with an optional Filter by Tag to shorten the course list), then confirm with Copy N Items. Videos and assignments are duplicated; PDFs and exams are shared, meaning the one item is attached to both modules. The button is disabled if your selection contains live sessions or embeds, and the tooltip tells you why.
- Set Hierarchy: Opens Bulk Update Educational Hierarchy, where you set Level, Group, Subject, Chapter and Topic once for everything you selected. This overwrites whatever those items had before. Disabled when the selection contains assignments or live sessions, because those do not carry a subject, chapter or topic.
- Delete: Opens a confirmation listing each selected item by name and type. Read it carefully: on All Items an exam is only removed from its module and the exam plus its student results are kept, while on the Exams tab the same button permanently deletes the exam and all of its results.
- Clear: On the right of the strip, drops the whole selection without doing anything.
Two tabs change the line-up. Exams keeps all four and puts Export JSON, Merit List and Combined Merit in front of them — Combined Merit needs at least two exams selected, otherwise it stays disabled with Select at least 2 exams. Questions replaces them entirely with Update Hierarchy and Delete.
Selections survive moving between pages, so you can gather items from page 1 and page 3 before acting. Changing any filter clears the selection, so you never act on rows you can no longer see.
4. Attaching a Resource to a Course Module
All teaching content in Course37 hangs off a course module, so adding anything from Resources starts by choosing where it should live.
- Click the Add button at the top right. It sits on All Items, Videos, Live Classes, Assignments and the PDFs sub-tab — on Live Classes it sits next to Auto Live Schedule. The Exams and Questions tabs create their own items instead, and have no Add button.
- The Where should this content go? dialog opens. Optionally narrow the list with Tag, then choose a Course and a Module, and click Continue.
- The Add Module Content dialog opens with six tabs: Video, Live, Quiz, Assignment, PDF and Embed. If you started from a specific tab, the matching type is already selected for you.
- Announce to students at the bottom left is ticked by default. Leave it on to post a course announcement plus a notification and push to the students who can see the content, or untick it to add the item quietly.
- Click the create button for the tab you are on — Create Video, Create Live Session, Create Assignment, Create Pdf or Create Embed — or Cancel to back out.
The Quiz tab works differently, and this is the clearest example of reuse: you do not upload anything there, and it has no create button. You search your organization's existing exams (Search exams by name, subject or chapter), optionally narrow them with Filter by Educational Classification, and click Connect on the one you want — or tick several and use Connect Selected. An exam already attached to that module shows a Connected badge and offers Disconnect instead. The same exam can therefore serve many modules at once.
5. Working with a Single Row
On All Items and Videos each row shows the item's Name, Course, Module, Subject and Created date, plus a Type badge on All Items. Clicking anywhere on a row opens its details, except that an assignment row jumps straight to its submissions page and a running live class opens the live room.
On the right of each of those rows you get quick icon buttons: Details, View on website (opens the student-facing page in a new tab), Edit, and Delete — which reads Unlink from module for an exam, since the exam itself is never destroyed from here.
Live class rows behave a little differently. A scheduled session shows a Start button, a running one shows Join Live (or Open Room) and End, and the three-dot menu adds Start Session, Cancel Session, Open Live Room, End Session, Details, Edit, View on website, Copy Join Link and Delete. The Auto Live Schedule button in that tab's header opens Auto Schedule Today's Live Classes, which creates sessions in one go for every course that has a class scheduled for today.
On the Exams tab the three-dot menu carries View Details, Get Test Link, Export as JSON, Update and Delete, and the header holds Import Exams and Create Exam. On the Assignments tab the menu carries View Details, View on website, Copy Student Link, Update and Delete.