
1. Opening a Student's Profile
In the left sidebar under Students, click Students, then click any student row in the list to open their profile.
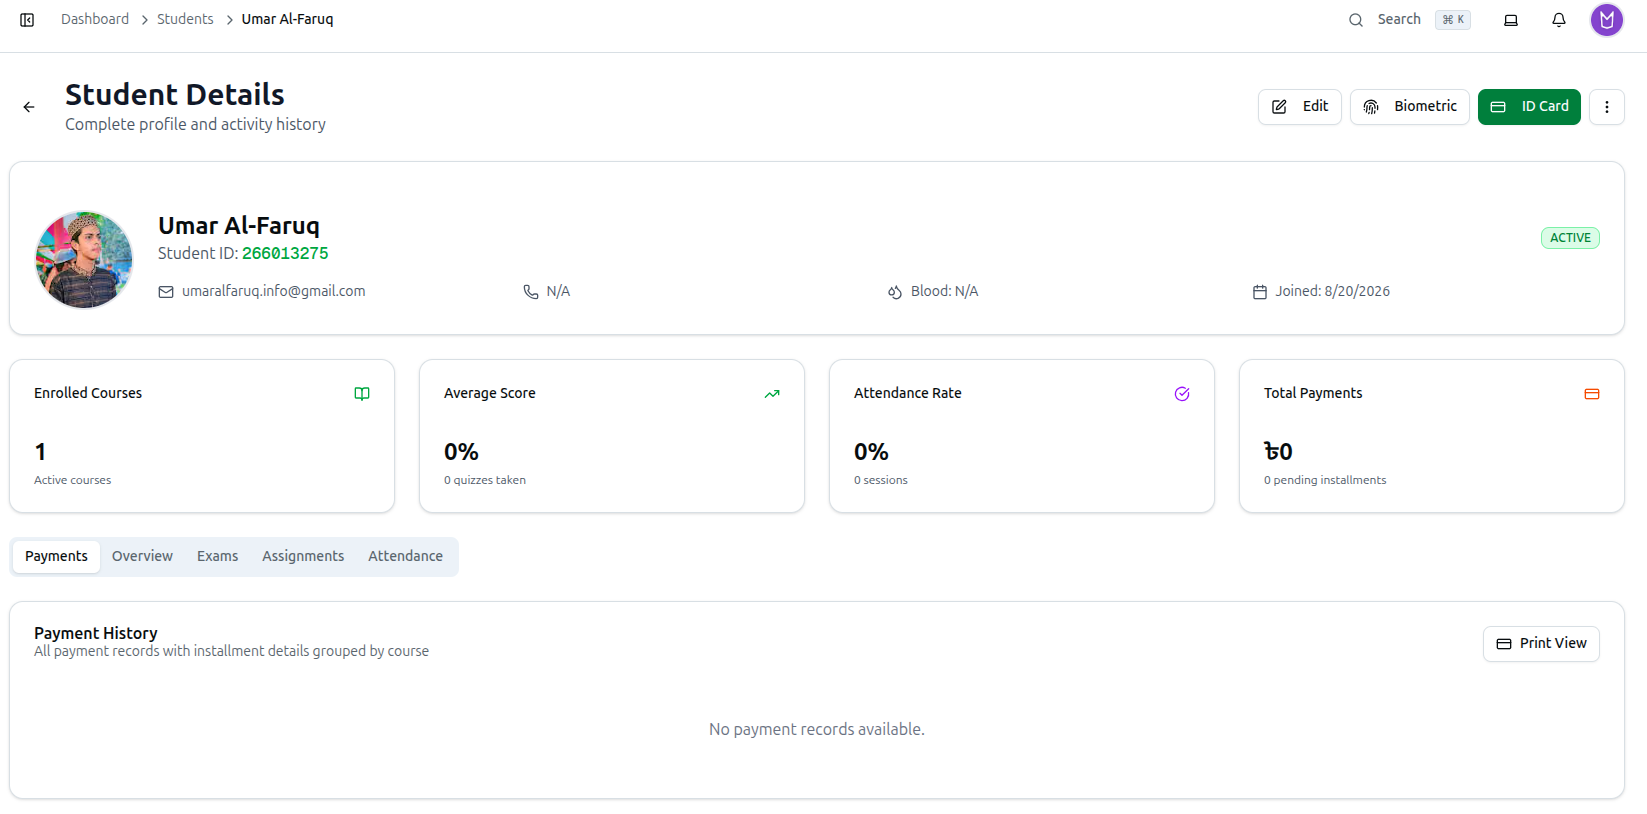
The page header reads Student Details with the subtitle Complete profile and activity history. The back arrow at the top-left returns you to the list you came from.
2. The Profile Card
The card directly under the header holds the student's identity and contact details:
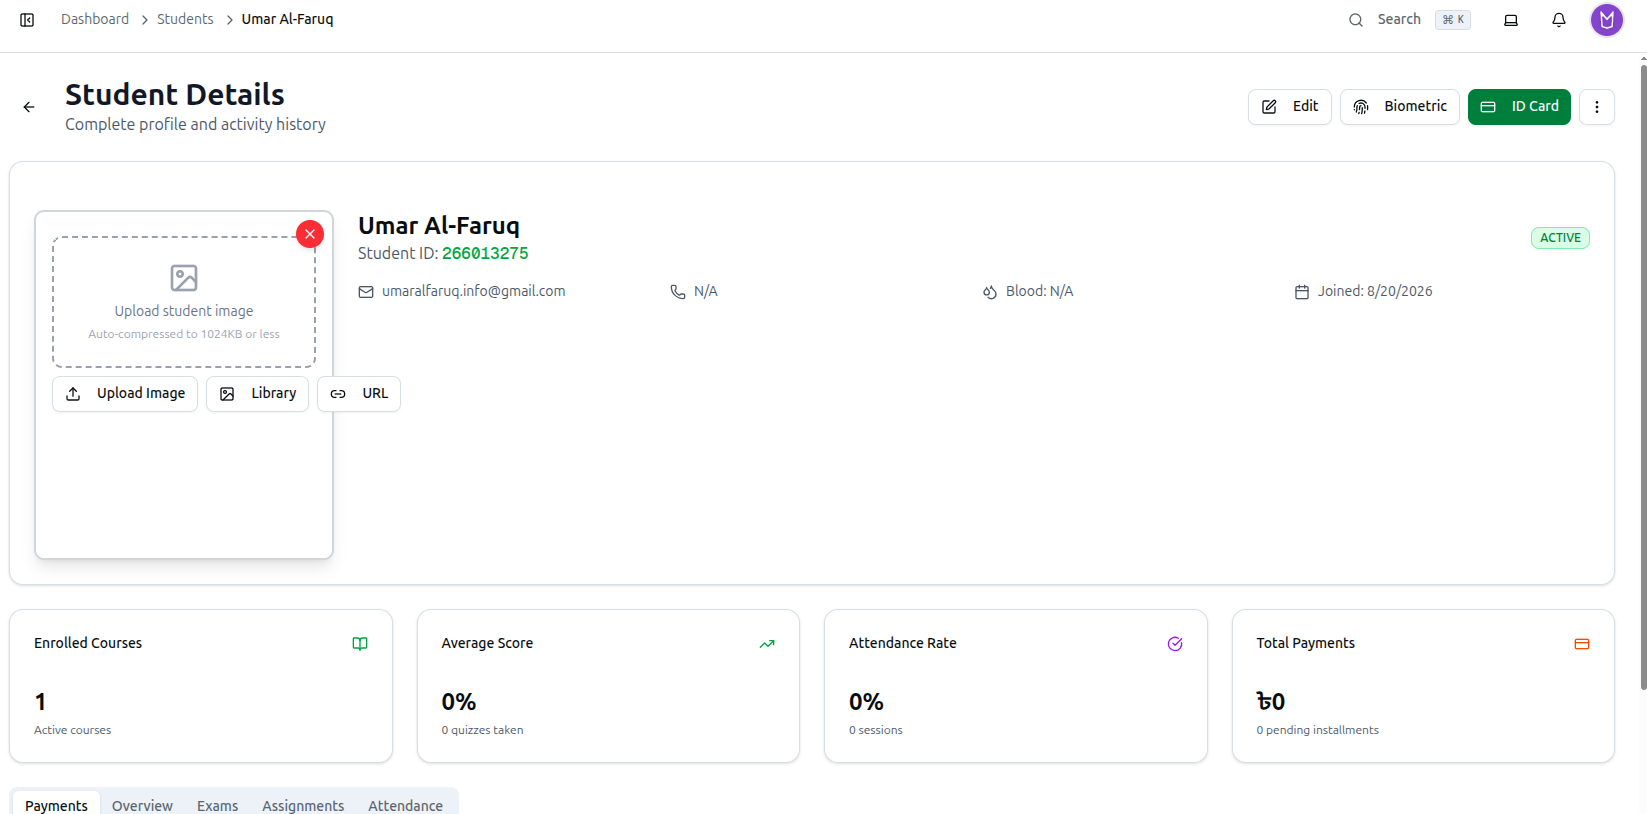
- Profile photo: Hover over the round photo and click the upload icon to replace it. A panel offers three ways in: Upload Image (auto-compressed to 1024 KB or less), Library (reuse an image already uploaded elsewhere in your organization), or URL (paste a direct image link). A confirmation appears once the new picture is saved.
- Name and Student ID: The student's full name with their Student ID shown underneath in green.
- Status badge: On the right-hand side, showing the student's current status — usually ACTIVE, INACTIVE, PAYMENT_DUE or SUSPENDED.
- Contact row: Email address, mobile number, Blood group, and the Joined date. Anything not recorded shows as N/A.
- Guardian Information: A grey panel showing Name and Contact. This panel only appears when at least one guardian detail has been saved.
3. The Four Summary Cards
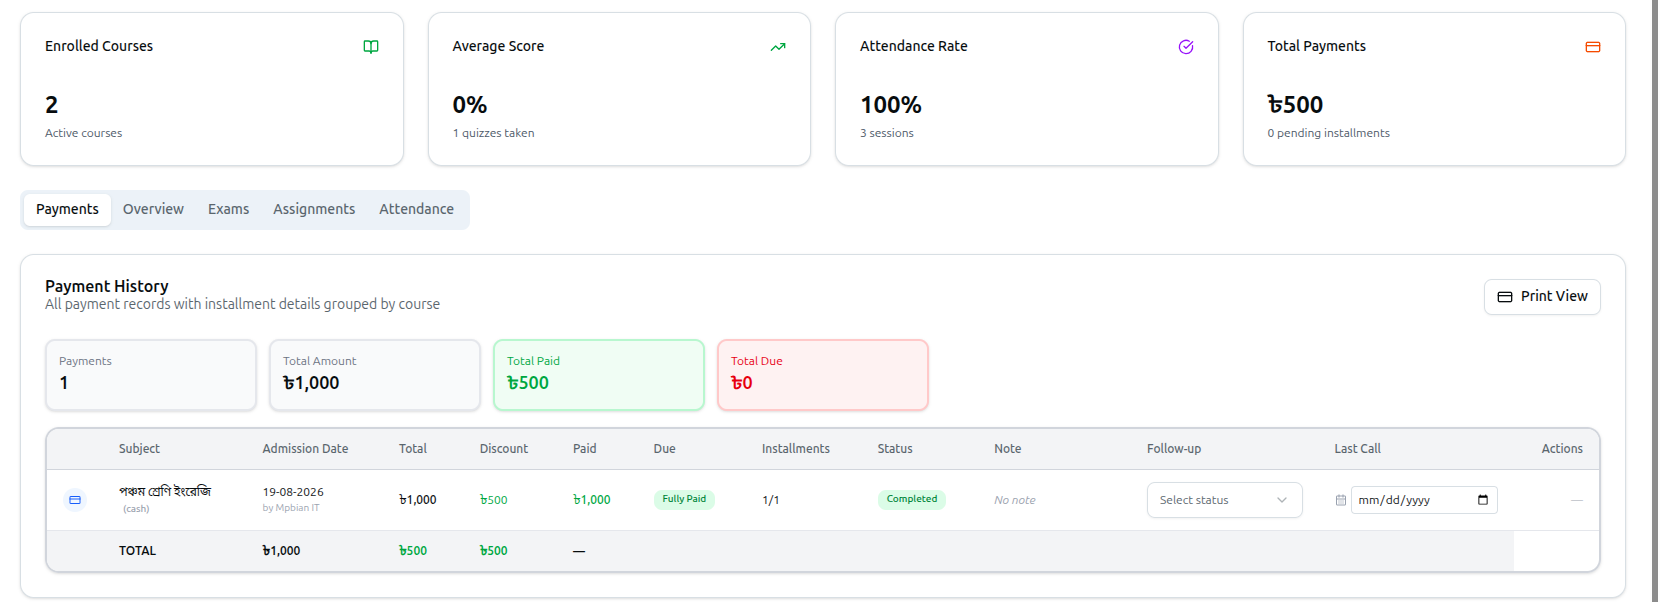
Below the profile card sit four figures calculated from the student's own records — the same four cards stay visible above every tab below, not just Payments:
- Enrolled Courses: The number of courses the student currently has access to (Active courses).
- Average Score: The average percentage across every quiz the student has taken, with the total number of quizzes taken underneath.
- Attendance Rate: The share of attendance records marked Present or Late, with the total number of sessions underneath.
- Total Payments: The total amount recorded against the student in Taka, with the count of pending installments underneath.
4. Header Action Buttons
Three buttons sit at the top-right of the page:
- Edit — opens the full Edit Student Information form (see section 14).
- Biometric — opens the Biometric devices panel for attendance hardware (see section 13).
- ID Card — opens the printable Student ID Card designer (see section 12).
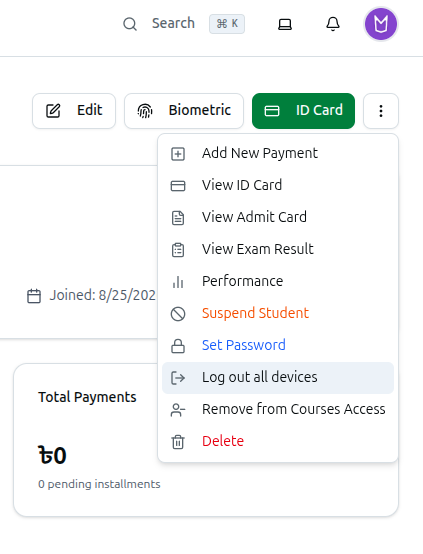
Next to them is the ⋮ (More actions) button. Clicking it reveals:
- Add New Payment: Opens the Create New Payment form with the student's name, mobile and email already filled in, so you can enrol them in another course or sell them a book.
- View ID Card: Same as the ID Card button.
- View Admit Card: Opens the Generate Admit Card designer.
- View Exam Result: Jumps the page down to the Exams tab.
- Performance: Opens the Student Performance Card report.
- Suspend Student: Switches the student's status to INACTIVE. Once suspended, this item changes to Activate Student and switches them back to ACTIVE.
- Set Password: Opens the password reset form (see section 15).
- Log out all devices: Signs the student out everywhere. This item only appears for Admin and Super Admin accounts.
- Remove from Courses Access: Jumps the page down to the Overview tab, where course access is actually removed.
- Delete: Permanently deletes the student (see section 15).
5. Payments Tab
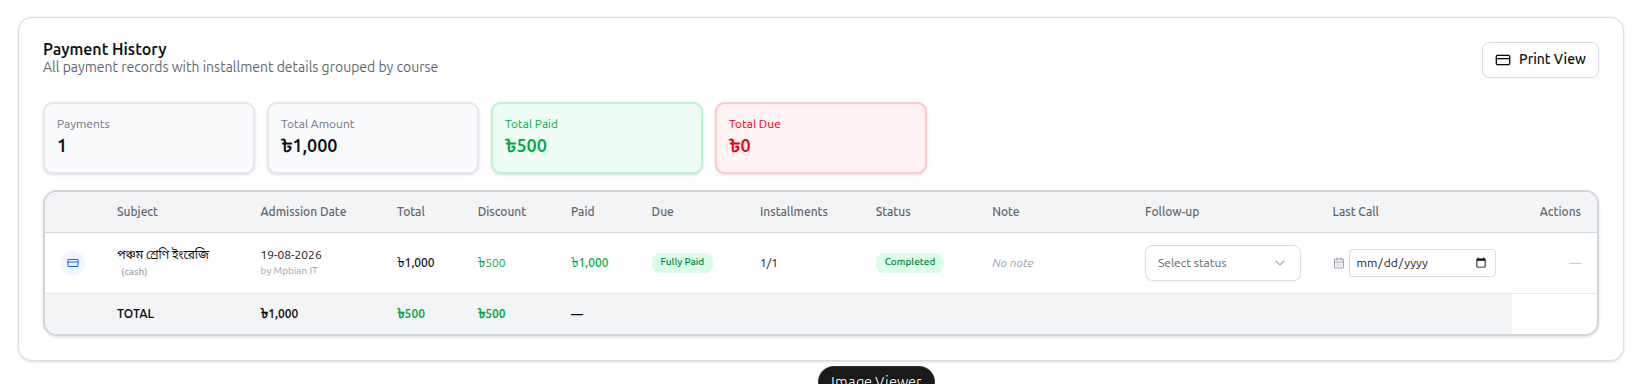
This is the tab the page opens on. The card is titled Payment History — All payment records with installment details grouped by course.
Summary strip Small boxes across the top show Payments (how many records exist), Total Amount, Total Paid (green) and Total Due (red).
The course table Each row is one course. The columns are Subject, Admission Date, Total, Discount, Paid, Due, Installments, Status, Note, Follow-up, Last Call and Actions. A TOTAL row closes the table.
- Status: Shows Completed once every installment is paid, Overdue when an installment has passed its due date, and In Progress otherwise. A one-off payment row shows Completed or Pending. When nothing is left to collect, the Due column shows a green Fully Paid badge in place of a figure.
- Click anywhere on a course row to expand its installment sub-table.
- Add: Appears in the Actions column whenever the course still has a due amount. It opens the installment form.
Installment sub-table Columns are Inst., Amount, Discount, Status, Date, Note and Actions. Installment statuses are Paid, Pending and Overdue.
For any Pending or Overdue installment you get two buttons:
- The pencil icon (Edit installment) — change the amount, discount or due date.
- Pay — record the money as received.
Notes and follow-up
- Note: Click the note text (or No note) in either table to open a writing box. Click Save to keep it. These notes are internal memos for admins only.
- Follow-up: A dropdown on each course row for collection tracking. The choices are Not Contacted, Not Responded, Talked, Will Pay Later, Refused and Follow Up. Unset rows show Not set.
- Last Call: A date box for the day you last phoned the student or guardian. It saves the moment you pick a date.
6. Recording and Editing Installments
Paying or adding an installment
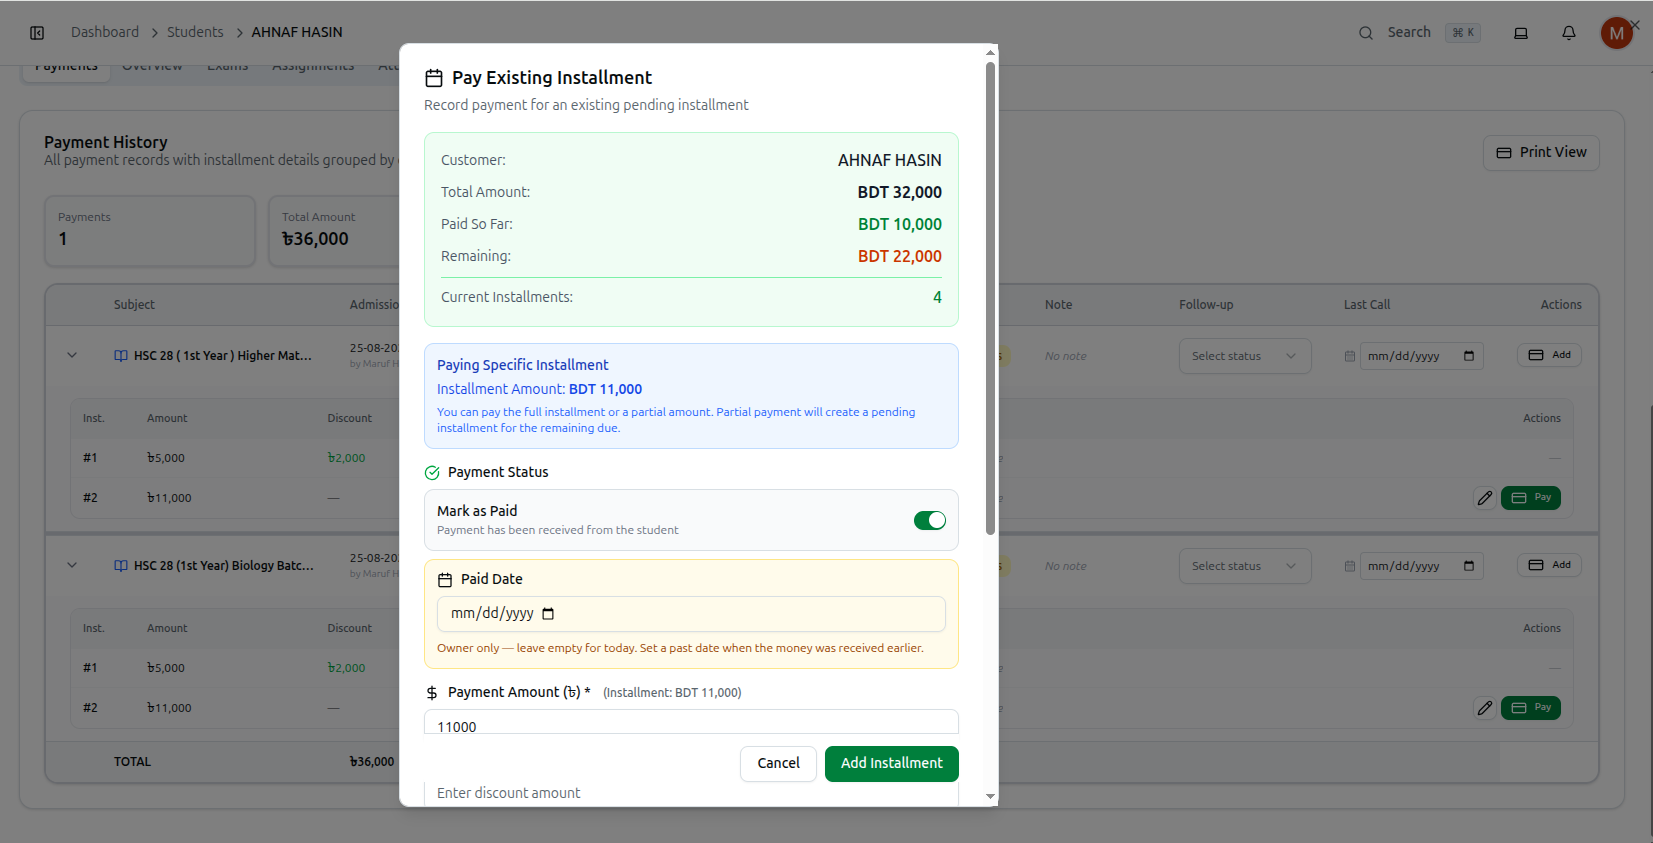
Clicking Pay opens Pay Existing Installment — subtitled "Record payment for an existing pending installment" — clicking Add opens Add New Installment. Both open on a live summary box: Customer, Total Amount, Paid So Far, Remaining, and Current Installments (how many installment rows already exist for this payment). The form itself contains:
- Payment Status: A switch that reads Mark as Paid (Payment has been received from the student) or Create as Pending (Student will pay this installment later).
- Paid Date: Owner only. Use it when the money actually arrived on an earlier date; leave it empty for today.
- Payment Amount (৳): Required. You cannot enter more than the remaining balance.
- Discount (Optional): Only shown when Mark as Paid is on.
- Note (Optional): Internal memo visible only to admins.
- Payment Due Date / Next Payment Due Date: Required whenever a balance will remain after this entry.
A small blue summary shows Payment, Discount and After This Payment, which reads FULLY PAID once nothing is left. Click Add Installment to finish. If the payment covers several courses at once, the button reads Pay 2 Courses, Pay 3 Courses, and so on.
Editing an installment The pencil icon opens Edit Installment #N. You can change Installment Amount (৳), Discount (৳), Due Date and the Note. Owners additionally see Created Date and Paid Date — clearing the Paid Date un-marks the installment as paid. A Reason for edit is compulsory and is stored in the edit trail. Click Update Installment to save.
7. Print View — the Full Payment History
Click Print View at the top-right of the Payments tab. A wide Payment History window opens, grouped by course with payments and installment details.
- Three boxes at the top show Courses, Total Paid and Total Due.
- Every course gets its own tab, plus a final All Courses tab.
- Inside a course tab you see a summary table (Admission Date, Amount, Discount, Payable, Paid, Due), an Installments table, and — when books or physical items were sold with the course — a Products table.
- In the Products table each item is marked Digital or Physical and carries a Not given yet or Got it badge. Click Mark as Given when you hand the item over, or Undo to reverse it.
- The pencil button edits a cash payment; the Add button adds an installment to that course.
- Tick the courses you want on the All Courses tab, then click the green Print Receipt button at the top-right of the window to produce a receipt. The button stays disabled until at least one course is ticked.
Customizing the Receipt
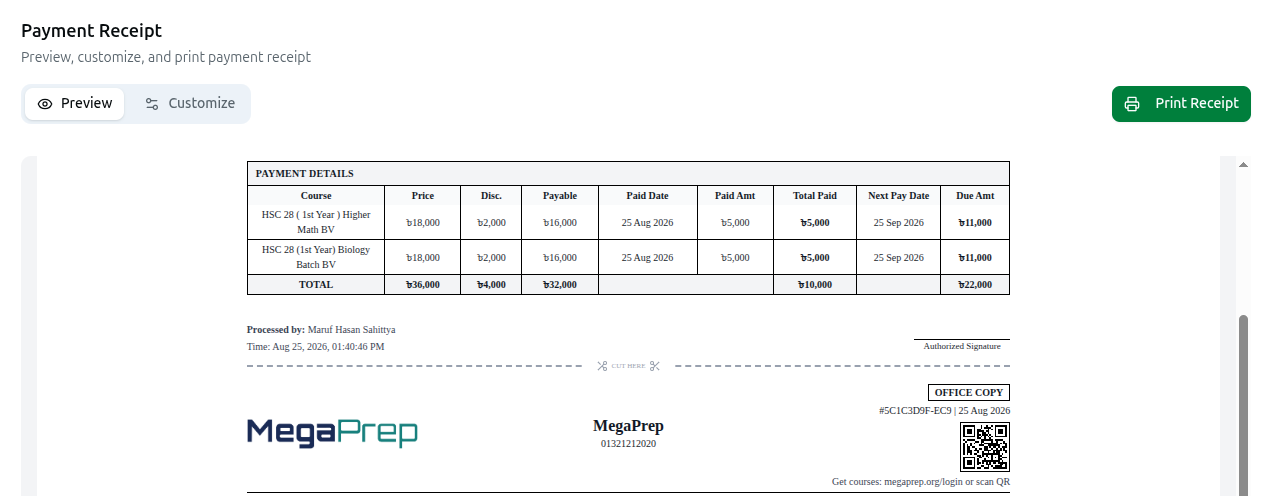
The Payment Receipt window itself opens on a Preview / Customize toggle, the same pattern as the ID Card and Admit Card designers. The Customize tab groups its fields as Style (theme, colour mode, font, font scale, heading/body size, border weight and corners, primary/accent colours, header and table-head background), Header (logo with size, and toggles for organisation name/mobile/email/address/website), Details (student ID, student mobile, payment method, installment info, an office-copy-only admin note, and a max-items-listed cap), Labels & language (every printed string on the receipt, editable for translation), and Footer (a signature line with its own label, a thank-you note, and a processed timestamp). A Page & margins group also lets you switch Page format away from the default A4 student-plus-office-copy layout to POS 80mm or POS 58mm thermal-receipt printing, each with its own content and print margins in millimetres.
A presets row offers six one-click looks: Classic, Modern, Bold Office, Minimal, Compact Print, and বাংলা স্টাইল (Bengali) — the last one relabels every printed field in Bangla and switches to a Bangla-capable font in one click.
8. Overview Tab — Courses, Batches and Books
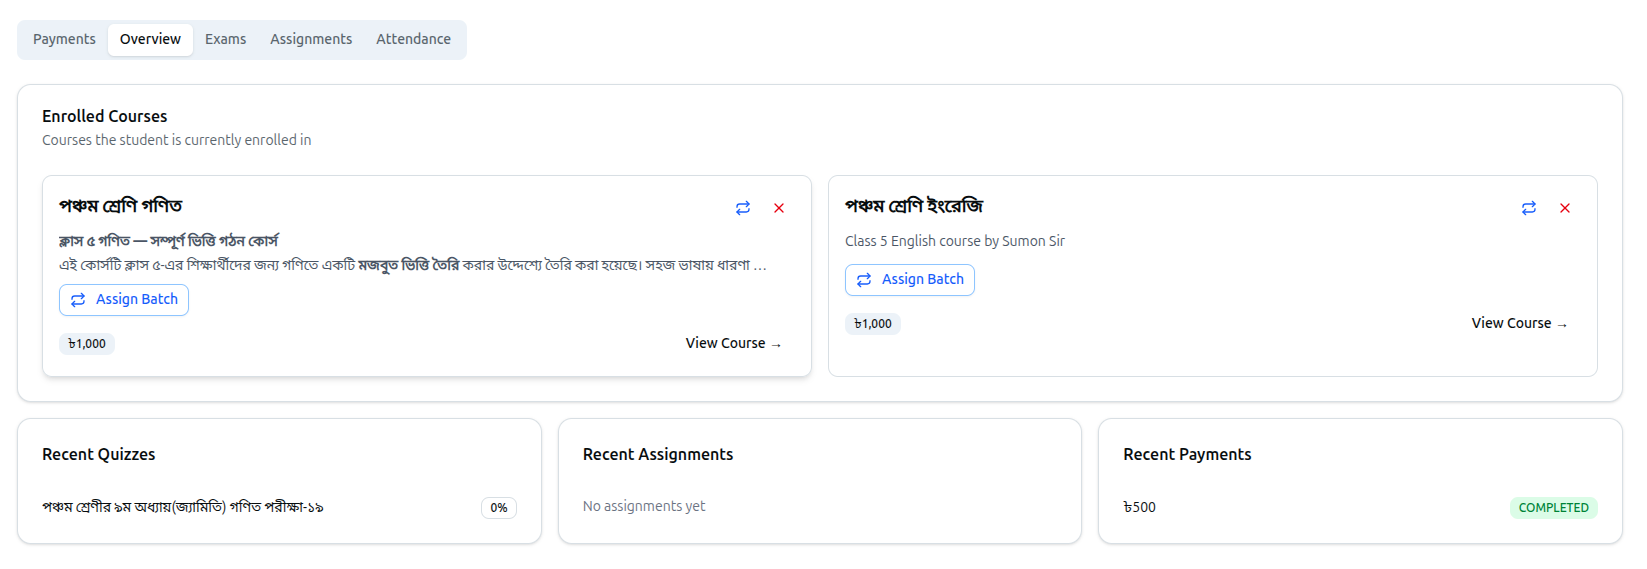
Enrolled Courses Each course appears as a card showing its name, short description, price and any batch the student sits in. Two icon buttons sit at the top-right of every course card:
- The repeat icon (Replace course and sync payments).
- The X icon (Unenroll from course).
Replacing a course
- Click the repeat icon on the course card. The Replace Course window opens.
- Optionally narrow the list with Filter by Tag.
- Pick the new course under Select New Course. Courses the student is already enrolled in are hidden from this list.
- Click Replace And Sync. The enrolment moves across and the related payment and installment records are re-pointed at the new course.
Removing a course
- Click the X icon on the course card. The red Confirm Removal window opens.
- Type REMOVE in the confirmation box — the button stays disabled until you do.
- Click Remove. The student loses access to that course and the payment and installment records are synced accordingly. This cannot be undone.
Batches
- Courses with a batch show it in a blue panel with the class time. Use the small repeat icon to Change Batch and the small X to Remove from batch (the same type-REMOVE confirmation applies).
- Courses with no batch show an Assign Batch button instead.
- In the Select Batch dropdown each option lists the batch name, its timing and how many students it already holds. Finish with Change Batch or Assign Batch. If the course has no other batch, you are told to create more batches in the course settings first.
Enrolled Books A separate Enrolled Books card lists books the student has access to, with each book's price. It only appears when the student owns at least one book.
Recent activity Three small cards at the bottom show the last three entries for Recent Quizzes (with percentage), Recent Assignments (with status) and Recent Payments (with amount and status).
9. Exams Tab
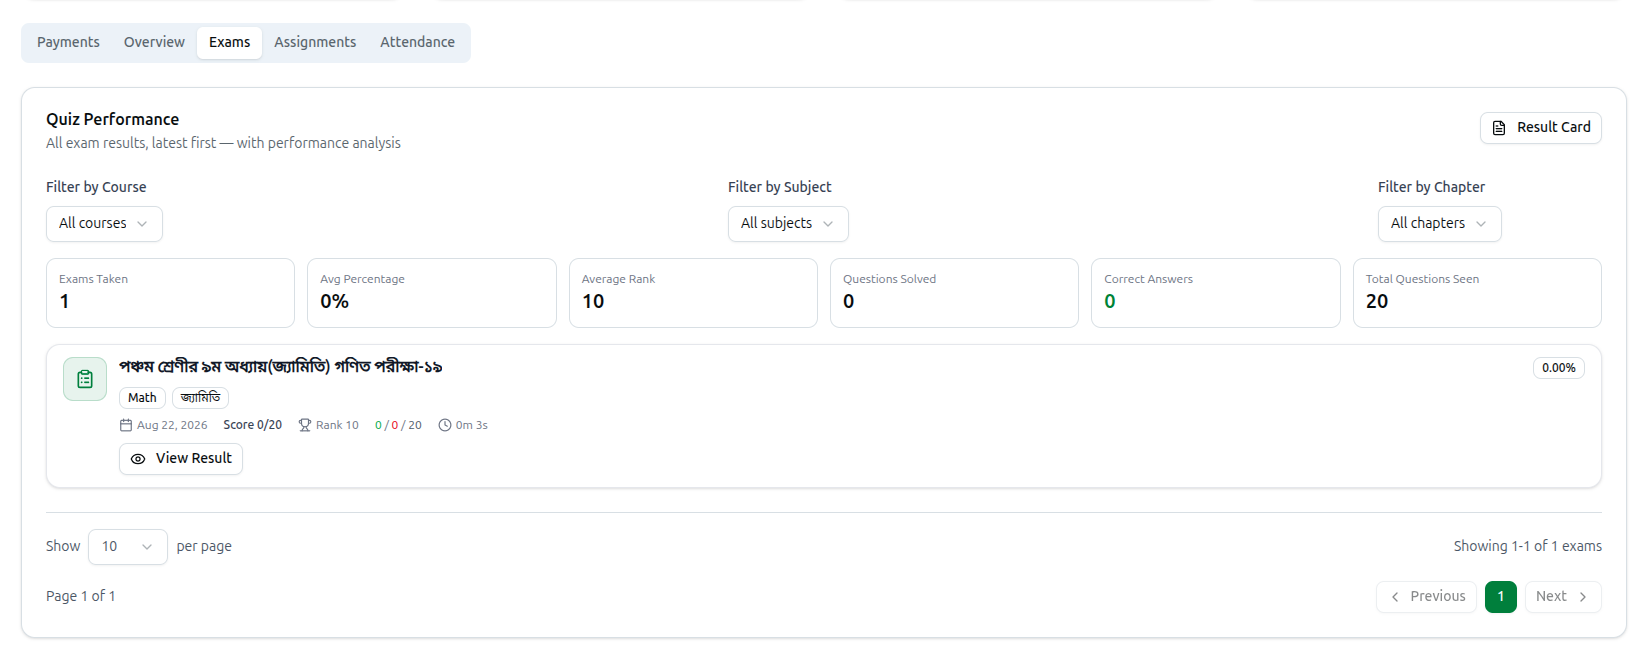
The card is titled Quiz Performance — All exam results, latest first — with performance analysis.
Filters Three dropdowns narrow the list: Filter by Course (All courses), Filter by Subject (All subjects) and Filter by Chapter (All chapters). Choosing a course resets the subject and chapter filters. Exams that were never linked to a course, subject or chapter are grouped under Unassigned. While a filter is active, a line reads Filtered to X of Y exams.
Performance boxes Exams Taken, Avg Percentage, Average Rank (only shown when at least one exam in the selection was ranked), Questions Solved, Correct Answers and Total Questions Seen.
The result list Each exam is a row showing the quiz name, its percentage badge, course/subject/chapter chips, the date, Score out of total marks, Rank where one exists, the correct / incorrect / skipped counts in green / red / grey, and the time taken in minutes and seconds. Use the page-size selector at the bottom (10, 25, 50 or 100 per page) to move through a long history.
View Result Click View Result on any row to open Result Details. It shows Score, Correct, Incorrect and Time, a Submission Information panel (Submission Type is one of Web Submission, OMR Processed or Manual Entry, plus Submitted At, OMR Set Code, OCR Confidence and the scanned sheet where relevant), and a Question-wise Analysis listing every question with the student's answer and the correct one.
To correct a wrongly-marked answer, click Edit Answers, fill in the required Modification Notes, click the right option (or Mark Skipped), then click Save Changes. The result is then flagged as Modified By Admin.
Result Card The Result Card button at the top-right of the tab opens a printable, school-style exam result card built from the student's whole exam history. It is greyed out when the student has no exam results.
10. Assignments Tab
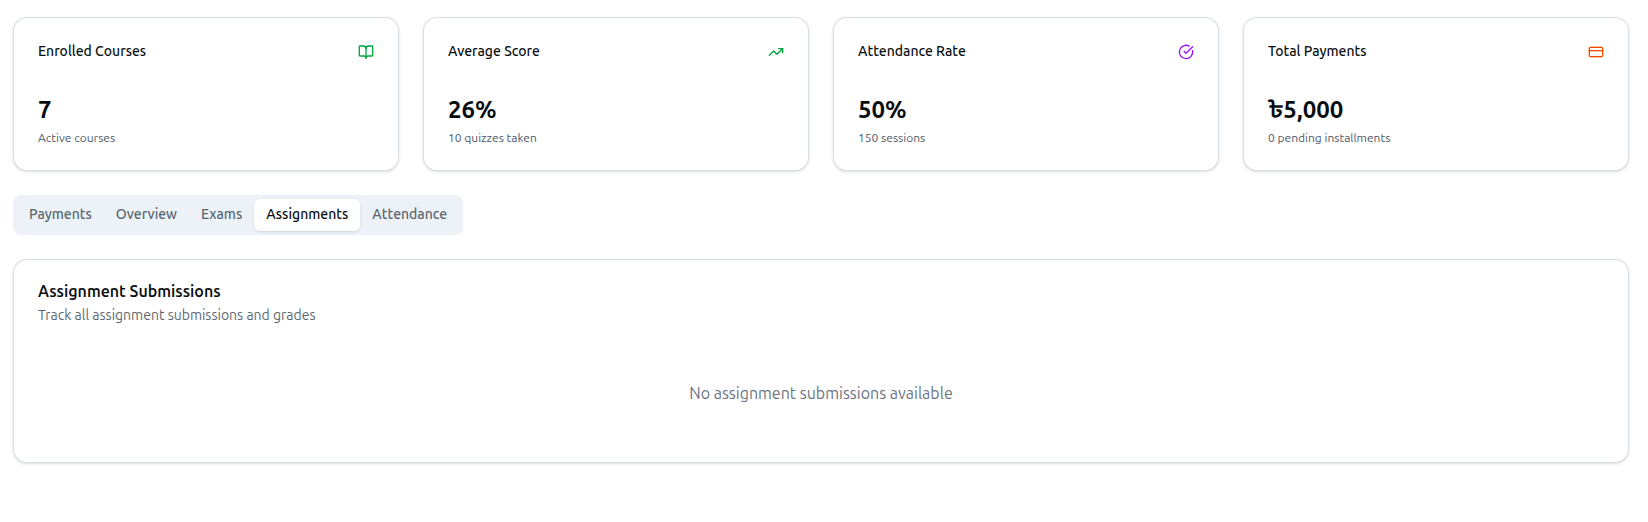
A single table titled Assignment Submissions — Track all assignment submissions and grades. Columns are Assignment, Status, Score, Due Date, Submitted and Feedback. Submissions handed in after the deadline carry an orange Late badge next to the assignment name. Statuses include SUBMITTED, GRADED, PENDING, LATE and MISSING. Page sizes of 10, 25, 50 and 100 are available. This tab is read-only.
11. Attendance Tab
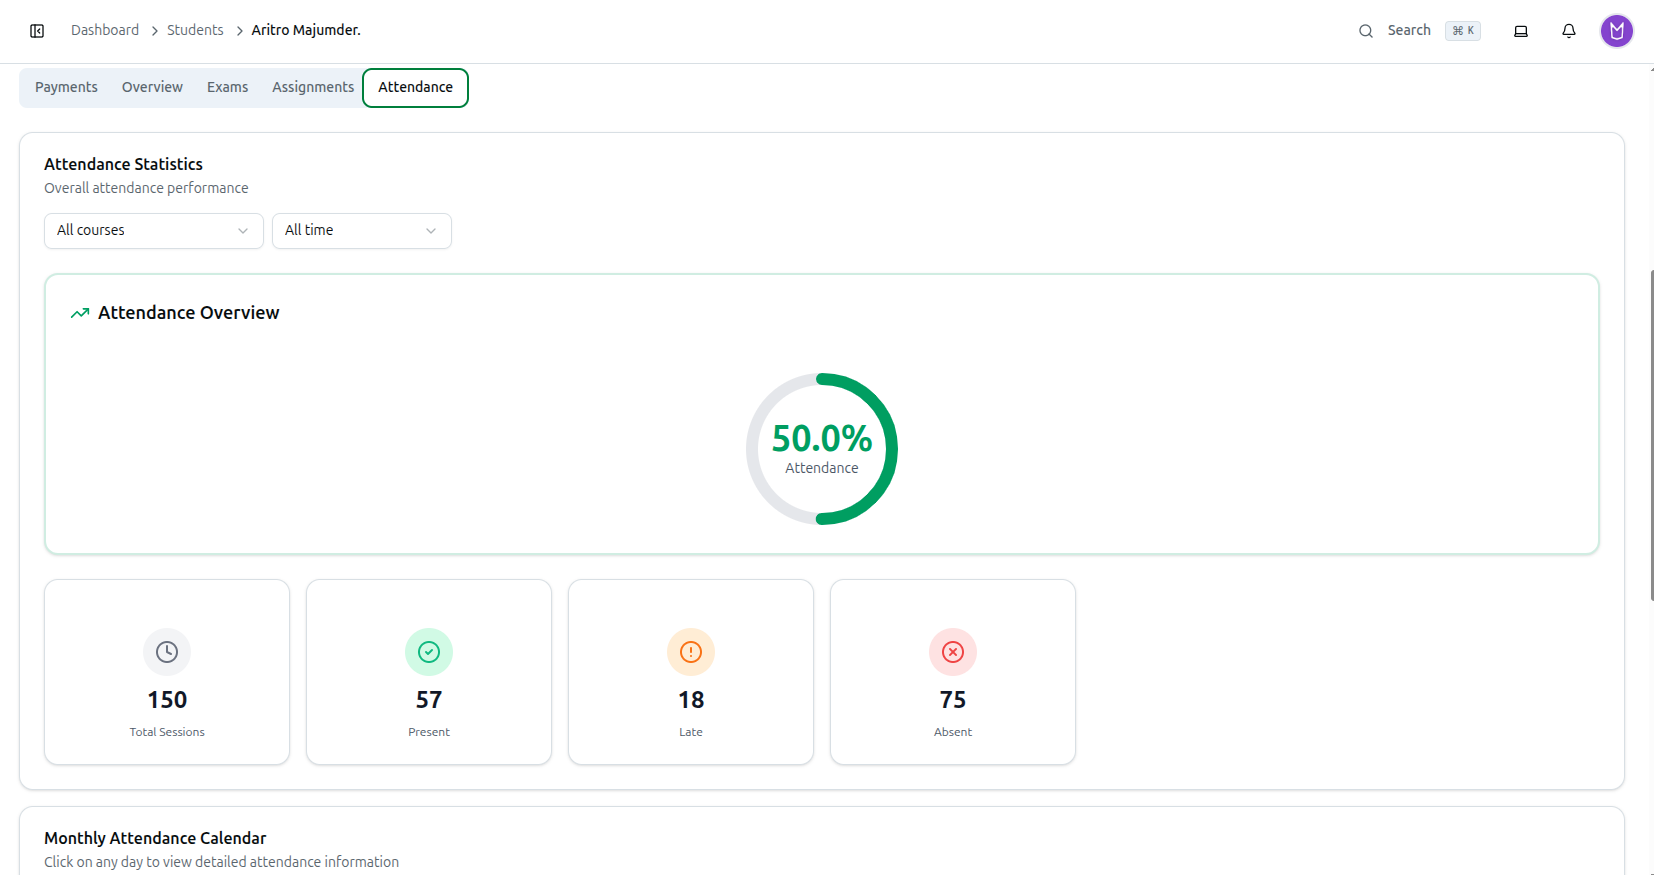
Attendance Statistics Two dropdowns sit in the card header: a course filter (All courses) and a period filter offering All time, Last month, Last 3 months, Last 6 months and Last 12 months.
Underneath, an Attendance Overview ring shows the attendance percentage, followed by four counters: Total Sessions, Present, Late and Absent.
Monthly Attendance Calendar Click on any day to view detailed attendance information. The colour key is Present, Late, Absent and No Session; use Previous and Next to move between months. If the student has no attendance history at all, the tab simply reads No attendance records available.
12. ID Card, Admit Card and Performance Card
All three are preview-and-print windows built around the same layout: a Preview tab and a Customize tab, with the print button at the top-right.
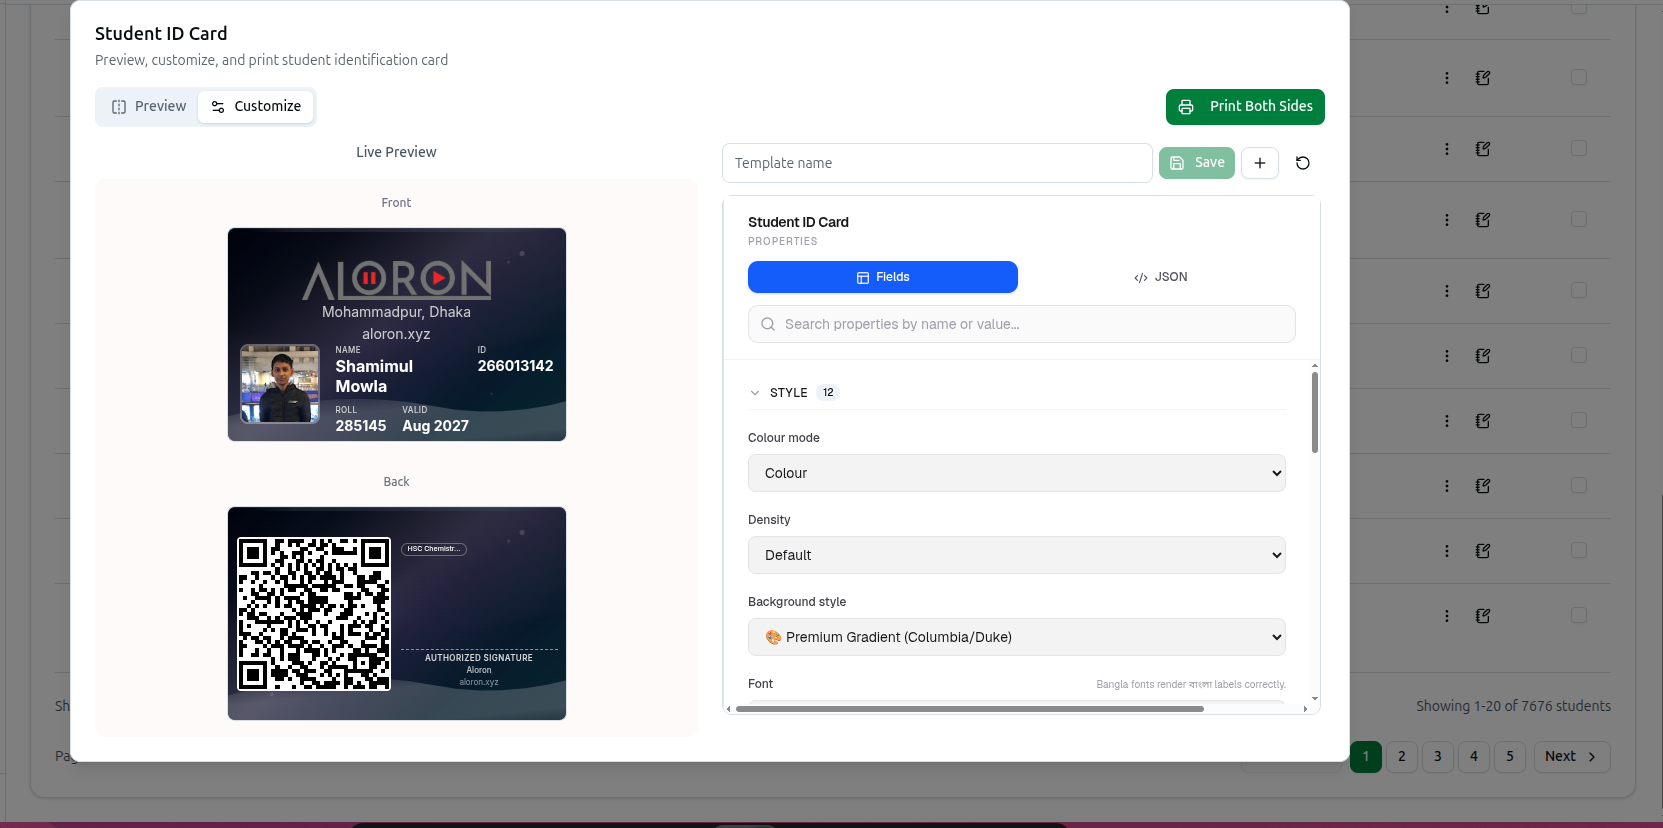
- Student ID Card (the ID Card button): Preview, customize, and print student identification card. Use Show Back / Show Front to flip the card, and Print Both Sides to print it. The Customize tab groups its fields as Style (colour mode, density, background style, font, sizes, primary/secondary/accent colour, corner radius, border width), Layout & size (orientation, photo position, width/height in mm), Front side (logo, organisation name/address, website, student photo with shape and size, name, ID, registration number, roll number, blood group, institute, education level, valid-until date), Back side (QR code, brief info, mobile, enrolled courses list, signature with front-or-back placement, organisation footer), and Custom text (front/back header & footer text, terms text, emergency contact, plus free-form custom label/value rows). There is no visual preset row for ID Cards — only a Default/Compact density choice.
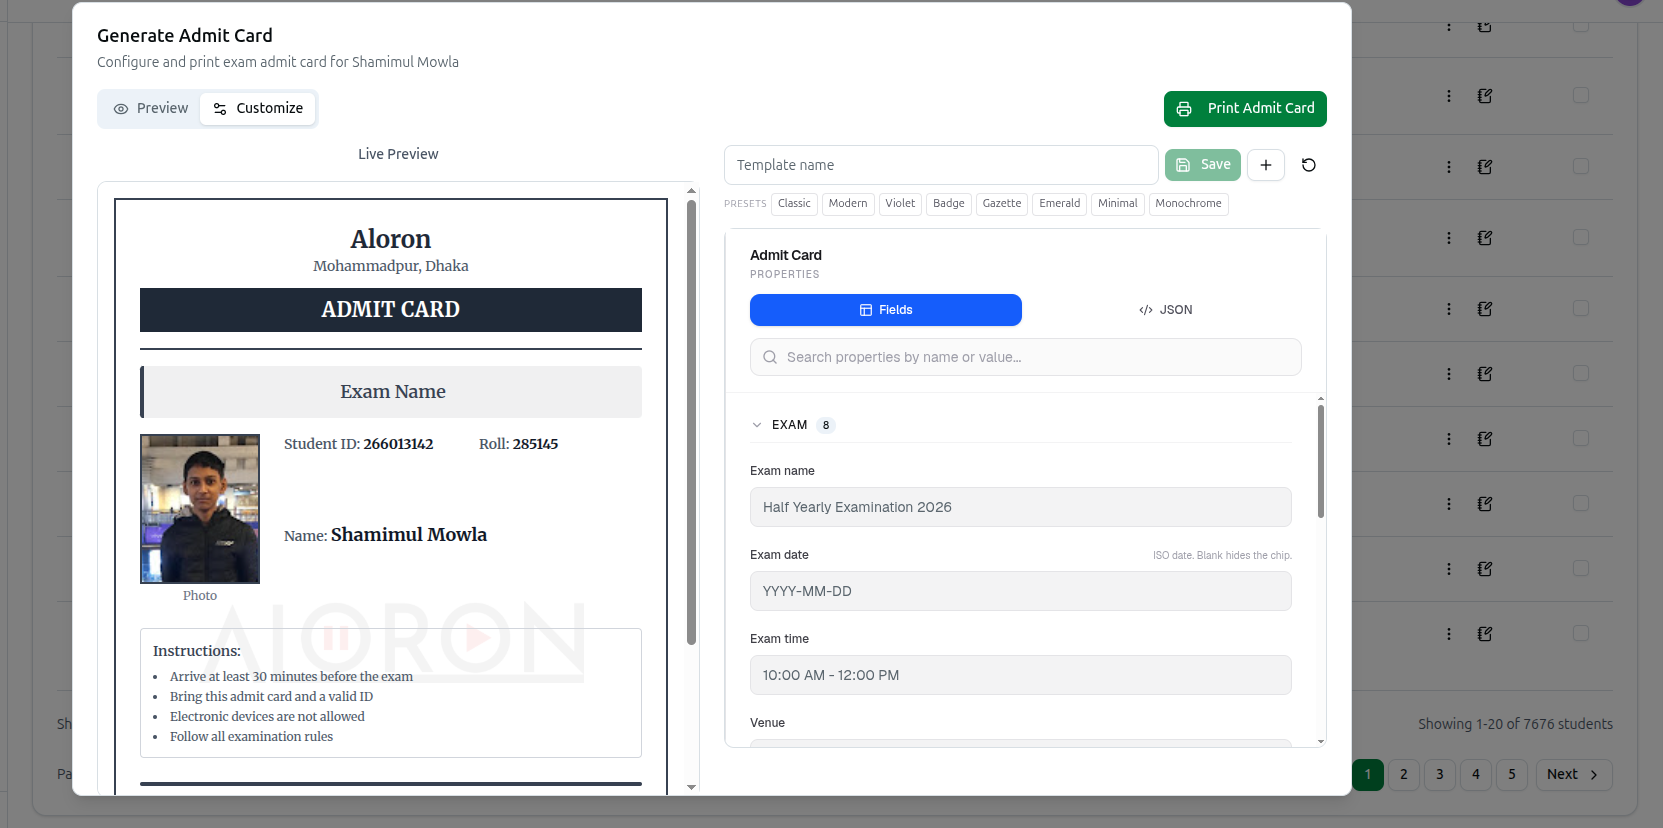
- Generate Admit Card (View Admit Card in the ⋮ menu): the Customize tab groups its fields as Exam (name, date, time, venue, seat/hall number, Class, Group, Subject), Style (header colour, accent colour, header fill, border style, font, colour mode, date language), Header (header label, logo position and size, organisation name/address), Student info (photo, ID, roll, class, group, subject, batch toggles) and Blocks (the date/time/venue/seat strip, an instructions box, signature lines, a footer note). A row of 8 presets sits above the fields — Classic, Modern, Violet, Badge, Gazette, Emerald, Minimal and Monochrome — each a one-click bundle of colour, header style, border style and font; Monochrome also switches the card to black-and-white for toner-friendly printing. Configure whatever you need, then click Print Admit Card.
- Student Performance Card (Performance in the ⋮ menu): a toggle at the top switches between Performance and Exam Result styles. Narrow the report with the Courses multi-select (All Courses by default, with Clear all to reset) and the Period dropdown (All Time, Last 7 Days, Last 30 Days, Last 90 Days, Last Year). Refresh re-pulls the figures and Print produces the card.
Both card designers share one template system. Type a name and click Save (or Update, if a saved template is selected) to store your layout on the server — it becomes available next time, for any student, not just this one. ★ sets a template as the default, the + button starts a fresh one, and the reset icon reverts to the card's built-in defaults without touching your saved templates.
13. Biometric Devices
Click Biometric in the header to open Biometric devices for this student.
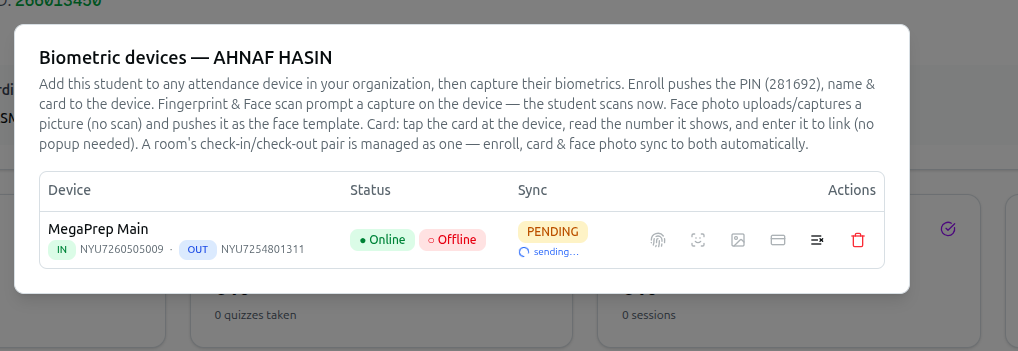
"Add this student to any attendance device in your organization, then capture their biometrics. Enroll pushes the PIN, name & card to the device. Fingerprint & Face scan prompt a capture on the device — the student scans now. Face photo uploads/captures a picture (no scan). Card: tap the card at the device, read the number it shows, and enter it to link (no popup needed). A room's check-in/check-out pair is managed as one — enroll, card and face photo sync to both automatically."
The table lists every attendance device in your organization with Device, Status, Sync and Actions. Device status shows as ● Online, ○ Offline or Disabled; the sync column shows SYNCED, PENDING or FAILED once the student is on the device, and Not enrolled until then.
- Click Enroll to push the student's PIN, name and card to the device.
- Once the row shows SYNCED, the icon buttons become usable: fingerprint (the student then scans at the device), face scan (the student captures their face at the device), face photo (upload or capture a picture — no scan needed), and card (tap the card at the device, read off the number, then type it in to link it).
- The trash icon removes the student from the device. When commands are still queued, an extra button lets you clear the pending queue.
A classroom's check-in and check-out devices are treated as one pair — enrolment, card and face photo sync to both automatically, while fingerprint and face capture must be done at each reader. If no hardware is connected the panel reads No attendance devices connected to your organization yet.
14. Editing the Student
Click Edit to open Edit Student Information, subtitled "Update student details and status. Student ID: {id} | Roll No: {roll}" so you can confirm you have the right record before changing anything.
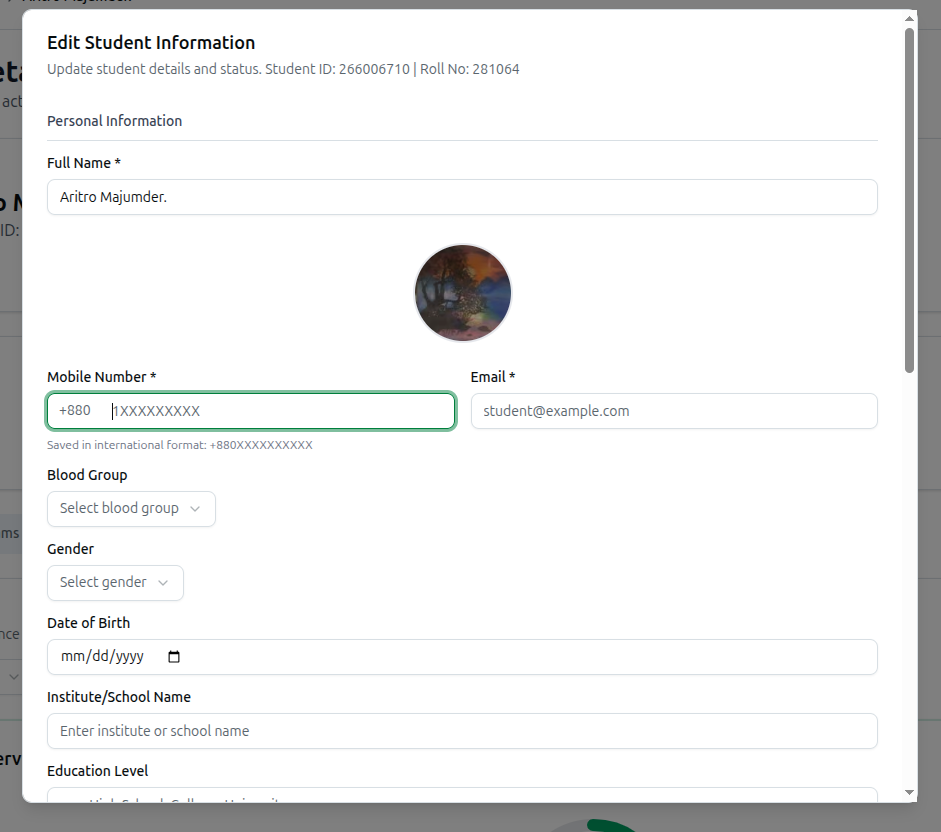
The form is split into four sections:
Personal Information
- Full Name: Required.
- Mobile Number: Entered without the country code (1XXXXXXXXX); it is saved as +880XXXXXXXXXX. Required if no email is given.
- Email: Required if no mobile number is given.
- Blood Group: A+, A-, B+, B-, AB+, AB-, O+ or O-.
- Gender: Male, Female or Other.
- Date of Birth, Institute/School Name, Education Level, Version (English, Bangla or Others) and Address.
Guardian Information
- Guardian Name and Guardian Mobile.
Student Status
- Status: Active (Student is actively enrolled), Inactive (Student is not currently active), Payment Due (Student has pending payments) or Suspended (Student is temporarily suspended).
Enrollment Information
- Student ID: Unique identifier across all organizations. A green tick or a red warning appears as you type to tell you whether the ID is free.
- Roll Number: Unique within your organization, checked the same way.
- Current Rating, Enrolled Courses and the list of course names are shown here for reference only.
Click Update Student to save, or Cancel to discard.
Duplicate contact warning If the mobile number or email you type already belongs to another account, an amber panel names that account and warns you. Saving then asks you to confirm Transfer activity and delete account? — continuing moves all of that account's enrolments, payments, results, attendance and assignments onto this student and then permanently deletes the other account. Read the listed accounts carefully before confirming.
15. Set Password, Log Out Devices and Delete
Set Password
- Open the ⋮ menu and click Set Password.
- The Set New Password for [student name] window shows the student's mobile and email so you can be sure you have the right person.
- Enter New Password and Confirm Password. The password must be at least 6 characters and both boxes must match. Use the eye icon to check what you typed.
- Click Reset Password.
Log out all devices
- Open the ⋮ menu and click Log out all devices. Only Admin and Super Admin accounts see this item.
- The confirmation explains that the student will be signed out of every device and will need to log in again.
- Click Log out all devices to confirm. A message tells you how many devices were signed out.
Delete
- Open the ⋮ menu and click the red Delete.
- The Delete Student window names the student and warns that the action cannot be undone.
- Click Delete. You are returned to the Students list.
Use Suspend Student rather than Delete when you only want to take a student out of the active list for a while — suspension is reversible, deletion is not.