
3. Using the Page Editor & Adding Components
Click Edit on any page to open the visual editor.
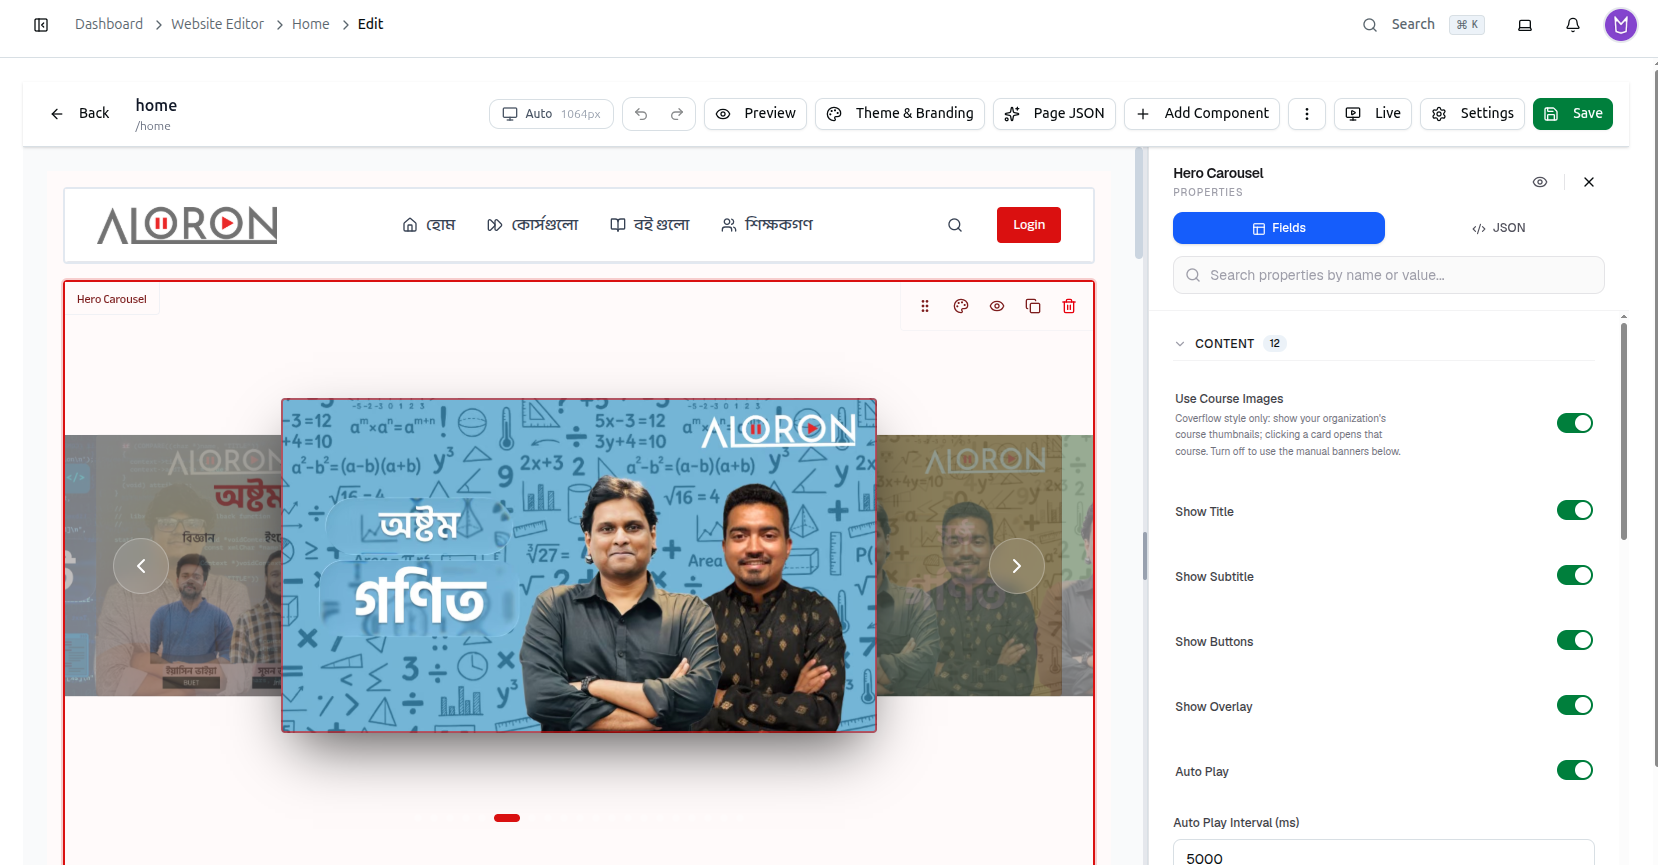
The toolbar above the canvas carries more than one preview mode, and they are not interchangeable.
Preview toggles the canvas itself into a clean read — it hides the editing overlays (borders, drag handles, the toolbar on each section) so you can see the layout without clutter. The button relabels itself Edit Mode while active, so you can tell at a glance which state you're in.
Live is different: it opens a real iframe of the actual page on your live site — the same page a student would load — with your unsaved edits streamed into it. This is the only way to see your draft exactly as your actual frontend renders it, including anything Preview mode's simplified canvas cannot replicate.
Use Preview for a quick layout check, Live before you trust it. Preview is faster and stays inside the builder. Live is slower but is the real page, so any styling or behaviour that only shows up on the actual site — not the builder's approximation of it — will only be visible there.
Adding Content Blocks
- Click + Add Component on the toolbar.
- The Component Library opens, filterable by category — Hero, Content, Navigation, Courses and more.
- Browse the visual cards — Hero Section, Features Section, Notification Bar, and others.
- Click + Add Component on the block you want. It drops into your page immediately.
Click any section on the canvas — such as the Hero Carousel above — to open its PROPERTIES panel on the right. Fields is the form view; JSON edits the same section as raw configuration. Search properties by name or value... finds a setting quickly on a section with many fields.
Publishing From Inside the Editor
You do not have to leave the editor to publish. If the page you're editing is unpublished, an unmissable button appears in the toolbar:
Draft — Publish now
It only shows up when the page is a draft, styled to stand out, with the tooltip "This page is a draft — the live site ignores it until published." Click it and the page goes live without opening Settings at all.
Full guide for the Settings-based publish flow: Publishing Settings & Backups
Troubleshooting
| What you see | What it means |
|---|---|
| Your edits look right in Preview but wrong on the real site | Check Live — Preview is a simplified canvas view, not the actual rendered page |
| You can't find a Publish button | If the page is a draft, it appears directly in the toolbar as Draft — Publish now |
| The properties panel feels overwhelming on a complex section | Use Search properties by name or value... rather than scrolling |
| A section change did not apply | Confirm you clicked Save — the editor does not autosave |
Related: Manage & Create New Pages · Publishing Settings & Backups · Theme & Branding