
Start here instead if you are new: How to Create and Assign Teachers covers creating a teacher and putting them on a course. This page is the full reference for everything else on the Teachers page.
1. Opening the Teachers Page
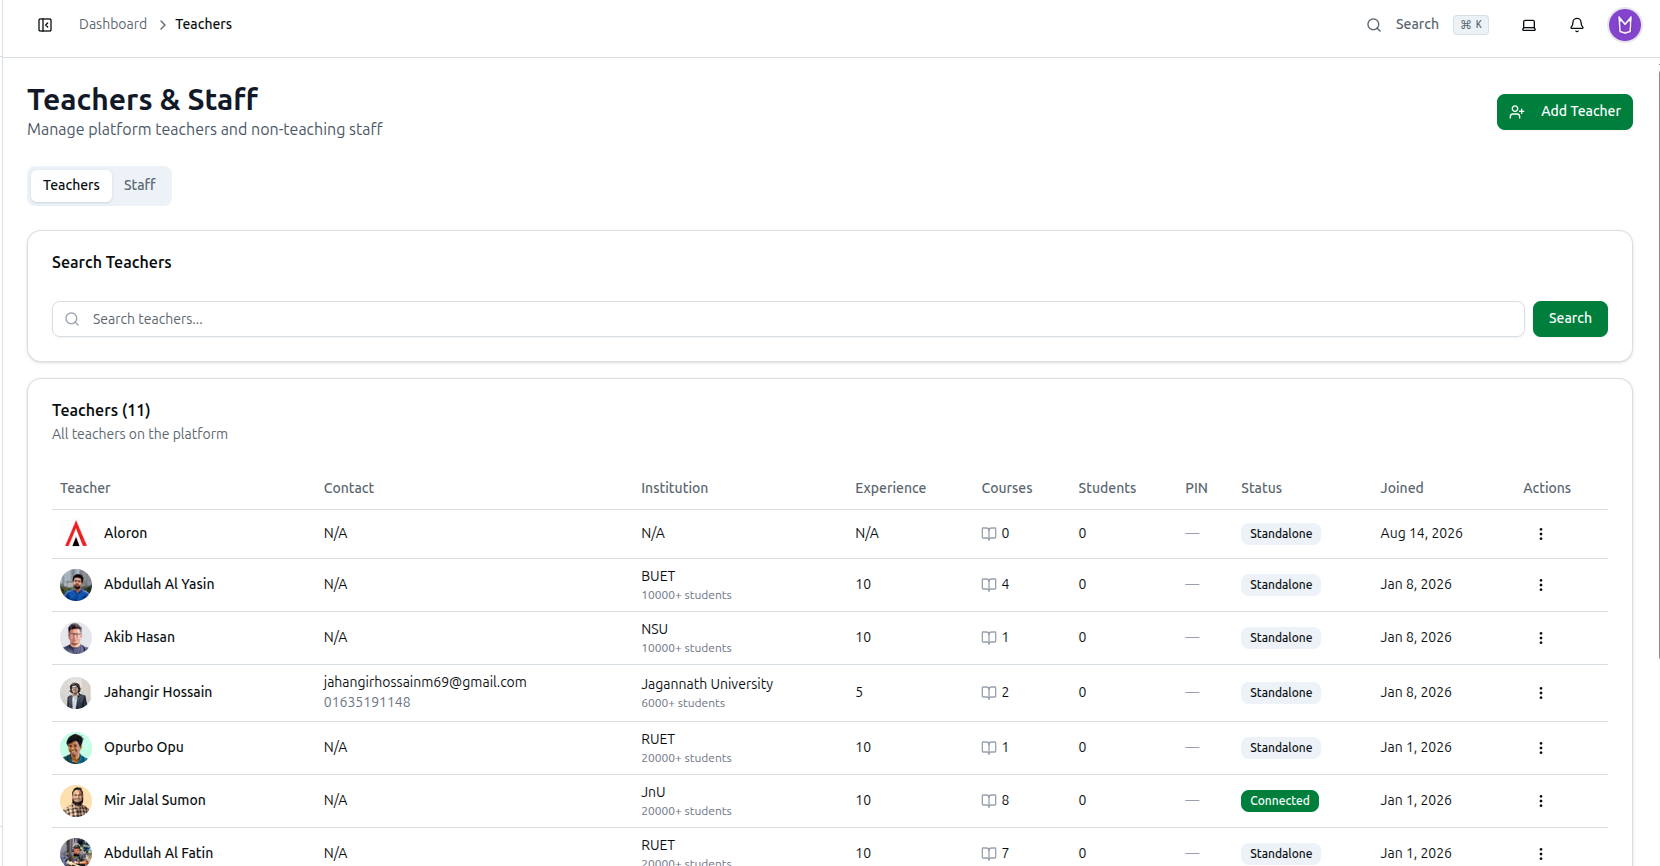
In the left sidebar under Students, click Teachers. The page opens with the heading Teachers & Staff and the note Manage platform teachers and non-teaching staff.
Two tabs sit under the heading:
- Teachers: teaching staff who can be assigned to courses and who appear on your public website.
- Staff: non-teaching people (office staff, guests, partners) who exist only for gate attendance.
The Add Teacher button sits at the top right of the page and stays visible on both tabs.
If you have not created anyone yet, the list shows No teachers found with the message You don't have any teachers yet. Add your first teacher to get started., plus an Add Teacher button and a Read Docs button.
2. Reading the Teacher List
The list card is titled Teachers (n) — where n is the number of teachers currently shown — with the description All teachers on the platform. Each row is clickable: clicking anywhere on a row (except the actions column) opens that teacher's profile page.
The columns are:
- Teacher: The profile photo — or the first letter of the name when no photo is uploaded — followed by the name. The first part of the bio (about 40 characters) appears in grey underneath.
- Contact: Email on the first line and mobile number on the second. Shows N/A when neither is filled in.
- Institution: The school or university you entered. Directly below it, the self-reported student figure appears as "100+ students" if you filled that field in.
- Experience: The years-of-experience text you entered, or N/A.
- Courses: The number of courses this teacher is currently assigned to.
- Students: A placeholder column that shows 0 for everyone. For the real enrolled-student count, open the teacher's profile page.
- PIN: The device PIN this teacher uses on biometric attendance devices. Shows a dash until they are enrolled on a device.
- Status: Connected when the teacher profile is linked to a login account on your platform, or Standalone when it is just a profile record with no login.
- Joined: The date the profile was created (for example, May 5, 2026).
- Actions: The three-dot menu described in section 5.
3. Searching for a Teacher
The Search Teachers card sits above the list.
- Type into the box marked Search teachers.... The visible list narrows as you type.
- Click Search to reload the list using your search text. The button reads Searching... while it works.
The search looks at the teacher's name, email, mobile number, bio text and institution, so you can find someone by any of those. There are no other filters or sorting controls on this tab — clear the box and click Search again to see everyone.
4. Adding a Teacher
Click Add Teacher to open the Add New Teacher window. Its note reads Create a new teacher profile. Teachers can be created with or without connecting to an existing user account.
Fill in the fields:
- Name *: Required. The teacher's full name.
- Avatar: The profile photo. Choose Upload Image to pick a file from your computer, Library to reuse an image you already uploaded, or URL to paste a direct image link. Photos are cropped to a 1:1 square and are automatically compressed to 512KB or less; the file you pick must be under 10MB.
- Email: (for example, teacher@example.com). Optional, but no two teachers in your organization can share the same email — you will be told Teacher with this email already exists in the organization if it is taken.
- Mobile: (for example, 01234567890). Also optional and also has to be unique inside your organization.
- Institution: The university, school or coaching centre the teacher is associated with.
- Students: A free-text figure you want shown publicly (for example, 100+ or 50-100). This is a claim you type in, not a calculated number.
- Experience: Also free text (for example, 5+ or 10-15 years).
- User ID: Optional. Leave it empty unless you are deliberately linking this profile to an existing account. It is far easier to make that link later from the Edit Teacher window, which gives you a dropdown instead of an ID box.
- Bio: A rich text editor for the teacher's background and expertise, with the usual formatting tools — headings, bold, italic, lists, quotes, tables, images and alignment.
Extra Info
At the bottom of the form is the Extra Info section — Add YouTube videos and social links shown on the public teacher card. Click Add to create a row, then set:
- The type dropdown: YouTube Video, Social / Website Link, or Text.
- Label: A short name for the entry (for example, Facebook).
- The value box: the link or text itself. The example hint changes with the type you picked.
Use the red bin icon at the end of a row to remove it. Rows left with an empty value are simply ignored when you save.
Click Create Teacher to finish (the button reads "Creating..." while it saves), or Cancel to discard.
5. Row Actions
Click the three-dot icon in the Actions column of any row to open its menu:
- View Profile: Opens the full teacher profile page (section 6).
- Edit Teacher: Opens the Update Teacher window (section 7).
- Profit Share Dashboard: Opens this teacher's earnings dashboard (section 8).
- View Courses: Present in the menu but not wired up — clicking it does nothing. To see a teacher's courses, open their profile page, where the Courses table lists them.
- Biometric Devices: Enrols this teacher on your attendance devices (section 9).
- Attendance Timetable: Sets their weekly working hours (section 9).
- Delete Teacher: Shown in red. See section 10.
6. The Teacher Profile Page
Clicking a row — or View Profile — opens a page headed Teacher Profile, with a Back button that returns you to the list. Three buttons sit at the top right: Profit Share, Edit and Delete.
Profile header
A large photo (or the teacher's initials) sits beside the name, with a badge reading either Connected User or Standalone. The bio appears below the name, followed by a row of details — email, mobile, institution and "5 years exp." — each shown only if you filled it in. The joined date (for example, Joined May 5, 2026) is always there.
Statistics
Four cards summarise the teacher:
- Courses: How many courses this teacher is assigned to.
- Students: The real total number of students enrolled across all of those courses.
- Experience: The years of experience you typed into the profile.
- Reported: The self-reported student figure from the Students field of the form.
Courses
The Courses card — Courses this teacher is assigned to — lists every course with:
- Course: The course name.
- Slug: The web address name of the course.
- Students: The number enrolled in that course.
- A View button that jumps straight to the course.
If nothing is listed you will see No courses assigned. Teachers are not attached to courses from this page — open the course itself, go to its Teachers tab, and use Add Teachers there.
7. Editing a Teacher
Choose Edit Teacher from the row menu, or Edit on the profile page. The Update Teacher window opens with every field already filled in.
The fields are the same as the creation form — Name, Avatar, Email, Mobile, Institution, Students, Experience, Bio and Extra Info — with one difference:
- Connect Admin: Replaces the User ID box with a dropdown listing the admin accounts in your organization. Pick one to link the login account to this teacher profile. If nothing is available you will see No organization admins found.
Be careful with Connect Admin: once an account is linked to a teacher profile, that person signs in as a teacher rather than as an admin. Only link accounts that are genuinely meant to teach.
Any extra info rows you delete here are removed for good once you save. Click Update Teacher to save, or Cancel to walk away.
8. Profit Share and Payouts
There are no payout fields on the teacher form itself. Click Profit Share Dashboard in the row menu, or Profit Share on the profile page, to open that teacher's earnings view. It shows:
- A date filter with All Time, Today, Yesterday, This Week, Last 7 Days, This Month, Last Month, Last 30 Days and Custom Range.
- Summary cards for Gross Share, Deductions, Withdrawn and Balance.
- Your Share Over Time, a daily chart broken down per course.
- Course Breakdown, listing Expected, Discount, Sales, Collected, Due, Gross Share, Withdrawn and Remaining for each course, with Hide zero-income and Hide settled checkboxes. The share percentage is not a column of its own — it appears as a small note under Gross Share.
- Individual Expenses and Withdrawals tables.
- Generate Report to produce a printable statement, and Copy Link to copy a shareable link to the dashboard.
The percentage each teacher earns on each course is not set here. In the left sidebar under Students, click Payments, open the Profit Share tab and use Add Teacher Share to pick a Course, a Teacher and a Share Percentage.
9. Attendance Devices and Timetables
These two options only matter if your organization uses fingerprint or card attendance devices at the gate.
Biometric Devices
Choosing Biometric Devices opens a window titled Biometric devices, followed by the teacher's name. It lists every device connected to your organization, with columns for Device, Status, Sync and Actions.
- Click Enroll next to a device to send this teacher to it. The teacher's PIN is assigned automatically the first time they are enrolled, and appears afterwards in the PIN column of the teacher list.
- Once the row shows as synced, the small icons let you trigger a fingerprint scan, trigger a face capture, upload a face photo instead of scanning, or register an RFID / ID card. The teacher then completes the scan at the device itself.
- The red bin icon removes them from that device again.
If no devices are set up you will see No attendance devices connected to your organization yet.
Attendance Timetable
Choosing Attendance Timetable opens Attendance timetable, followed by the teacher's name. This is an optional weekly working schedule:
- Days: Click the Mon to Sun buttons to select working days (Monday to Friday are selected by default).
- Start and End: The working hours (09:00 to 17:00 by default).
- Grace (min): How many minutes late is still acceptable (15 by default).
With a timetable saved, a check-in after the start time plus grace is marked LATE, and a scheduled day with no punch at all shows as ABSENT. Click Save to apply it, or Remove timetable to go back to recording plain check-in and check-out times only.
10. Deleting a Teacher
Click Delete Teacher in the row menu, or Delete on the profile page. A confirmation box asks Are you sure you want to delete this teacher?
Two things are worth knowing before you confirm:
- A teacher with courses cannot be deleted. You will get the message Cannot delete teacher who has courses assigned. Please remove the teacher from all courses first. Open each course, go to its Teachers tab and remove the teacher there, then try again.
- A connected login account is not deleted — it simply stops being a teacher account and goes back to a normal student account. The teacher is also removed from any attendance devices they were enrolled on.
There is no deactivate option for teachers — a teacher profile is either present or deleted. If you only want to stop someone teaching, remove them from their courses and leave the profile in place.
11. The Staff Tab
Click the Staff tab for non-teaching people. The card is titled Staff (n) with the description Office staff, guests, partners — tracked at the gate with daily check-in/check-out. Staff have no login account at all; they exist so the gate devices can recognise them.
Finding staff
- Type in the Search staff... box to filter the list.
- Tick Show inactive to include deactivated people, who appear greyed out.
The staff table
- Name: Photo or first initial, plus the name.
- Type: The free-text category badge (Staff, Guest, Partner, or anything you typed).
- Contact: Mobile on the first line, email underneath.
- PIN: Their device PIN, or a dash if not yet enrolled.
- Status: Active or Inactive.
- Joined: The date they were added.
Adding or editing staff
Click Add Staff to open Add staff member. Its note reminds you that Staff have no login account — they exist for gate attendance.
- Name: Required (for example, Abdul Karim).
- Type: Free text, with quick-pick buttons for Staff, Guest and Partner.
- Mobile (optional): (for example, 01XXXXXXXXX).
- Email (optional): (for example, name@example.com).
Click Save. Choosing Edit from a row menu opens the same window as Edit staff member.
Staff row actions
The three-dot menu on each staff row offers Edit, Biometric Devices, Attendance Timetable, Deactivate (or Reactivate for an inactive person) and Delete. The device and timetable windows work exactly as described in section 9.
Deactivating a staff member makes the devices forget them; reactivating means you need to enrol them on the devices again. Delete warns you first — if the person already has attendance history, they are deactivated instead of being removed, so past records stay intact. Either way the devices forget them.