Course37 Logo
Course Management

How to Manage Teachers in Course37 Dashboard

A comprehensive guide on how to navigate the Teachers module, add new teacher profiles, manage existing teachers, and update their information within the Course37 LMS.


Navigating the Teachers Dashboard

Dashboard URL: course37.com/dashboard/teachers

To access the teacher management area, locate and click on Teachers from the left-hand navigation sidebar under the STUDENTS section.

The main Teachers dashboard provides a centralized view of all instructors on your platform. At the top of the page, there is a Search Teachers section with a search input field ("Search teachers...") and a Search button to quickly find specific profiles.


Empty State: When No Teachers Exist

If you have not added any teachers to your platform yet, the "Teachers (0)" list will display an empty state message:

No teachers found You don't have any teachers yet. Add your first teacher to get started.

From this empty state, you have two options:

  • Add Teacher: A green button to open the creation form.
  • Read Docs: A dark button to open relevant documentation.

Adding a New Teacher

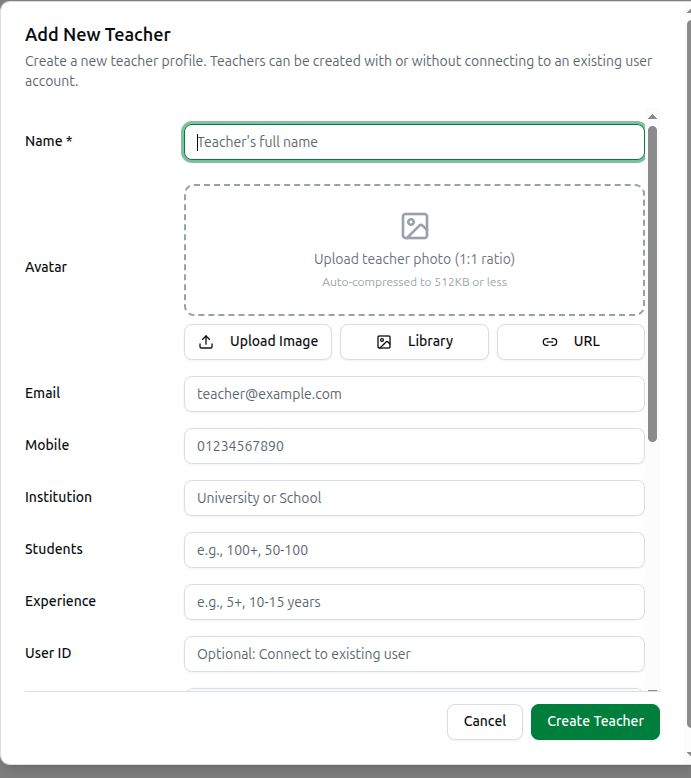
To create a new profile, click the green Add Teacher button located either in the empty state area or at the top right corner of the dashboard. This will open the Add New Teacher modal.

Form Details & Fields: Description: Create a new teacher profile. Teachers can be created with or without connecting to an existing user account.

  • Name *: (Required) Enter the teacher's full name (e.g., "Rakib Hossain").
  • Avatar: An upload area for the teacher's profile picture.
    • Guidelines: Requires a 1:1 ratio and is auto-compressed to 512KB or less.
    • Methods: You can add an image using three buttons: Upload Image, Library, or URL.
  • Email: Enter the teacher's email address (e.g., teacher@example.com).
  • Mobile: Enter the teacher's mobile number (e.g., 01234567890).
  • Institution: Enter the teacher's affiliated university or school.
  • Students: Enter the approximate number of students they teach (e.g., 100+, 50-100).
  • Experience: Enter their years of experience (e.g., 5+, 10-15 years).
  • User ID: An optional field to connect this profile to an existing user ID on the platform.
  • Bio: A comprehensive rich text editor to input the teacher's background and expertise. The editor includes formatting tools such as:
    • Undo / Redo
    • Text styles (T, H1, H2, H3)
    • Blockquote, Code block
    • Bold, Italic, Underline, Strikethrough
    • Bullet List, Numbered List
    • Table insert, Image insert, Math/Formula insert
    • Text alignment (Left, Center, Right, Justify)
    • Language toggles (U2A, A2U)

To finalize, click the green Create Teacher button. To abort, click Cancel.


Managing Existing Teachers

Once a teacher is added, they will appear in the main list under Teachers (All teachers on the platform).

The Data Table: The table displays the following columns for a quick overview:

  • Teacher: Displays the initial/avatar and Name.
  • Contact: Displays available contact info.
  • Institution: Displays affiliated institution.
  • Experience: Displays experience level.
  • Courses: Shows the number of courses assigned to them.
  • Students: Shows the total number of students enrolled in their courses.
  • Status: Shows their account status (e.g., Standalone).
  • Joined: Shows the date the profile was created (e.g., May 5, 2026).
  • Actions: Contains a three-dot menu icon for management options.

Action Menu Options: Clicking the three-dot icon in the Actions column reveals a dropdown menu with four choices:

  1. View Profile: View the teacher's public-facing profile.
  2. Edit Teacher: Open the form to modify their details.
  3. View Courses: See all courses assigned to this specific teacher.
  4. Delete Teacher: Remove the teacher from the platform (displayed in red text to indicate a destructive action).

Updating a Teacher Profile

Selecting Edit Teacher from the actions menu opens the Update Teacher modal.

Description: Update teacher information. Leave fields empty to keep current values.

The fields provided are nearly identical to the "Add New Teacher" form (Name, Avatar, Email, Mobile, Institution, Students, Experience, Bio), with one distinct difference:

  • Connect Admin: The User ID field from the creation step is replaced by a dropdown labeled Connect Admin. This allows you to link the teacher profile to an existing administrative account.
    • Note: If you click this dropdown and there are no admins available to link, a message will appear stating "No organization admins found".

To save your changes, click the green Update Teacher button. To discard changes, click Cancel.

#teachers #dashboard #manage users #add teacher #edit teacher #admin #lms setup