
Designing an answer sheet is a loop: build it in the editor, check it in the preview, print one, then commit to a class set. This guide covers that loop. For the template list and its settings panel, see How to Manage OMR Templates.
Open OMR Template from the left sidebar under Assessment.
1. Creating a Template
Create New Template opens the editor.
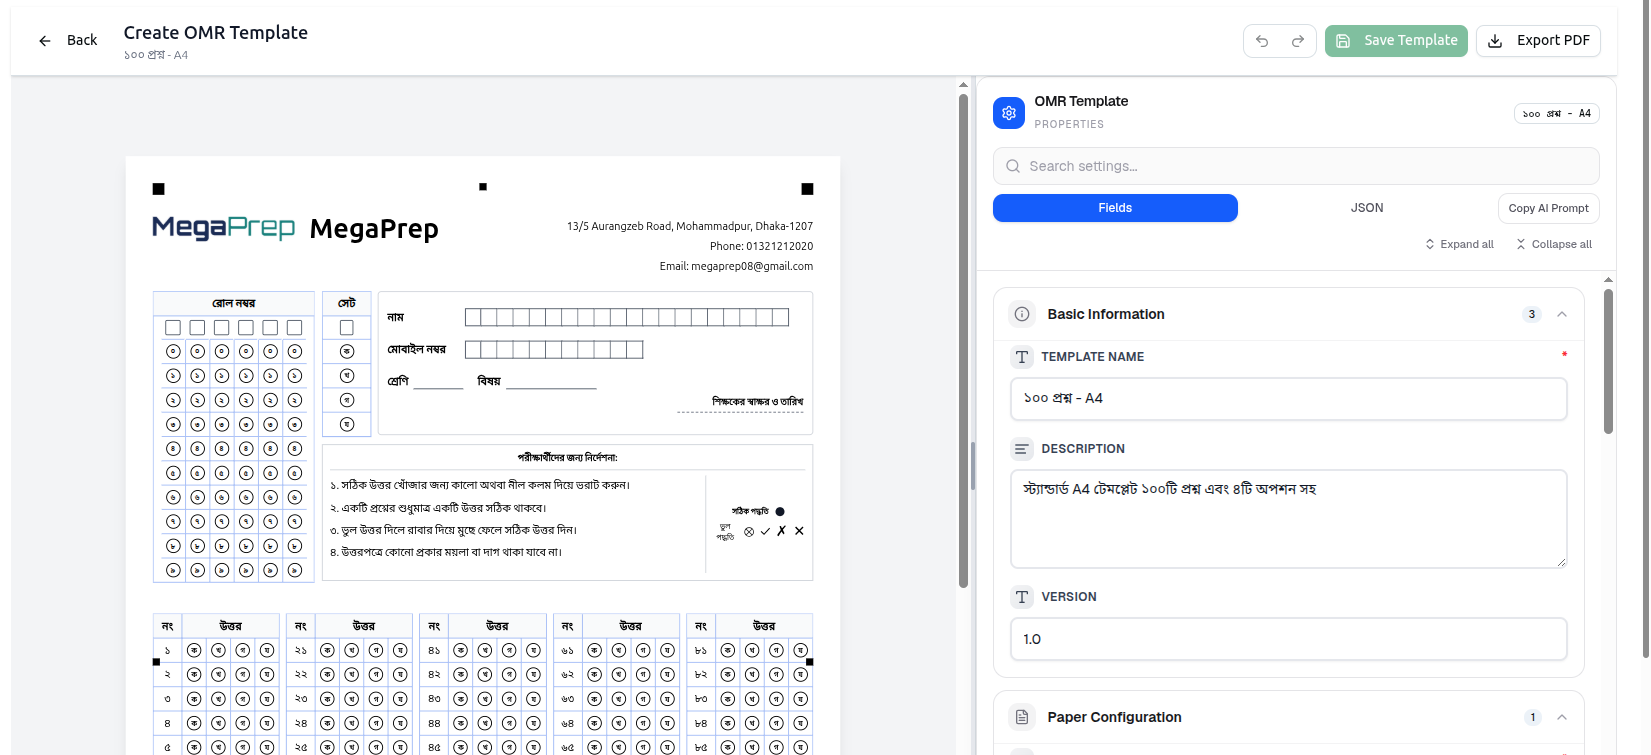
The page is headed Create OMR Template, with the template's name beneath it. Editing an existing one reads Edit OMR Template instead.
A new template does not start blank — it loads the 100-question A4 preset, so you are adjusting a working sheet rather than building one from nothing.
The layout
- Left — a live preview of the printed sheet, redrawn as you edit.
- Right — the OMR Template · PROPERTIES panel.
- Between them — a divider you can drag to give either side more room.
The toolbar
| Control | What it does |
|---|---|
| Back | Return to the template list |
| Undo / Redo | Also Ctrl+Z and Ctrl+Y, up to 50 steps |
| Save Template | Greyed out until you make a change and set a name |
| Export PDF | Print the sheet at its real paper size |
An Unsaved changes badge appears beside the title the moment you edit anything.
Finding a setting
The panel groups settings into collapsible sections, each showing how many fields it holds — Basic Information carries the Template Name (required), Description and Version; Paper Configuration sets the page itself.
Search settings... is the quickest way in: type part of a field's name instead of hunting through sections. Expand all and Collapse all open or close everything at once.
Two extras sit beside the Fields tab: JSON shows the same template as raw configuration — handy for copying a design between organizations — and Copy AI Prompt copies a description of the template for use with an AI assistant.
2. Previewing a Template
From the template list, Preview on any card opens the read-only view.
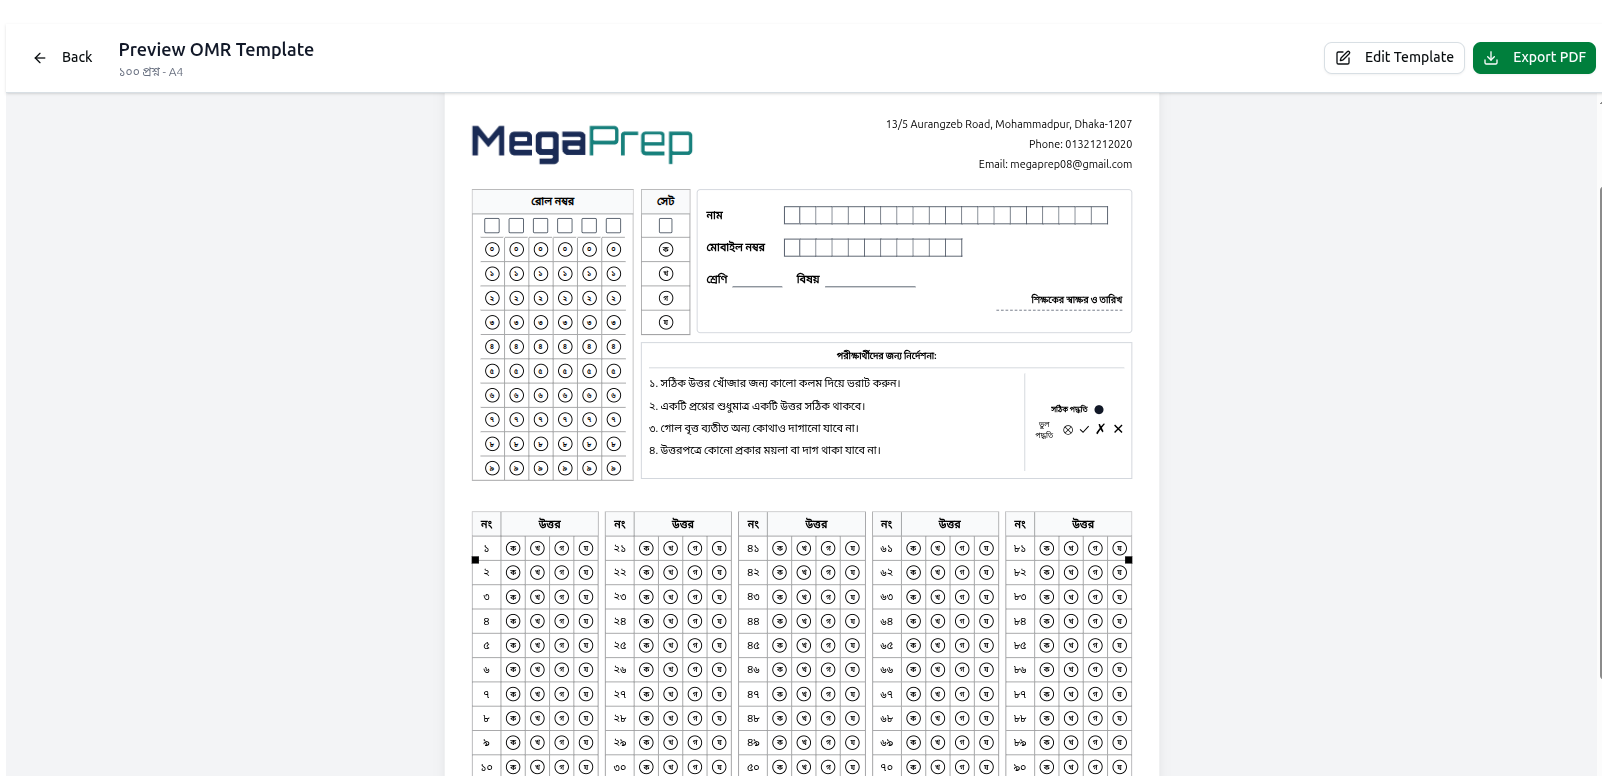
This is the sheet without the editor around it — the closest thing on screen to what comes out of the printer. Two buttons: Edit Template to go back and change something, and Export PDF to print.
What to check before printing
| Area | Look for |
|---|---|
| Header | Your organization's name, address, phone, email and logo, loaded from your profile |
| Roll number grid | Enough digit columns for your longest roll number |
| Set column | Present, if you are using question sets A/B/C/D |
| Student fields | Name, mobile, class, subject, signature — as many boxes as you need |
| Instructions | Readable, with the correct and incorrect shading examples |
| Answer grid | The right number of questions and options per question |
| Registration marks | The small black squares that let the scanner find and align the page |
The black registration squares are the single most important thing on the sheet. The scanner uses them to locate and straighten the page before reading any bubble. If they are missing, faint, or cropped, every sheet in the batch fails — and the failure looks like bad handwriting rather than a printing problem. Confirm they are present and solid in the preview, and again on the paper copy.
3. Printing
Export PDF from either the editor or the preview. Course37 sets the page size to match the template — A4 templates print A4, others print Letter.
Print at 100%, never "fit to page". Scaling moves every bubble away from the coordinates saved with the template, and the scanner then reads the wrong positions. In your print dialog set scale to 100% or Actual size, and turn off any "shrink to fit margins" option.
Print one sheet first. Hold it up and check:
- The registration squares are complete and solid black.
- Bubbles are cleanly separated, not merged or blurred.
- Text is sharp — a low-toner print scans badly.
- Nothing is cut off at the edges.
Then run the class set.
The Full Loop
- Create New Template — adjust the preset.
- Set the Template Name and organization details.
- Save Template — coordinates are generated and validated.
- Preview — check everything in the table above.
- Export PDF and print one sheet at 100%.
- Inspect it, then print the class set.
- After the exam, scan and go to Exam Results → Process OMR Sheets.
Full guide: OMR Processing & CSV Upload
Troubleshooting
| What you see | What it means |
|---|---|
| Save Template is greyed out | Nothing changed yet, or Template Name is empty |
| Saving fails on coordinate validation | The layout will not fit. Fewer questions, larger paper, or tighter spacing |
| The preview looks different from the printed sheet | The print dialog scaled it. Print at 100% |
| Wrong organization details in the header | They load from your profile — fix them under Organization → Basic Info |
| Scans fail across a whole batch | Check the registration squares printed fully, and that sheets were not scaled |
| The roll number grid is too short | Add digit columns in the properties panel before printing |
Related: Manage OMR Templates · OMR Processing · Question Sets & Answer Keys