
Everything about an OMR sheet is configured from the properties panel on the right of the template editor. This guide covers finding your way around it, and the two sections you set first — Basic Information and Paper Configuration.
Navigating the Panel
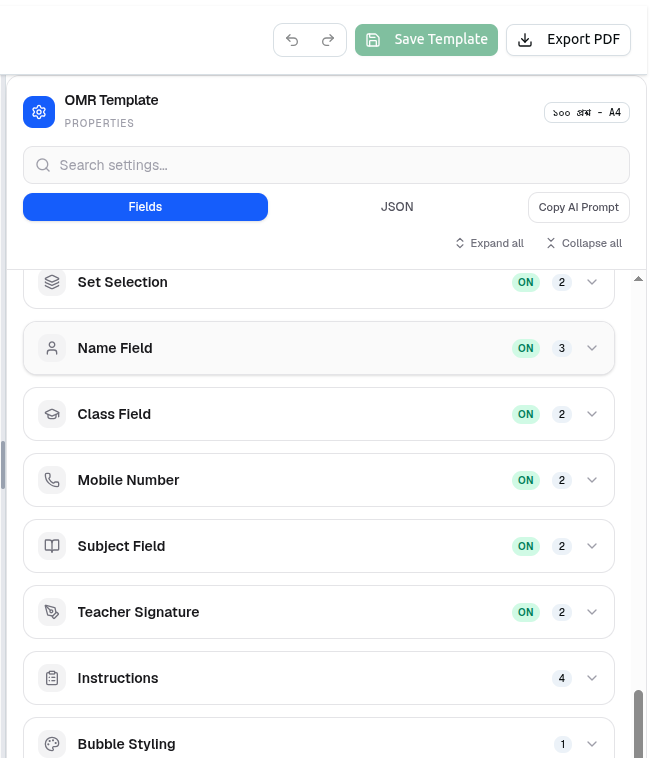
The panel is headed OMR Template · PROPERTIES, with the current template's name in the corner.
Search settings... is the fastest way in. There are fifteen sections, so typing part of a field's name beats scrolling.
Fields and JSON are two views of the same template. Fields is the form. JSON is the raw configuration — useful for copying a design between organizations, or for reading every value at once. Copy AI Prompt copies a description of the template for use with an AI assistant.
Expand all and Collapse all open or close every section together.
Reading a section header
Each section shows two things on the right:
- A field count — how many settings it contains, such as 3 or 2.
- An ON badge on the optional ones — Set Selection, Name Field, Class Field, Mobile Number, Subject Field and Teacher Signature can each be switched off entirely.
Turning a section off removes that block from the printed sheet. If your students never write a subject on the paper, switch Subject Field off and the space goes back to the rest of the layout. Fewer blocks also means a cleaner sheet and fewer things for the scanner to misread.
The fifteen sections
Basic Information · Paper Configuration · Language Settings · Header Information · Roll Number · Set Selection · Name Field · Class Field · Mobile Number · Subject Field · Teacher Signature · Questions · Bubble Styling · Detection Settings · Instructions
Basic Information
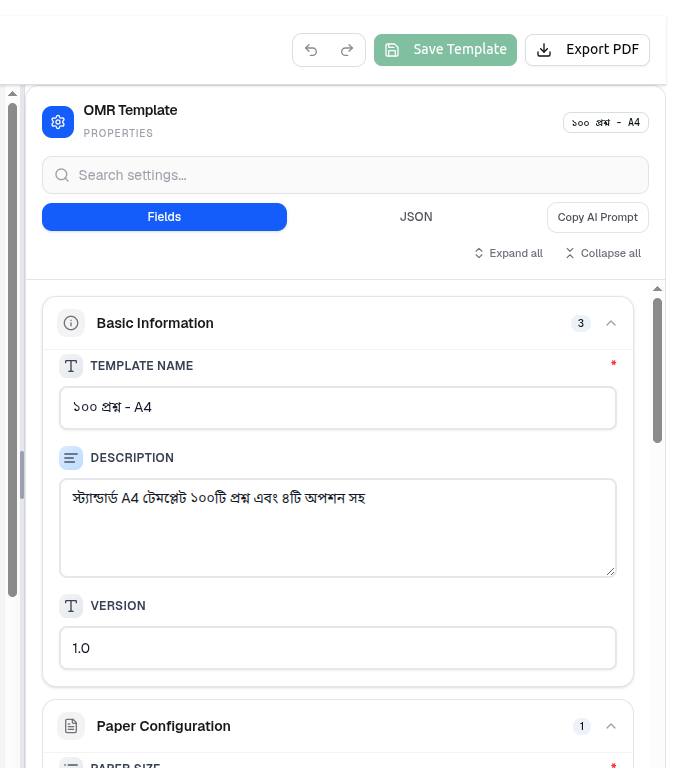
Three fields, and the first is the one that blocks saving.
| Field | Notes |
|---|---|
| Template Name (required) | e.g. 100 Questions MCQ Sheet. Save Template stays greyed out until this is filled |
| Description | Describe this OMR template... — a note for your team, such as Standard A4 template with 100 questions and 4 options |
| Version | A free-text version marker such as 1.0 |
Use Version deliberately. Templates are not versioned automatically, and a sheet already printed cannot be changed. Bump this whenever you alter a layout that is in circulation, and put the version in the Description too, so nobody scans this year's sheets against last year's coordinates.
Paper Configuration
Paper Size (required) decides how much fits on a page — and it is the setting you cannot change casually once sheets are printed.
| Option | What you get |
|---|---|
| A4 Full Page | 100 questions, one sheet per student |
| A4 Half Page | 45 questions × 2 copies per sheet |
| A4 Quarter Page | 15 questions × 4 copies per sheet |
Half and quarter pages print several answer sheets on one piece of paper, then get cut apart. For a 15-question weekly quiz across 200 students, quarter-page turns 200 sheets of paper into 50 — a real saving on paper and printing time. Each copy still carries its own registration marks and scans independently.
Match the paper size to your question count. Choosing A4 Full Page for a 15-question quiz wastes most of the sheet; choosing A4 Quarter Page for a 100-question exam will fail coordinate validation when you save, because the bubbles cannot fit.
Language
Language (required) — English or Bangla — sets the language of the printed labels and instructions. The template in these screenshots is Bangla, which is why its headings read রোল নম্বর and সেট.
Separately, Digit Type (Roll Number) (required) controls the numerals inside the roll number grid: English, Bangla or Custom.
These two are independent, and both matter for scanning. You can print Bangla labels with English digits — common where students are used to Latin numerals on forms. What matters is that the digit type matches what students will actually shade, because the scanner reads positions against the grid you defined.
Order of Work
- Template Name — nothing saves without it.
- Paper Size — sets the space everything else fits into.
- Language and Digit Type.
- Then the layout sections: header, roll number, set selection, student fields, questions, bubbles, instructions.
- Save Template — coordinates are generated and validated.
Getting paper size right early avoids redoing the layout when it turns out the questions do not fit.
Troubleshooting
| What you see | What it means |
|---|---|
| Save Template is greyed out | Template Name is empty, or nothing has changed yet |
| Saving fails on coordinate validation | Too many questions for the paper size. Increase the size or reduce the count |
| A block is missing from the printed sheet | That section is switched OFF. Find it in the panel and turn it on |
| Labels print in the wrong language | Change Language under Paper Configuration |
| Roll numbers show the wrong numerals | Change Digit Type (Roll Number) — it is separate from the sheet language |
| You cannot find a setting | Use Search settings... rather than scrolling fifteen sections |
Related: Create and Preview OMR Templates · Manage OMR Templates · OMR Processing