
1. Where the Bulk Communication Dialog Opens From
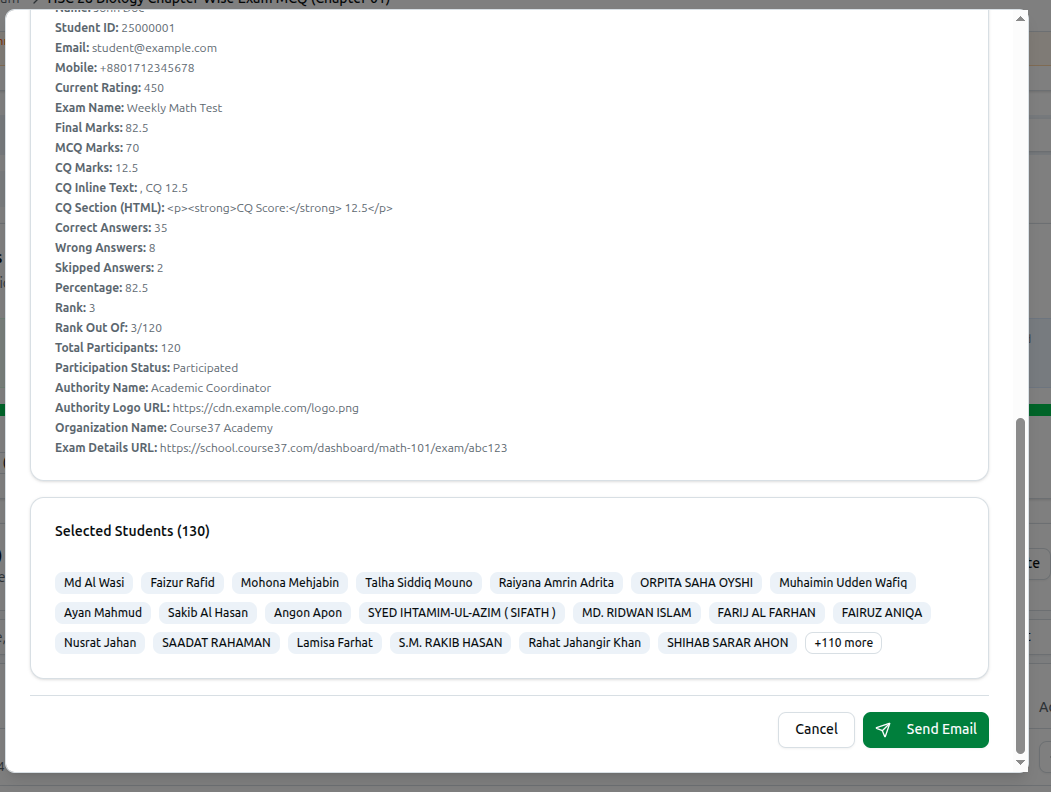
Bulk messages are always sent to a group of students you have already picked, so every entry point works the same way: choose the students first, then click the send action. The dialog that opens is titled Send Bulk Communication and its subtitle confirms the count, for example Send email, SMS, or push notification to 42 selected students.
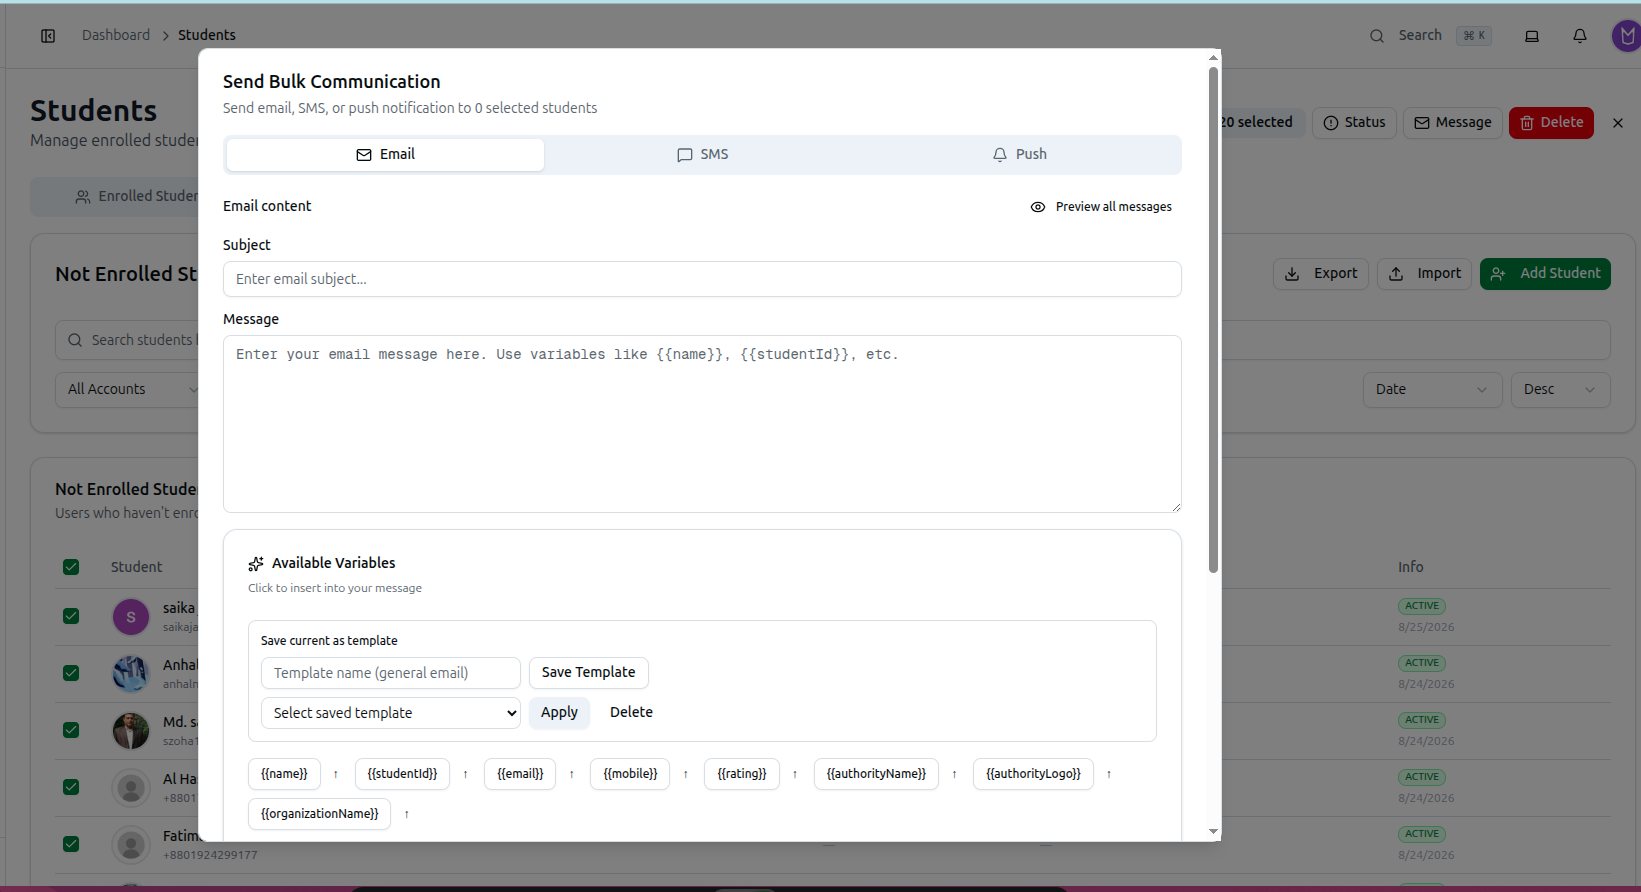
There are four places it opens from:
From the student list
- In the left sidebar under Students, click Students.
- Stay on the Enrolled Students tab and narrow the list using the search box (name, email, mobile, ID, or roll) or the Filters panel — Tags, Courses, Batch, Account, Student status, Medium, Institution, Paid amount and Last call.
- Tick the checkbox beside each student, or use the checkbox in the table header to select every row shown on the current page.
- A badge showing how many you picked — for example 12 selected — appears in the toolbar with extra buttons. Click Message.
If you click Message with nothing ticked, you get the warning "Please select at least one student".
From exam results
- In the left sidebar under Assessment, click Resources, then Exams, and open the exam.
- Go to the Results & Analysis tab.
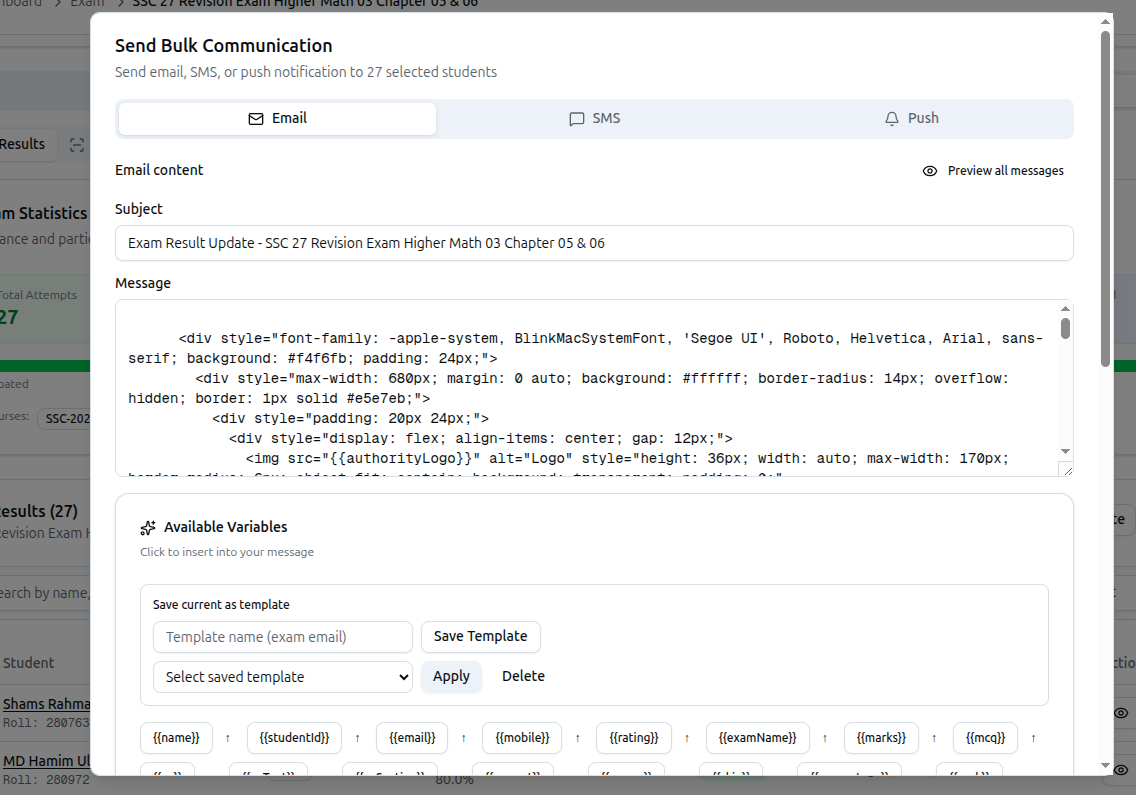
- On the Exam Results sub-tab, click More and choose Notify All. If you have ticked some result rows first, the item reads Notify (N) and only those students are used.
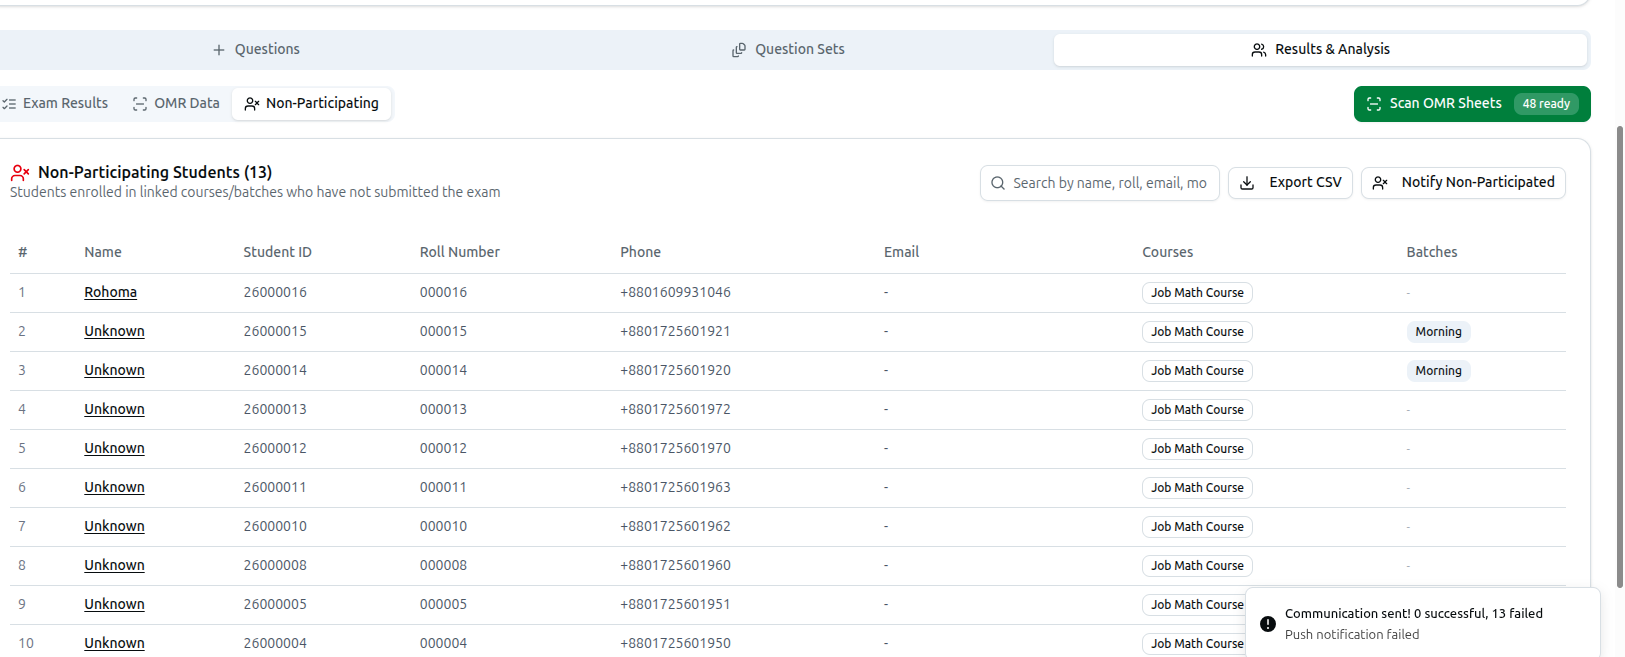
- On the Non-Participating sub-tab, click Notify Non-Participated to message everyone who did not sit the exam.
With nothing ticked, Notify All covers every result that matches your current search and set filter across all pages — not only the rows visible on screen.
From an assignment
- In the left sidebar under Assessment, click Resources, then Assignments, and open the assignment.
- On the Submissions tab, click More, then Notify All (or Notify (N) for ticked rows).
- On the Not Submitted tab, click Notify All (or Notify (N)) to chase students who have not handed in.
From an attendance session
- In the left sidebar under Students, click Attendance and open the session.
- Click SMS Absent (N) to message every student marked absent — the dialog opens on the SMS tab — or tick individual students and click Send Communication.
Exam, assignment and attendance sends open with a ready-made message already written for you, which you can edit before sending.
2. Choosing the Channel
Across the top of the dialog are three tabs. These are the only channels available:
- Email: Sends to the email address on each student's account.
- SMS: Sends a text message to the mobile numbers saved on each student record.
- Push: Sends an in-app notification to students who have the app installed and notifications switched on.
Pick the channel before you start writing. Switching tabs reloads that channel's starting text and replaces whatever is in the boxes — when the dialog was opened from exam results, each channel already has its own wording prepared.
3. Picking Recipients
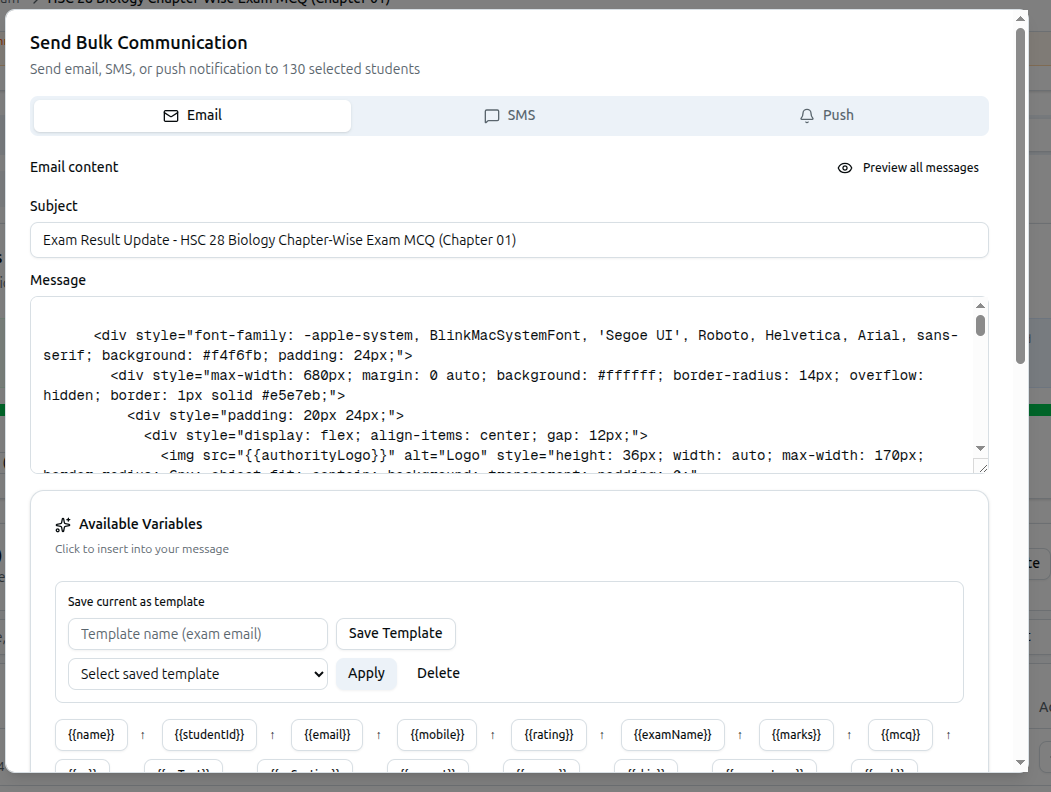
The Selected Students card near the bottom of the dialog confirms who will be messaged. It shows the total in the heading, the first 20 names as small chips, and a +N more chip for the rest. You cannot add or remove students inside the dialog — close it, change your selection, and open it again.
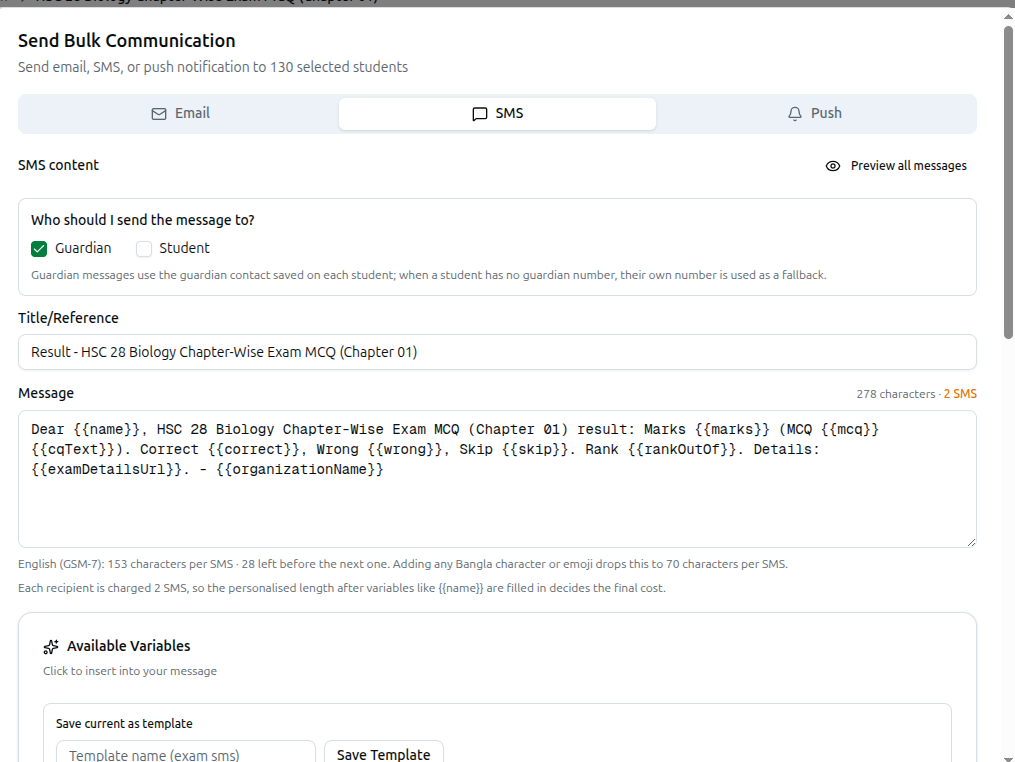
For SMS only, an extra box appears at the top of the tab: Who should I send the message to?
- Guardian: Ticked by default. Uses the guardian contact saved on each student. If a student has no guardian number, their own number is used instead so the message still goes out.
- Student: Uses the student's own mobile number.
You can tick both — but note that this sends the message twice for that student and is charged twice. If the guardian number and the student number are identical, only one message goes out. If you untick both, you get the message "Select at least one SMS recipient (student or guardian)".
4. Writing the Message
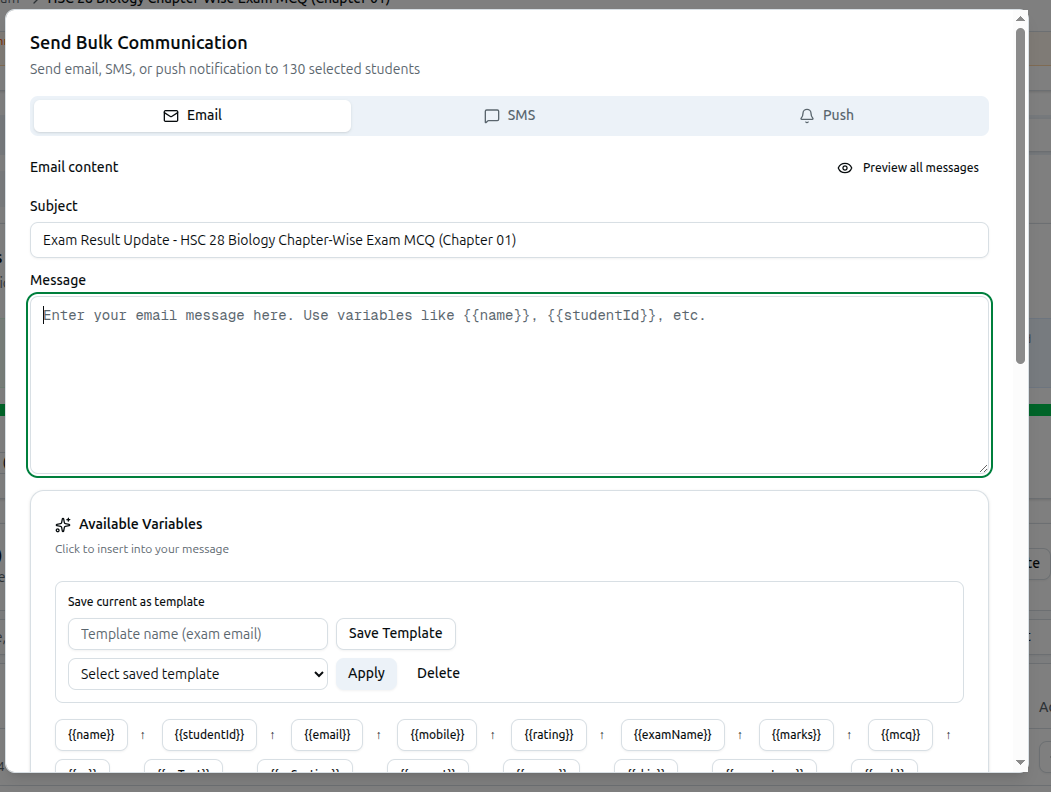
Each tab has its own fields.
- Subject: The subject line the student sees.
- Message: The body of the email.
SMS
- Title/Reference: A label for your own reference only — it is not part of the text message the student receives.
- Message: The text that is actually sent. Keep it short (see the segment counter below).
Push
- Notification Title: Limited to 65 characters, with a live 0/65 characters (recommended max for title) counter underneath.
- Notification Body: Limited to 240 characters, with a live 0/240 characters counter. Push notifications work best short and to the point, and only reach students who have notifications enabled on their device.
All three channels need both a subject/title and a message. If either is empty, sending is refused with "Please enter a subject/title" or "Please enter a message".
5. Personalisation Placeholders
The Available Variables card lists every placeholder you can drop into a message, with the note Click to insert into your message. Each one is a button showing the placeholder itself, for example {{name}} — clicking it adds the placeholder to the end of your message. The small ↑ button next to each one adds it to the subject or title instead. Underneath the buttons is a plain-language list showing what each placeholder means and a sample value.
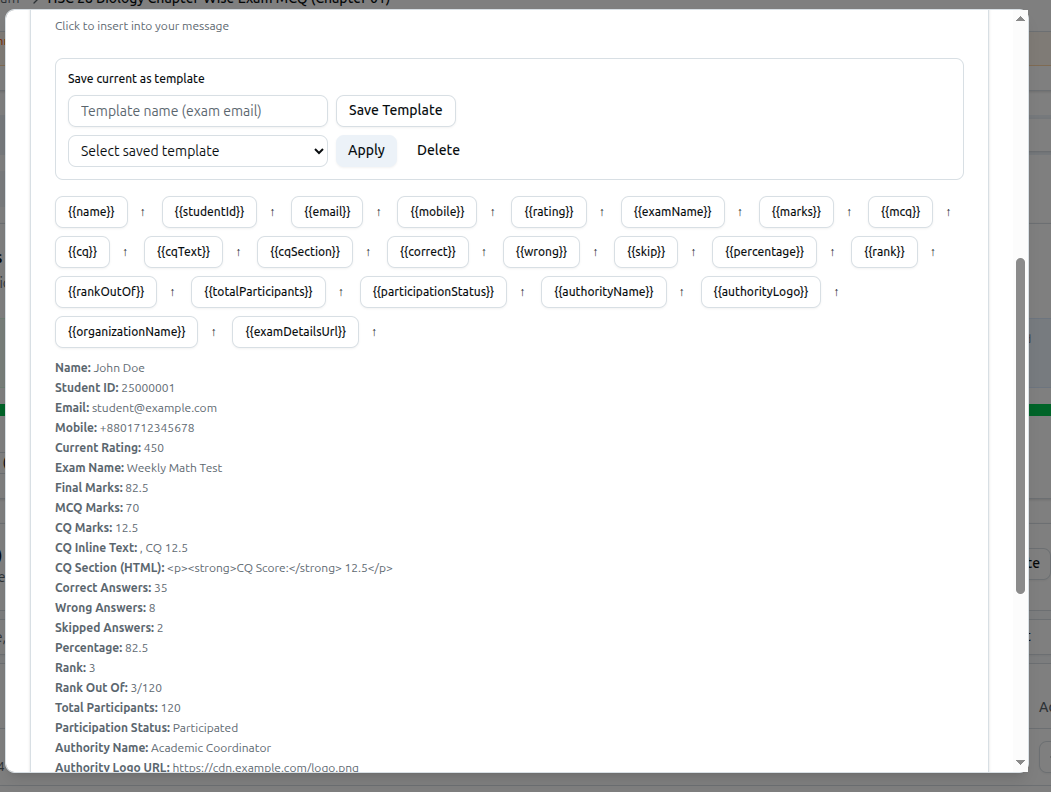
These placeholders are always available:
- {{name}}: The student's name (John Doe).
- {{studentId}}: Their student ID (25000001).
- {{email}}: Their email address.
- {{mobile}}: Their mobile number.
- {{rating}}: Their current rating (450).
- {{authorityName}}: The name of the person sending on behalf of the institution.
- {{authorityLogo}}: Your organisation logo image address, for use inside email designs.
- {{organizationName}}: Your organisation name.
When the dialog is opened from exam results, these exam placeholders appear as well:
- {{examName}}, {{marks}}, {{mcq}}, {{cq}}, {{cqText}}, {{cqSection}}
- {{correct}}, {{wrong}}, {{skip}}, {{percentage}}
- {{rank}}, {{rankOutOf}} (3/120), {{totalParticipants}}, {{participationStatus}}
- {{examDetailsUrl}} — a link the student can open to see the full result
A student with no exam result gets N/A in place of their marks, rank and percentage, so their message would read Marks N/A, Rank N/A. The preview step exists precisely so you catch this before sending.
6. Saving and Reusing a Template
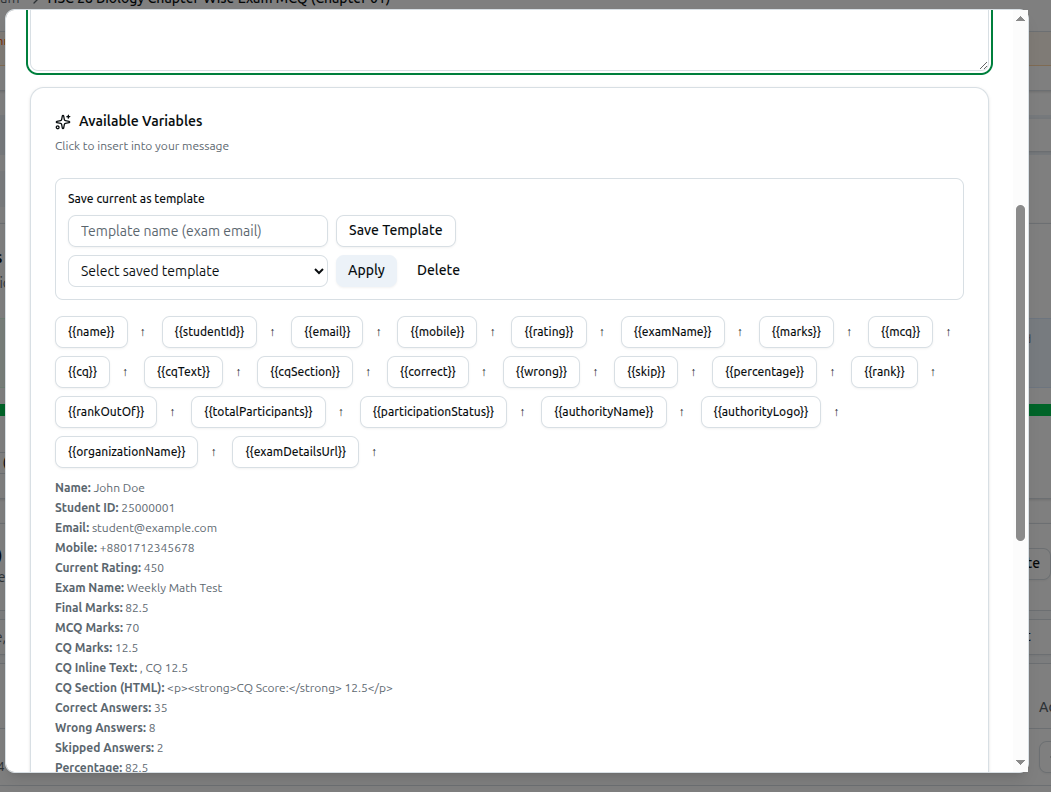
Inside the same card is a small Save current as template box:
- Type a name into the template name field.
- Click Save Template. Saving again with the same name overwrites it (Template updated).
- To reuse it later, choose it from the Select saved template dropdown and click Apply — the subject and message are filled in for you.
- Delete removes the selected template.
Templates are kept separately for each channel and separately for general sends versus exam sends, so the dropdown only ever shows the ones that fit what you are doing now. They are stored in the browser you are working in, so they will not appear for a colleague or on another computer. Both a subject and a message are required before a template can be saved.
7. The SMS Character and Segment Counter
On the SMS tab, the right-hand side of the Message label shows a live count in the form 132 characters · 1 SMS. The SMS number turns amber as soon as it goes above 1, because that is the moment the send starts costing more.
Below the box, a hint line explains why:
- English (GSM-7): 160 characters per SMS — plain English, digits and basic punctuation.
- Unicode (Bangla/emoji): 70 characters per SMS — a single Bangla character, emoji or curly quote flips the whole message to Unicode and drops the limit from 160 to 70, even if the rest is English.
The line also tells you how much room is left, for example · 28 left before the next one.
How segments affect cost
- A message that fits in one segment is charged as 1 SMS.
- Once a message runs over, it is split into parts and each part is charged separately. Parts are slightly smaller than a standalone message: 153 characters per part in English, 67 per part in Unicode.
- Each recipient number is charged for the full number of parts. Sending to both Guardian and Student doubles the cost for that student.
- The count in the composer is for the text as typed. The real cost depends on the personalised length after placeholders like {{name}} are filled in, which is why the preview recalculates it per student.
8. Previewing Every Message
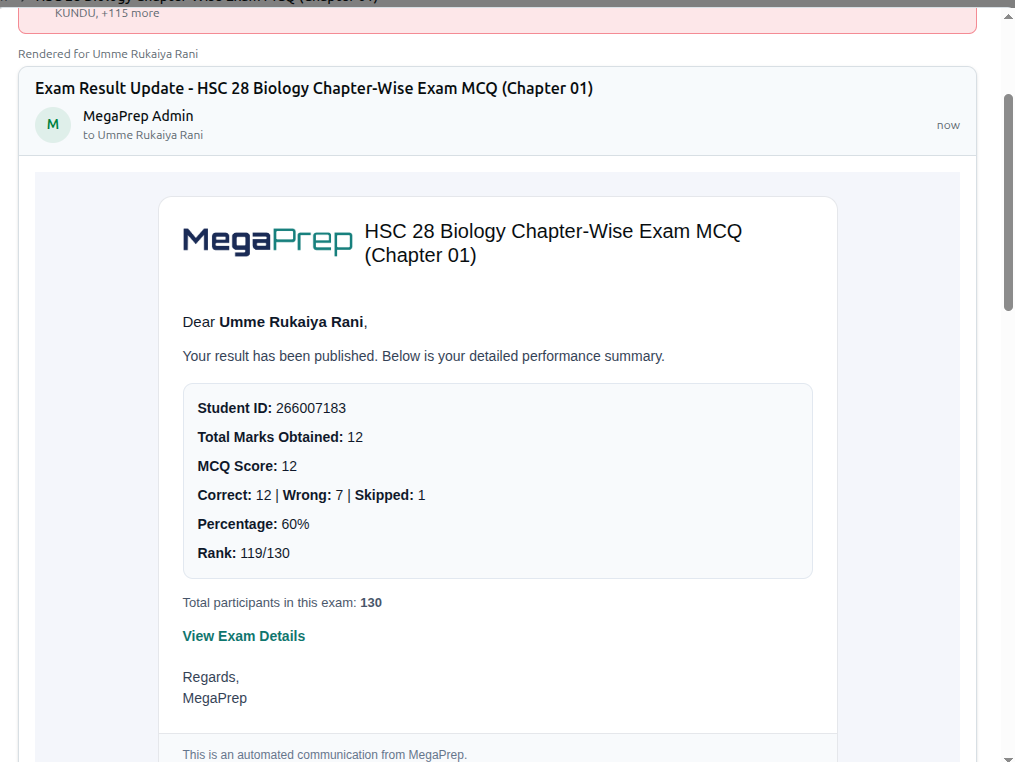
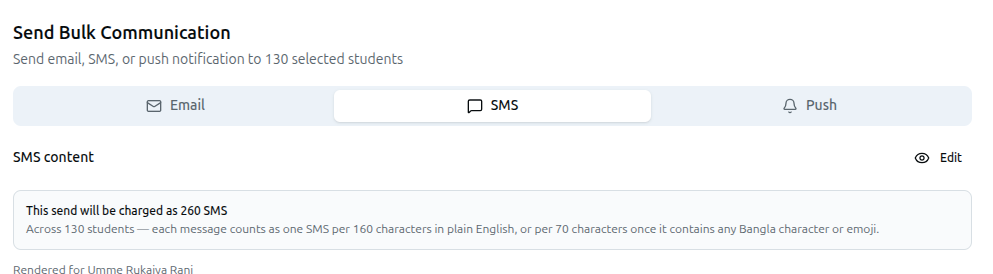
At the top right of each tab is a Preview all messages button. It builds every message exactly as it will be sent — real names, real marks, real ranks — without sending anything. While it works, the button reads Building...; when it is done the button becomes Edit so you can go back. Changing the message, the subject or the SMS recipient tick boxes cancels the preview, so preview again after every edit.
The preview shows, in order:
- An amber warning (exam sends only): "N of M students have no exam result", listing the first eight names. Their marks, rank and percentage will read N/A.
- A red warning: "N students have no contact and will fail", listing who they are.
- A cost box (SMS only): "This send will be charged as N SMS", with a reminder that the count is one SMS per 160 characters in plain English, or per 70 once any Bangla character or emoji is present.
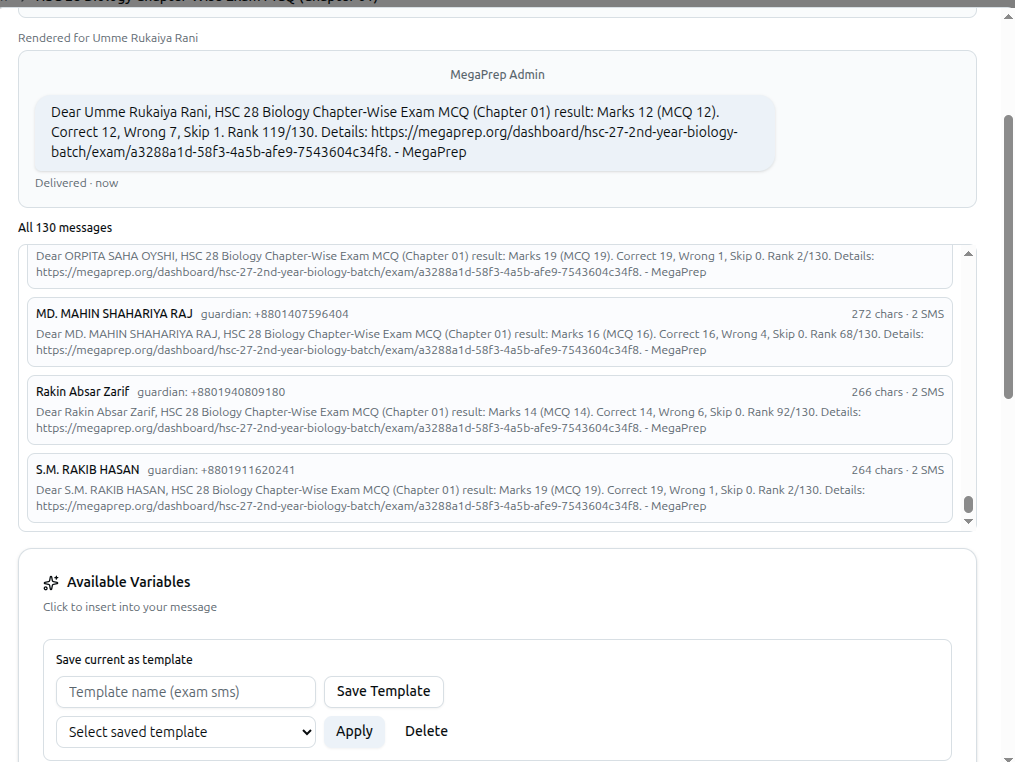
- A realistic sample rendered for the first student — an inbox-style card for email, a phone chat bubble for SMS, or a lock-screen banner for push.
- All N messages — a scrollable list with one row per student showing their name, the actual numbers or email address the message will go to (or no contact), a no result badge where relevant, and for SMS the exact chars · SMS count for that student's personalised text.
Previewing needs a message and at least one student; for SMS it also needs at least one recipient type ticked.
9. Sending and Reading the Delivery Results
- Click the send button at the bottom right. Its label matches the tab: Send Email, Send SMS or Send Notification.
- While it runs, the button reads Sending.... Cancel closes the dialog and discards what you wrote.
- When it finishes, a notification appears in the corner of the screen: "Communication sent! 40 successful, 2 failed".
If nothing failed, the notification is green with All messages sent successfully! underneath. If anything failed, it is shown in red and stays on screen for about ten seconds with the reason listed, so read it before it disappears. Common reasons are No email address, No mobile number, No guardian contact and No user account linked, plus any message returned by the SMS provider itself — such as an invalid API key, an unwhitelisted server IP, or insufficient balance.
The dialog then closes and, on the student list, your selection is cleared. There is no separate delivery log screen, so the count in that notification is your record of the send. Fix the contact details of the students named in the preview warnings and send again just to them.
To keep an eye on how much you are using, go to the left sidebar under Account, click Uses & Plans, and look at the Platform Free Resources card. The Platform SMS and Platform Emails rows show what you have used, your allocation and what remains, with a status of Healthy, Warning or Critical.
10. Setting Up the SMS Provider under Integrations
SMS will only leave the building once a provider is connected.
- In the left sidebar under Platform, click Integrations.
- Open the Communication section (Email & SMS integrations).
- Find the BulkSMS BD card — Send SMS via BulkSMS BD. This is the supported SMS provider. The badge on the card reads Active or Inactive.
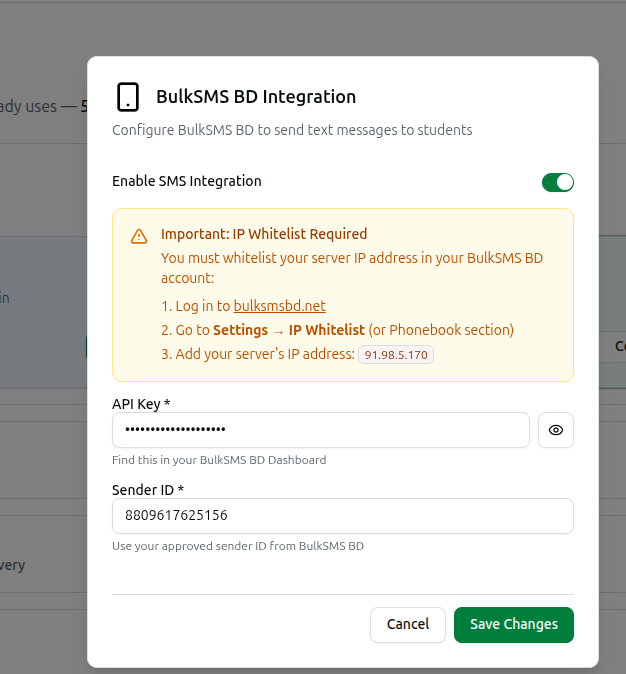
- Click Set up (or Configure if it is already active) to open the BulkSMS BD Integration dialog.
- Turn on Enable SMS Integration.
- Fill in API Key (from your BulkSMS BD dashboard — use the eye icon to check what you typed) and Sender ID (your approved sender ID).
- Read the amber Important: IP Whitelist Required notice. You must log in to your BulkSMS BD account and add the server IP address shown in that notice to your IP whitelist, otherwise every send will be rejected.
- Click Save Changes.
Email is configured from the Email (SMTP) card in the same section, and in-app alerts from the Push Notifications card.
If you have not connected your own SMS account, sends fall back to the platform's free SMS allocation shown on the Uses & Plans page. Once that allocation is exhausted, connecting your own BulkSMS BD account is what keeps messages going out.