
1. Finding the AI Chats Tab
In the left sidebar under Assessment, click Resources, then click AI Chats. The Resources page also carries its own tab row across the top — All Items, Videos, Exams, Live Classes, Assignments, PDFs, Questions and AI Chats — so you can jump straight here from any other resource list.
This tab is a read-and-clean-up view of the conversations your students had with the AI study assistant. Everything listed belongs to your organization only — you can never see another organization's chats, and no other organization can see yours. Admins, teachers and moderators with access to Resources can open the tab.
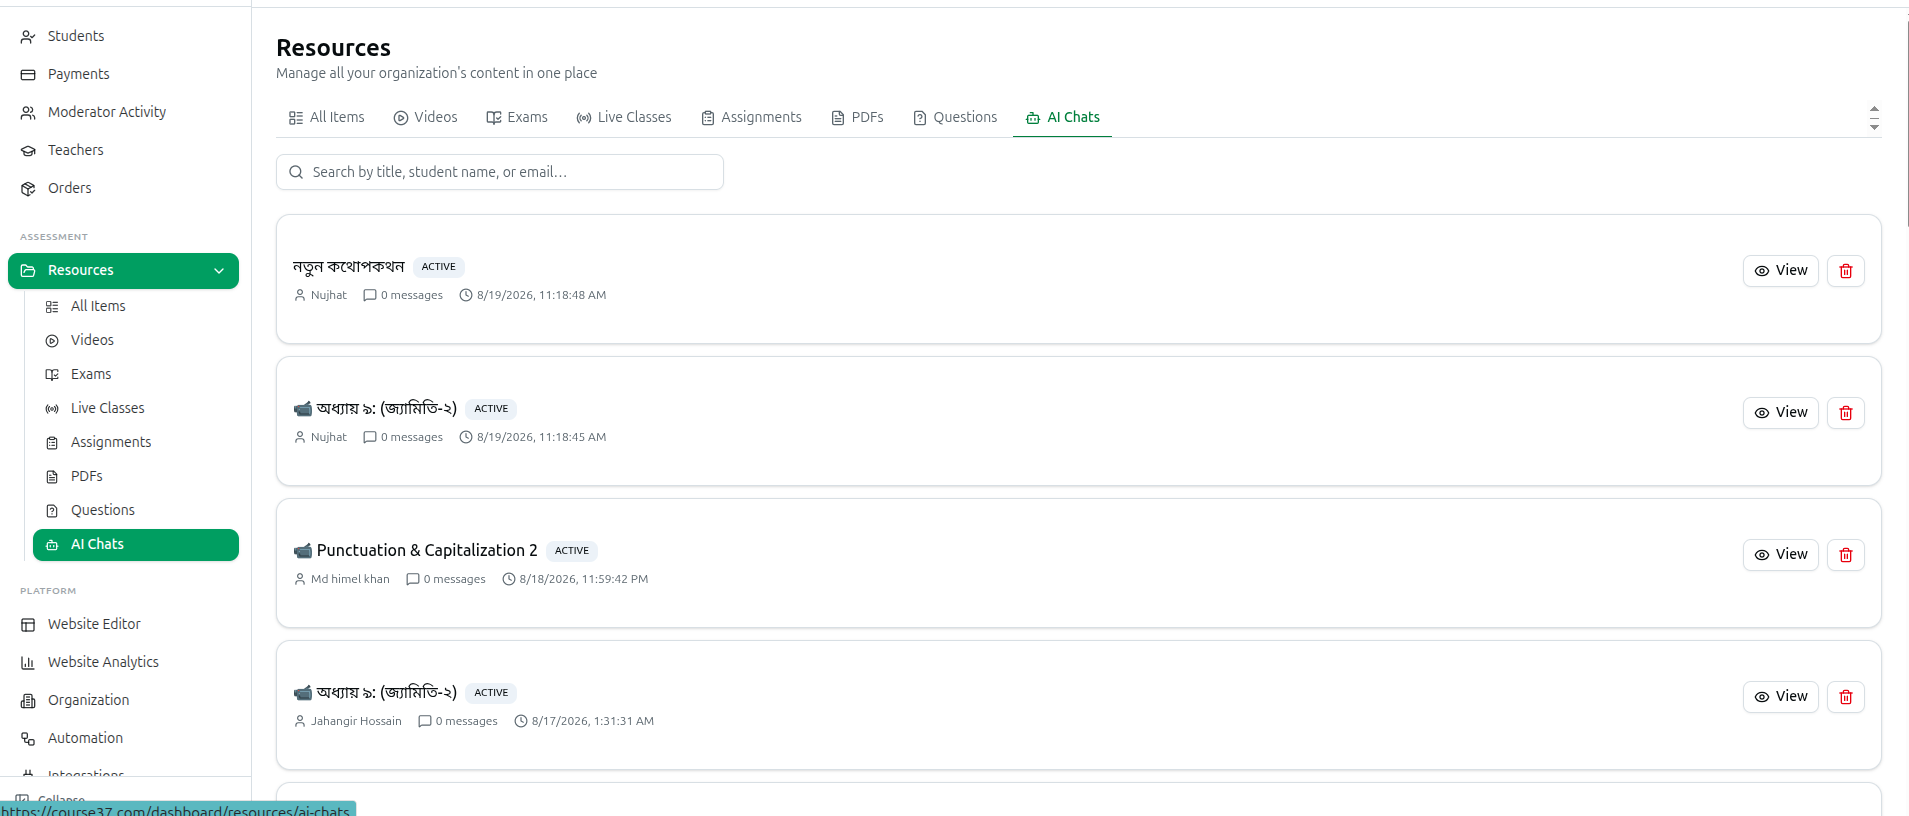
This tab looks different from the rest of Resources. Conversations are cards rather than table rows, and it has only a search box — none of the course, module or curriculum filters the other tabs share.
2. Reading the Conversation List
Each conversation appears as its own card, newest activity first. A card shows:
- Conversation title: built automatically from the first thing the student typed, cut down to a short phrase. A thread that was opened but never used still reads New Conversation, and one with no title at all falls back to Untitled conversation.
- Status badge: the state of the thread — ACTIVE for a normal conversation, and DELETED for one the student removed from their own chat list. A deleted thread stays here for you to read until you remove it too.
- Student: the student's name. If no name is on file the card falls back to their email, then their mobile number, and finally Unknown student.
- Message count: how many messages the whole thread contains, counting both the student's questions and the assistant's replies.
- Date and time: when the last message was sent, or when the conversation was started if it never got a reply.
On the right of every card sit two buttons: View, which opens the full transcript, and a red bin button, which deletes the conversation.
If there is nothing to show you will see No conversations found with the note Students haven't chatted with the AI yet, or none match your search.
3. Searching and Paging Through the List
There is a single search box at the top of the tab, labelled Search by title, student name, or email…. It searches three things at once:
- The conversation title.
- The student's name.
- The student's email address.
Capitalisation does not matter, and partial words work — typing rahim finds Rahim Uddin. The list refreshes a moment after you stop typing and jumps back to the first page of results.
That search box is the only filter on this tab. There is no separate dropdown for course, batch, date range or status, so use the student's name or a keyword from the question to narrow things down, and read the status and date off each card.
The tab shows 20 conversations per page. When there is more than one page, a footer appears below the list reading Page 1 of 4 · 78 total, with Prev and Next buttons to step through. The buttons grey out at the first and last page.
4. Opening and Reading a Conversation
Click View on any card to open the transcript in a pop-up window. The heading shows the conversation title, and underneath it the student's name and email address.
The transcript reads exactly like the chat the student saw, oldest message at the top, and it opens already scrolled to the newest message:
- Student messages sit on the right in a grey bubble with a person icon.
- Assistant replies sit on the left with a purple robot icon and are fully formatted — headings, bullet lists, tables, links and mathematical formulas all render properly, so a physics or maths answer is readable rather than raw text.
- Attached images appear above the message. If you allowed image upload, a student can photograph a handwritten problem and send it, and that photo is shown here.
- Context chips appear above a student's question when they asked it from inside a lesson. The chip names what they were looking at — the video's title, or the opening words of the exam question — so you can see what prompted the question.
- Failed replies are shown in a red-bordered bubble, which tells you the assistant could not answer that message.
Every message carries its own date and time underneath it. Scroll the window to read the whole thread, then close it to return to the list.
5. Deleting a Conversation or a Single Message
Deleting is the only change an admin can make to a chat. You cannot edit a message, reply to a student inside the thread, flag it, or download and export the transcript — the tab is for reading and removing.
To delete a whole conversation
- Click the red bin button on the conversation's card.
- A confirmation box appears: Delete this conversation? — Permanently deletes the thread, all its messages, and any attached images. This cannot be undone.
- Click Delete to confirm, or Cancel to back out.
The card disappears from the list and you get a Conversation deleted confirmation. If you had that thread open, the reading window closes too. Any images the student uploaded to that thread are removed from storage as well.
To delete one message only
- Open the conversation with View.
- Hover over the message you want gone. A small bin icon appears next to its timestamp.
- Click it. The confirmation reads Delete this message? — Permanently deletes this message and any attached image. This cannot be undone.
- Click Delete.
The message vanishes from the transcript straight away and you get a Message deleted confirmation. The message count on the card drops by one the next time the list loads. Use this when a single question contains something inappropriate or private but the rest of the thread is worth keeping.
Both deletions are permanent. There is no recycle bin and no undo.
6. Where the AI Itself Is Configured
Nothing on the AI Chats tab changes how the assistant behaves. All of that lives in Integrations.
In the left sidebar under Platform, click Integrations, then expand the AI & LLM section. You will find a card for each provider — OpenAI, Anthropic Claude, Google Gemini and Groq — plus a card called AI Chat Settings.
Switch on at least one provider first and fill in its API Key. Until you do, opening AI Chat Settings shows only No AI Providers Configured and a Configure AI Providers First button. Once a provider is switched on, open AI Chat Settings and use the Student AI tab:
- Enable AI Chat for Students: the master switch. Turn it off and students lose the assistant entirely.
- AI Provider: which company answers the questions. Only providers you have already enabled appear in this list.
- Thinking Model: the main model used for reasoning and tutoring — explanations, problem solving and image questions.
- Fast Model (Optional): a cheaper, quicker model used automatically for simple lookups such as my courses, my dues or my schedule. Leave it empty and every question goes to the Thinking Model.
- Fallback Model (Optional): used when the main model hits its rate limit, so students still get an answer.
- Allow Image Upload (Vision): lets students attach a photo of a problem. This switch stays locked unless the Thinking Model you picked can actually read images.
- Message Rate Limit (per student): two boxes, Per hour (default 20) and Per day (default 50). Set either to 0 for unlimited.
- Custom Instructions (Optional): free text added to the assistant's instructions — tone, greeting style, promotions, or anything specific to your centre.
7. What This Tab Tells You About Usage
The AI Chats tab is where you see how much the assistant is actually being used.
- The total count in the pagination footer is your overall volume of conversations.
- The message count on each card tells you how heavy a single conversation was — a thread with 60 messages is far more work than one with 4.
- The status and date on each card show you whether the chatting is recent and still going on.
The tab itself shows no token counts and no money figures. If you entered your own provider key under Integrations, that usage is billed to your own provider account, and you check the charges there. If you have not added a provider of your own, students run on the platform's free monthly allowance, which you can watch under Account in the sidebar on Uses & Plans — the Platform Free Resources table has a Platform AI Tokens row with what you have used and what is left.
If you spot one student running very long conversations, lower Per hour or Per day in AI Chat Settings, or set a Fast Model so routine lookups stop hitting your most expensive model.