
1. Opening the Live Classes Tab
In the left sidebar under Assessment, click Resources, then click Live Classes. The page header reads Resources — Manage all your organization's content in one place — with a row of tabs across the top: All Items, Videos, Exams, Live Classes, Assignments, PDFs, Questions and AI Chats.
The Live Classes tab is the single list of every live session in your organization, no matter which course or teacher it belongs to. Two buttons sit at the top right of the list: the yellow Auto Live Schedule button and the Add button.
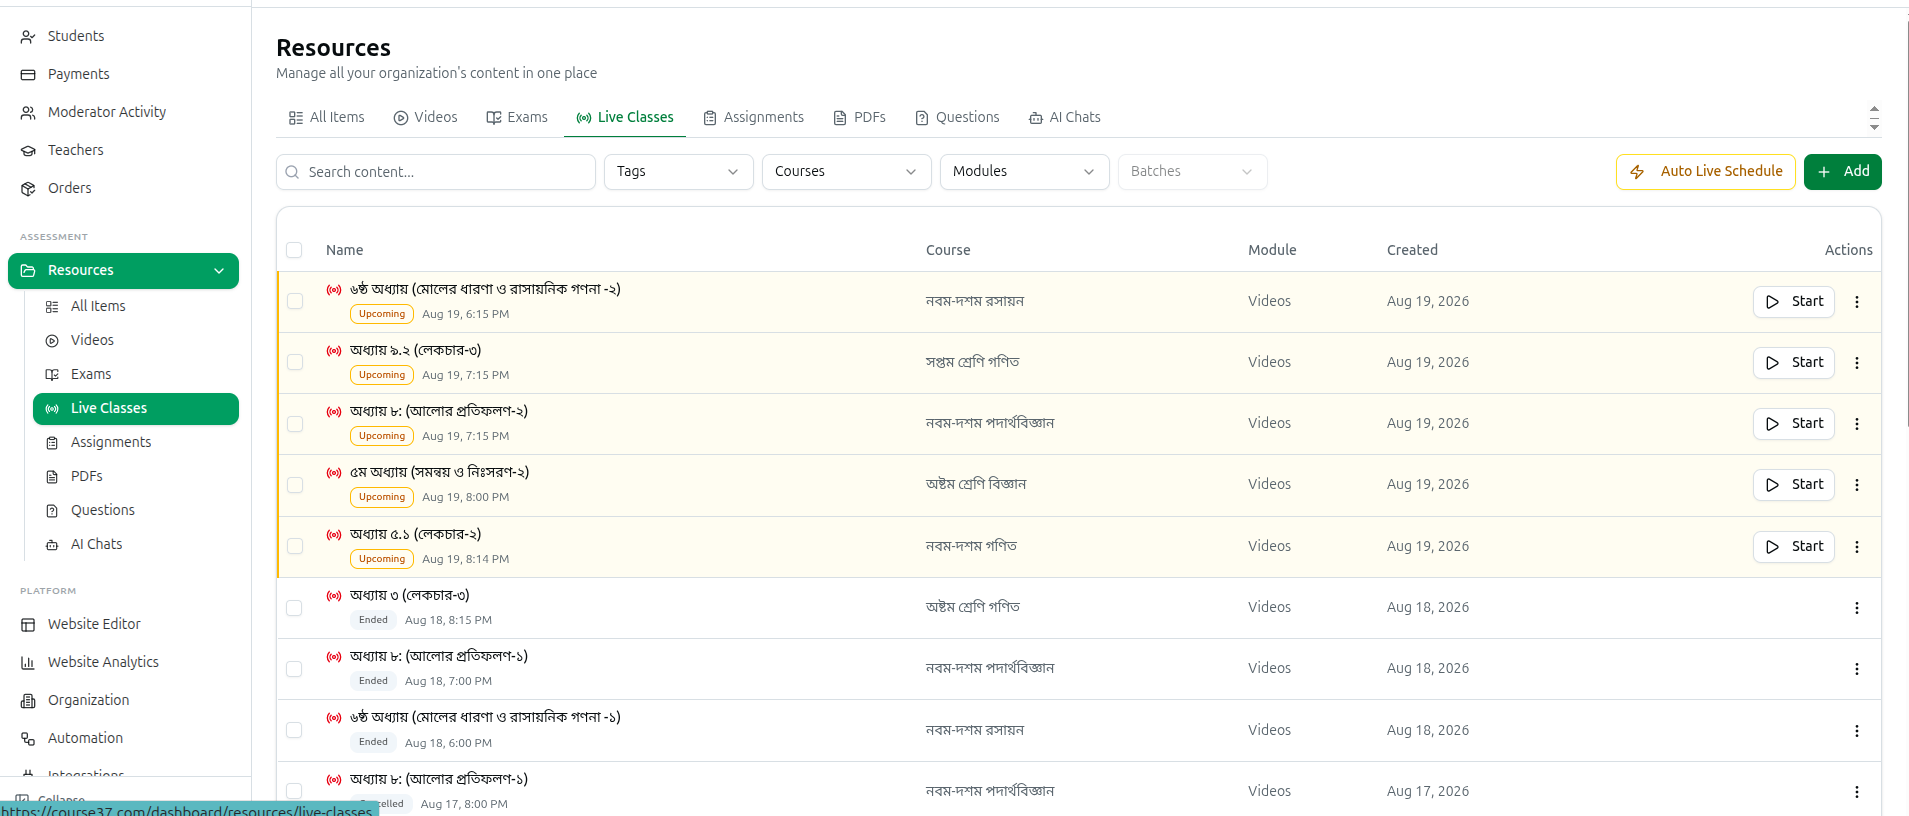
2. Reading the List
This tab does not simply sort by date. It floats the classes that need your attention to the top of the page: running classes first, then classes marked as starting, then upcoming ones (soonest first), and finally finished and cancelled ones (most recent first).
The table shows:
- Name: the session title with a red broadcast icon. Directly underneath sits a status badge and the scheduled start date and time.
- Course: the course the class belongs to.
- Module: the module inside that course.
- Created: the date the session was added.
The last column holds the row actions, and a checkbox sits at the far left of every row for bulk work.
The status badge tells you where the class stands:
- ● LIVE — red and pulsing. The class is running right now.
- Starting soon — the session has been switched to starting but is not broadcasting yet.
- Upcoming — scheduled. The badge turns amber when the start time is inside the next 24 hours, or when the start time has already passed and nobody has started the class.
- Ended — the class has finished.
- Cancelled — the class was called off.
Rows are tinted to match: a red stripe down the left edge for a running class, an amber stripe for one that is due within a day. Clicking anywhere on a running or starting row takes you straight into the live room; clicking any other row opens its details panel.
3. Searching and Filtering the List
The filter row sits directly above the table. On a phone the dropdowns hide behind a Filters button that shows a count badge when filters are active.
- Search content...: type any part of a session title.
- Tags: narrows the Courses and Modules dropdowns to courses carrying those tags.
- Courses and Modules: pick one or many.
- Batches: stays disabled until you select a course — it reads Select a course first.
- Clear: appears as soon as any filter is set and resets everything.
There is no Subject / Chapter / Topic cascade on this tab, and no Subject column, because a live session itself carries no curriculum classification.
Your filter choices are stored in the page address, so switching to another Resources tab and coming back keeps them, and you can bookmark or share a filtered view.
At the bottom you get a count such as 1–20 of 64, a page-size dropdown offering 10 / page, 20 / page, 50 / page and 100 / page, and arrow buttons to step through pages.
4. Scheduling a Single Live Class
- Click the Add button at the top right of the list.
- The Where should this content go? dialog opens — Pick the course and module the new content belongs to.
- Optionally choose a Tag to shorten the course list.
- Choose the Course, then the Module (the module dropdown stays locked until a course is picked).
- Click Continue.
Picking the module here is how the class gets attached to a course — every live session must live inside a module, and that is where students will find it. If the course has no modules yet, the dropdown says No modules in this course and you will need to create one on the course page first.
The Add Module Content dialog then opens with the Live tab already selected. The other tabs — Video, Quiz, Assignment, PDF and Embed — remain available if you picked the wrong type.
A blue notice at the top of the tab reminds you which clock is being used: All times are in Asia/Dhaka (or whichever timezone your organization is set to). Everything you type below is read in that timezone.
Under the notice comes the Streaming Provider choice, covered in the next step. Below that sit the class details:
- Session Title *: required. The empty box reads Enter session title.
- Start Time *: required. The picker will not let you choose a moment in the past.
- Description: a rich text editor for what the class will cover.
- End Time: optional. Useful because it also sets how long an auto-created Zoom meeting is booked for.
- Max Participants: how many students may join at once. Starts at 1000.
5. Choosing How the Class Is Delivered
Under Streaming Provider you pick one of three cards — the only three delivery methods Course37 supports.
- YouTube Live — Stream from your YouTube channel (free, no cost). You broadcast from your own YouTube channel and Course37 embeds the stream for your students.
- Zoom — Auto-creates Zoom meeting via your integration. There is nothing to fill in: when you save, Course37 creates the meeting for you using your organization's Zoom credentials. If your Zoom integration is set up for in-platform meetings, the meeting is embedded inside Course37; otherwise students join through an external Zoom link.
- Google Meet — Auto-creates Meet via your Google integration. The meeting link is created through your organization's Google account. Google Meet cannot be embedded, so students always join through the external link.
If you choose YouTube Live, one extra field appears:
- YouTube Live URL or Video ID *: paste the full link (e.g. https://www.youtube.com/live/C1Xj1fW48tw) or just the 11-character video ID. Watch, live, embed and youtu.be links are all understood and the ID is pulled out automatically. As soon as a valid ID is in the box a Preview player appears so you can confirm you pasted the right stream.
Zoom and Google Meet show an information panel instead of a field, confirming that the meeting will be created automatically when you save.
6. Attendance, Batches and Classification
Scroll on down the Live tab for the remaining settings.
- Assign to Batches (Optional): Select which batches can access this live session. Leave empty for all batches. If the course has no batches you will see No batches available for this course.
- Count Attendance: unticked by default. Tick it and Course37 automatically records who joined — Students who don't join will be marked absent when the session ends.
- Grace Period (minutes): only shown once Count Attendance is ticked. Defaults to 15 and accepts 0 to 120. Students who join inside this window count as Present; after it they are marked Late.
- Educational Classification (Optional): set Education Level, Group, Subject, Chapter and Topic for tidiness.
At the bottom of the dialog:
- Announce to students: ticked by default — Posts a course announcement and sends a notification + push to students who can see this content. The announcement carries the start time, the length and the platform, so untick it only if you want to add the class quietly.
- Cancel closes without saving.
- Create Live Session saves it, and the new class appears in the list as Upcoming.
7. Auto Live Schedule — Filling Today's Timetable in One Go
If your courses already carry a weekly timetable, you do not have to create today's classes one at a time.
The timetable comes from the course itself: open the course for editing, go to its Schedule tab and switch on Set weekly class schedule — Show recurring class days and times on the course page. Pick the Class days and add a Time slot for each class on that day. Only courses with a time slot on today's weekday can be auto-scheduled.
- On the Live Classes tab, click the yellow Auto Live Schedule button.
- The Auto Schedule Today's Live Classes dialog opens — Create live sessions for all courses that have classes scheduled for today. The day and date it is working with are printed in the description, read in your organization's timezone.
- If nothing qualifies you get No classes scheduled for Tuesday and a reminder that class schedules are configured in each course's settings.
Otherwise you get a checklist headed Courses with today's classes (N), with Select All and Deselect All shortcuts. Each course row shows today's class times and how many modules it has. A course with no modules is greyed out, carries a No modules badge, and cannot be ticked.
Tick a course and two extra controls appear on its row:
- A session title box, pre-filled with Course name - Live Class. Edit it if you want.
- A module dropdown, which defaults to the course's first live-session module (marked with a small Live badge).
Below the list, the settings that apply to every session in this run:
- Session Duration: 30 minutes, 45 minutes, 1 hour (default), 1.5 hours, 2 hours or 3 hours. The end time of each session is worked out from its start time plus this duration.
- Live Class Method: YouTube Live (Recommended), Zoom (Auto-Created) or Google Meet (Auto-Created). Choosing YouTube Live reveals a single YouTube Live URL or Video ID box — the same stream is used for every session created in this run, so use it when you broadcast all of today's classes from one channel stream.
- Max Participants: applies to all of them.
- Grace Period (min): 0 to 60, defaults to 15.
- Enable Attendance Tracking: ticked by default.
The footer keeps a running count such as 4 courses · 7 sessions. Click the yellow Create 7 Live Sessions button and a progress bar tracks Creating sessions... 3/7, followed by a green Successfully created 7 sessions! confirmation. Each created class is named after your title with its start time appended (e.g. Physics Batch A - Live Class (11:00 AM)).
This tool only ever creates today's classes, so run it at the start of each teaching day. Sessions it creates use the module you picked per course, and the classes appear in the list immediately.
8. Starting a Class and Running the Live Room
On a scheduled row, click the Start button (or Start Session in the three-dot menu).
- If the delivery details are complete, you land straight in the live room.
- If they are not — for example a YouTube session with no video ID yet — the Edit Live Session dialog opens first so you can fill the gap. Save it and you are taken into the room.
On a class that is already running, the red Join Live button takes you in (it reads Open Room while the class is still in the starting state).
The live room opens on its own page with a Back button, the class title and its status badge, the course and module underneath, and a Configure button on the right. The page re-checks the class status every ten seconds, so a status change shows up on its own.
The main panel is the Live Preview card, which shows your YouTube stream embedded, or a Zoom / Google Meet panel with the meeting details and an Open in Zoom App / Open Google Meet button.
- Click the large Start Live Session button to go live. A confirmation tells you students can now join. For Zoom and Google Meet the meeting also opens in a new tab (unless it is embedded).
- Once running, the button is replaced by a red End Live Session button, plus Re-open Zoom Meeting or Re-open Google Meet if you closed that tab.
Below it, the Session Information card lists Session ID, Status and Participants, plus Active Features badges for Recording and Chat. The Interaction Controls card — Control student features in real-time — carries a Chat switch you can flip between Enabled and Disabled mid-class.
The right-hand panel has three tabs:
- Participants: every student who has joined, with the time they joined. Warn disables that student's chat and stamps them with a Warned badge; Remove throws them out. Removed students collect in a Removed list — These students cannot rejoin. Allow them back to restore access. — where Allow Rejoin lets them back in.
- Chat: the class chat. Type in the Reply to students... box and press Enter to send.
- Polls: click Create New Poll, enter the Question, fill the Options (Add Option for more, at least two are required), set Duration (minutes) (1 to 60 — the poll closes itself after this once published) and click Create Poll. A new poll sits as a Draft until you click Publish to Students; after that it shows as Active and View Results opens the tally.
9. Ending a Class
You can end a class from either place:
- From the list, click the End button on the running row, or End Session in its three-dot menu.
- From inside the live room, click the red End Live Session button — from here the dialog below only appears when the class counts attendance; without it the class simply ends.
The End Live Session dialog appears — All students who haven't joined will be marked as absent. Would you like to notify absent students? Tick any of SMS, Email and Push Notification under Notify absent students via:, then choose:
- Skip & End — finishes the class without messaging anybody.
- Notify & End Session — finishes it and sends the absent students the channels you ticked.
Ending a Zoom class also closes the meeting in your Zoom account; ending a Google Meet class removes its calendar event. An ended class cannot be restarted — schedule a new one instead.
10. After the Class — Recordings and History
What happens to the recording depends on the provider you used:
- YouTube Live: the moment you end the session, the class entry in the module turns into a replay pointing at the same YouTube video, with its thumbnail attached and ready to watch. Students who missed the class find the replay in the module, and you will see it listed on the Videos tab of Resources.
- Zoom and Google Meet: the class entry is simply marked as finished. Course37 does not pull a copy of the meeting recording, so a Zoom or Meet recording stays in that account and you would add it as a video separately.
Open the live room of a finished class and instead of the broadcast controls you get a Session Ended banner with an Archived badge, and a Session History card with three tabs, each showing its count: Participants (with join and leave times), Chat (the full transcript, including anything drawn on the board) and Polls (each question with its options and response count).
If the class had Enable Recording switched on, the banner adds The recording may be available soon and the session sidebar shows a Recording Enabled marker.
11. Viewing Details and Sharing the Join Link
Click a row that is not currently running — or choose Details from its three-dot menu — to open the class's details panel. It shows the status badge and scheduled date, then:
- Open Live Room (only while the class is running), Copy Join Link, and an external-link button that opens the class on your public website.
- Four stat tiles: Participants, Duration (or Running for while the class is on), Chat messages and Q&A questions.
- A detail block listing Scheduled start, Scheduled end, Started, Ended, Provider (YouTube Live, Zoom or Google Meet), Host, Recording (Enabled or Disabled) and Max participants.
Copy Join Link puts the student-facing address of the class on your clipboard and confirms Join link copied — share it with students — handy for posting into a class group. The three-dot menu carries the same Copy Join Link plus View on website. Both only appear once your organization's website address is configured.
12. Editing, Cancelling and Removing a Class
Choose Edit from the three-dot menu — or Configure inside the live room — to open Edit Live Session, which has two tabs and opens on Streaming Config.
Streaming Config
- Provider: switch between YouTube Live, Zoom and Google Meet at any time before going live.
- For YouTube Live, the YouTube Live URL or Video ID box with its live Preview.
- For Zoom, a read-only panel showing the auto-created Meeting ID, Passcode and URL.
- For Google Meet, a read-only panel showing the Meet URL.
Basic Info
- Title * and Description.
- Scheduled Start Time * and Scheduled End Time.
- Maximum Participants: 1 to 10000.
- Status: force the class to Scheduled, Starting, Live, Ended or Cancelled — useful when a class was left running by mistake.
- Enable Recording and Auto-start Recording (the second only becomes selectable once the first is ticked).
Click Update Live Session to save. Renaming the class here also renames the entry students see in the module.
To call off a class, open the three-dot menu on a scheduled row and choose Cancel Session. A confirmation asks Cancel "…"? and the row then shows a Cancelled badge. Nothing is deleted, so you can still open its details.
To remove it altogether, choose Delete from the three-dot menu. The Delete Live confirmation asks Are you sure you want to delete "…"? This action cannot be undone. Deleting removes the class entry from the module as well, along with its chat, polls and participant history.
13. Working on Several Classes at Once
Tick the checkbox on one or more rows and a selection strip appears above the table showing N selected:
- Move: opens Move to another Module. Pick a Target Module from any course in your organization and click Move N Items. This is how you re-attach an existing live class to a different module or course after the fact.
- Copy: greyed out on this tab — hover it and the reason reads Live sessions can't be copied.
- Set Hierarchy: greyed out too — Live sessions have no subject/chapter/topic.
- Delete: removes everything selected after a confirmation.
Clear drops the selection, and changing any filter clears it too so you never act on rows you can no longer see.