
1. Opening the Products Page
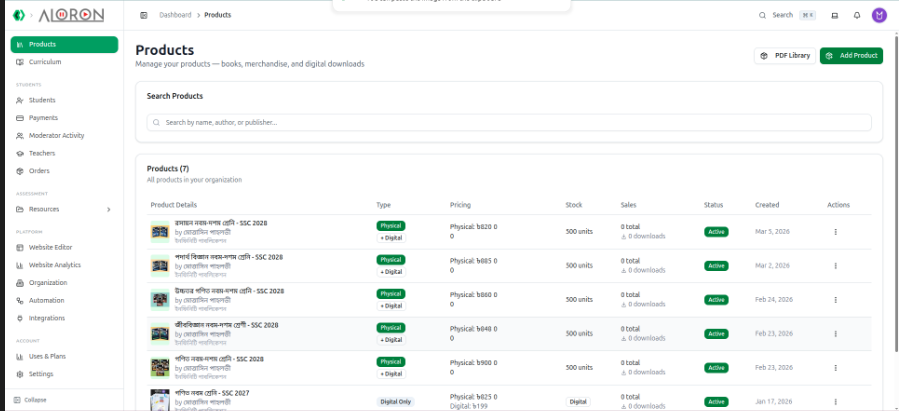
In the left sidebar, click Products. This is where every sellable item in your organization lives — books, merchandise, and digital downloads.
Two buttons sit at the top right of the page:
- PDF Library: Opens the organization-wide PDF list under Resources, where you can browse every PDF your organization holds.
- Add Product: Opens the product creation form.
If you have not added anything yet, the page shows No products found together with an Add Product button and a Read Docs button.
2. Reading the Product Table
The table is titled Products (N), where N is the number of products currently shown, and carries the note All products in your organization. It has these columns:
- Product Details: The cover thumbnail, the product name, by [author] underneath (or a dash when no author is set), and the publisher in smaller grey text.
- Type: Either a single Digital Only badge, or a Physical badge with a + Digital badge under it.
- Pricing: The physical price shown as Physical: ৳..., a red -N% badge when a discount is set, and the digital price on the line below as Digital: ৳....
- Stock: The number of units on hand. The figure turns red once stock drops below 50. Digital-only products show a Digital badge instead, because there is nothing to count.
- Sales: A total sales figure with a downloads count beneath it.
- Status: Active, Draft, or Archived.
- Created: The date the product was added (e.g. Mar 12, 2026).
- Actions: The three-dot menu described in section 5.
Clicking anywhere on a row (except the Actions column) opens that product's detail page.
3. Searching for a Product
Above the table is a card called Search Products with a single box: Search by name, author, or publisher.... Type into it and the list narrows immediately — the count in the Products (N) heading updates as you type. There are no separate filter dropdowns on this list; status is changed from the row menu, and the filter dropdowns you may be looking for live on a product's Recipients tab (section 9).
4. Adding a Product
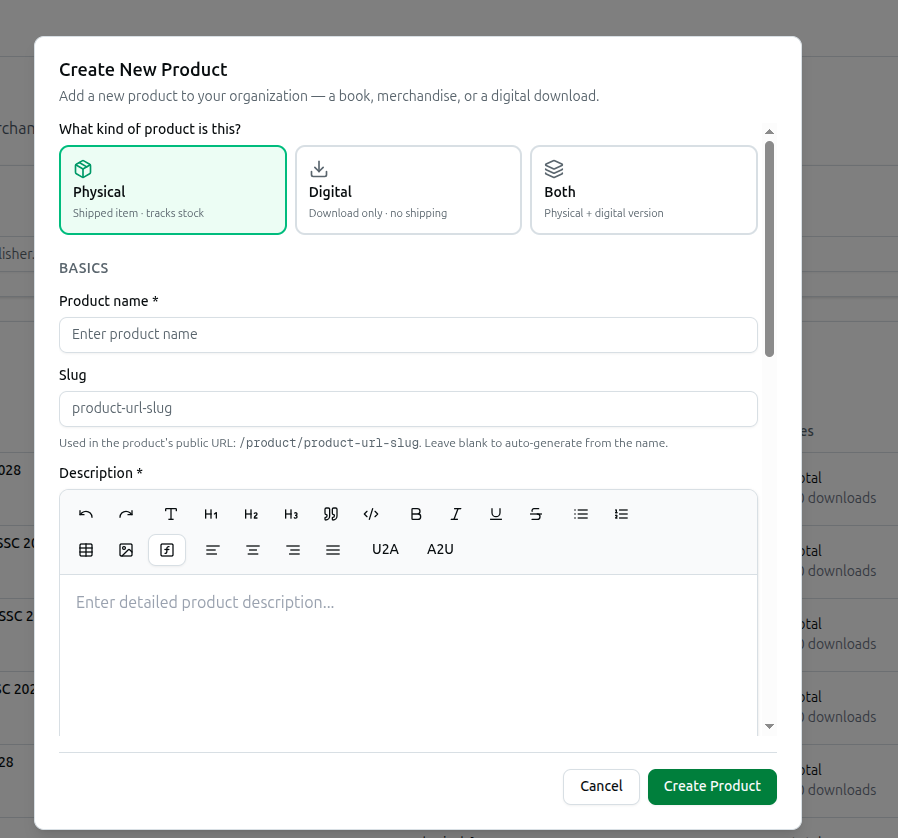
Click Add Product to open the Create New Product dialog.
What kind of product is this?
Pick one of the three cards at the top. Your choice decides which fields the rest of the form shows, and switching between them clears the fields that no longer apply, so a physical product never quietly keeps a digital price.
- Physical: Shipped item · tracks stock.
- Digital: Download only · no shipping.
- Both: Physical + digital version.
Basics
- Product name: Required. The title customers see.
- Slug: The address used in the product's public link. It fills in automatically from the name until you edit it yourself; leave it blank to auto-generate.
- Description: Required. A rich-text editor for the full product description.
Pricing & stock
- Physical price (৳): Shown for Physical and Both.
- Digital price (৳): Shown for Digital and Both.
- Discount (%): A whole number from 0 to 100, applied to both prices.
- Stock: The quantity you have in hand. Shown for Physical and Both.
Leave a price at 0 to make the item free. Free products are automatically included when the product is attached to a course.
Book details (optional, collapsed by default)
Click the Book details row to expand author, publisher, pages. Leave it closed for merchandise.
- Author: The writer's name.
- Publisher: The publishing house.
- Pages: The page count.
Media
- Sample / Preview PDF: A free preview buyers can look at before purchase. Shown for Digital and Both, maximum 15MB.
- Main Image: The cover shown everywhere. Upload at a 3:4 ratio; the image is auto-compressed to 1024KB or less. You can Upload Image from your computer, pick one from your Library, or paste a URL. Uploaded files open a Crop Image step first.
- Gallery Images: Extra photos. Add them one at a time; each thumbnail gets a small red X in its corner for removal.
Digital files (shown for Digital and Both)
These are the files a buyer of the digital version downloads after purchase. Upload one file at a time, maximum 30MB each. Each uploaded file appears in a row where you can rename it and see its size, with a red bin icon to remove it.
Tags
Tick any tags that apply. Selected tags collect under Selected Tags: at the bottom. If the list is empty you will see No tags available. Create tags in the Education System.
Click Create Product to save, or Cancel to discard. New products are saved as Active.
5. The Row Actions Menu
Click the three dots in the Actions column of any row:
- View Details: Opens the product's own page.
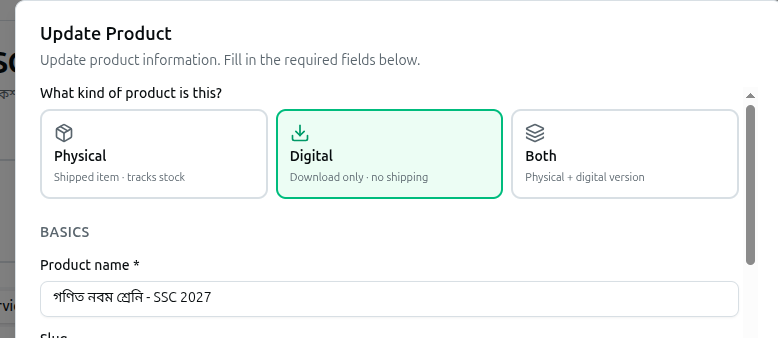
- Edit Product: Reopens the form above as Update Product, pre-filled with the current values.
- Manage Stock: Opens the Update stock dialog. Type the new quantity into the stock box and click update Stock. A negative number is rejected with Stock cannot be negative.
- Download Reports: Listed in the menu, but it is not wired up yet — clicking it does nothing.
- Delete Product: Removes the product. A browser confirmation appears first: Are you sure you want to delete this product? This action cannot be undone.
- Status selector: The last item in the menu is a dropdown offering Archived, Draft, and Active. Picking a value changes the product's status straight away, without opening the edit form.
6. The Product Detail Page
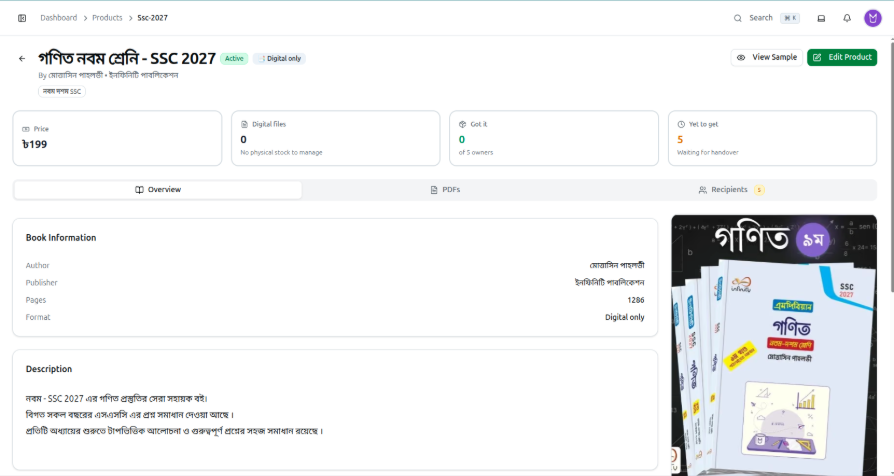
Clicking a row (or View Details) opens the product workspace. The back arrow at the top left returns you to the list.
Beside the product name you will see its status badge (Active, Draft, or Archived) and a format badge — Digital only, Physical + Digital, or Physical. The author and publisher sit underneath, followed by any tags. On the right are:
- View Sample: Opens the sample PDF in a new tab. Only appears when a sample has been uploaded.
- Edit Product: Opens the same form described in section 4.
Four summary cards run across the page:
- Price: The headline price after discount, or Free. The small line underneath shows the digital price or how much discount is applied.
- Stock: The units on hand, marked In stock, Running low (below 10), or Out of stock. Digital-only products show a Digital files card here instead, counting the attached files.
- Got it: How many owners have already received the product. Click it to jump to the Recipients tab.
- Yet to get: How many are still waiting for handover. Click it to jump to the Recipients tab.
Down the right-hand side sit the cover image with its gallery thumbnails, a Pricing card (Physical, Digital, and Discount rows), and an Inventory card (Stock, Pages, Digital files).
The tab bar offers Overview, PDFs, and Recipients. The PDFs tab only appears for products that have a digital side — a digital-only product, one with a digital price, or one carrying downloadable files. The Recipients tab shows an amber number badge when someone is still waiting.
7. The Overview Tab
- Book Information: Author, Publisher, Pages, and Format.
- Description: The description you wrote. If it is empty, an Add one link opens the edit form.
- Digital Files: Every file buyers receive, with its size. Files are added through Edit Product.
- Sample Preview: View Sample PDF opens the preview, Download Sample saves a copy. Only shown when a sample exists.
- Details: Created and Last updated timestamps, plus the Product ID and Slug — click either one to copy it to your clipboard.
8. The PDFs Tab — Attaching PDFs and Sections
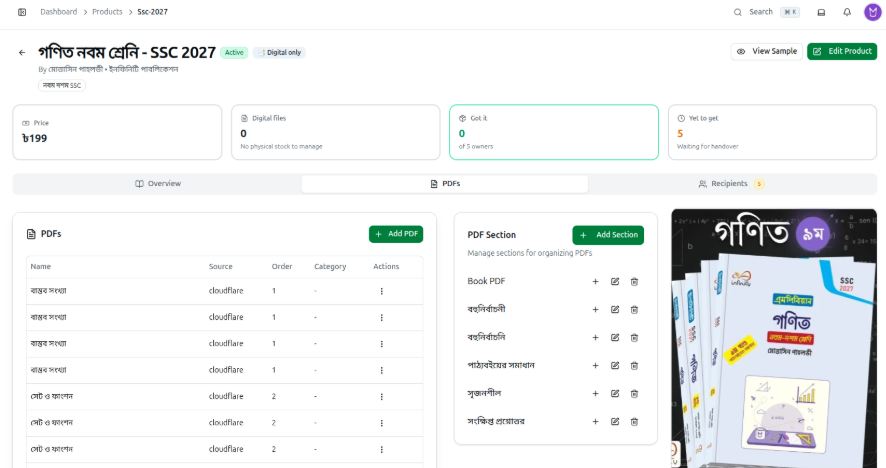
This tab has two panels: the product's own PDFs on the left, and the shared section list on the right.
Adding a PDF
Click Add PDF to open Upload New PDF (Max file size: 30MB).
- PDF Name: Required. What the file is called on screen.
- PDF Source: Two tabs. Upload PDF takes a file from your computer; Hard Copy URL takes an External PDF URL for a document hosted somewhere else (https://example.com/document.pdf).
- Source: Optional free text noting where the material came from.
- Order: A number controlling the position in the list.
- Description: Optional notes.
- Sections: A searchable dropdown reading Select a section... — pick one of your PDF sections.
- Education Hierarchy: Optional Education Level, Group, Subject, Chapter, and Topic dropdowns, so the file also appears in the right place in your curriculum.
Click Upload & Create to save. The button stays disabled until a file is uploaded or a URL is entered.
The PDF list
Attached PDFs appear in a table with Name, Source, Order, and Category columns. The three-dot menu on each row offers View (opens the file in a new tab), Edit (reopens the form as Edit PDF, saving with Update), and Delete, which asks Are you sure you want to delete this PDF? first.
PDF sections (categories)
The PDF Section panel on the right manages the sections used to organize PDFs across your whole organization.
- Click Add Section to open Create New Category. Fill in Category Name and Display Order, then click Create.
- Each section row has three icons: + adds a subsection beneath it, the pencil opens Edit Category (save with Update), and the bin deletes it after a Are you sure you want to delete this category? confirmation.
- Sections with subsections show an arrow on the left — click it to expand or collapse the children.
9. The Recipients Tab — Who Gets Access
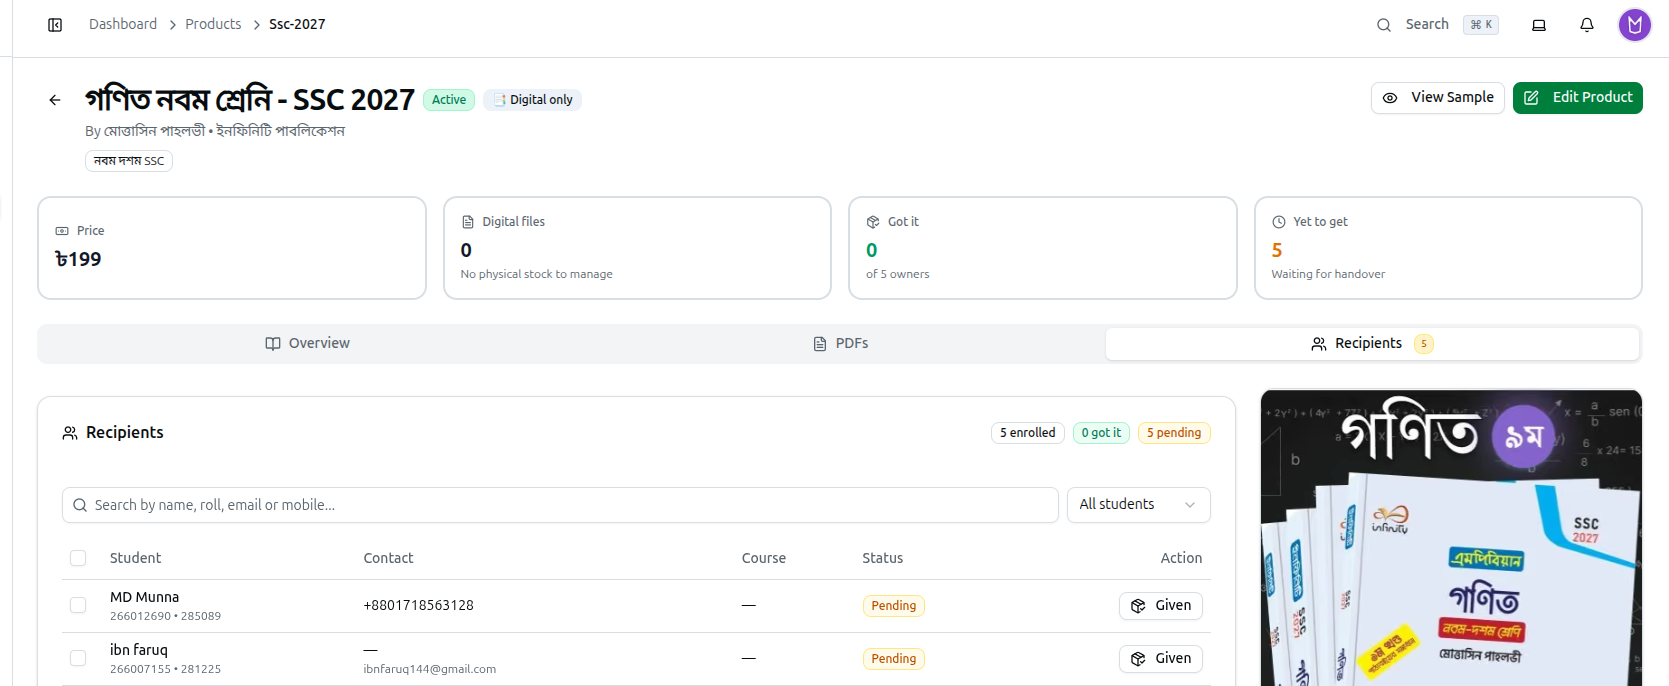
The Recipients card lists everyone entitled to this product: students who bought it, and students enrolled in a course the product is attached to. Three badges at the top summarize the picture — N enrolled, N got it, and N pending.
Filters
- Search: Search by name, roll, email or mobile...
- Status dropdown: All students, Got it, or Yet to get.
- Course dropdown: All courses plus each course this product is attached to. It only appears when the product is attached to at least one course.
The table
- Student: Name with the student code and roll number underneath.
- Contact: Mobile number with email beneath.
- Course: Which of this product's attached courses the student is enrolled in.
- Status: A green Got it badge with the handover date, or an amber Pending badge.
- Action: Given marks a pending student as handed over; Undo reverses a student who was marked by mistake.
Handing over in bulk
Tick the checkboxes beside several students (or the header checkbox to take the whole page) and a toolbar appears showing N selected, with Mark as Given and Mark as Not Given. The list shows 20 students per page, with arrow buttons at the bottom for moving between pages.
If nobody appears, you will see No students own this product yet. Students appear here once the product is included in a payment or granted with a course.
10. Editing and Deleting a Product
Open the form either with Edit Product from the row menu, or with Edit Product on the detail page. The dialog title changes to Update Product and every field is pre-filled. Change what you need and click Update Product.
To remove a product, use either the red Delete button at the bottom left of the edit form or Delete Product in the row menu. Both ask you to confirm first, and both are permanent — the handover records on the Recipients tab go with it. If you only want the item off your storefront, set its status to Archived from the row menu instead of deleting it.