
1. Where Classrooms and Devices Live
Classrooms and attendance devices are the two building blocks behind automatic attendance. Instead of an admin marking a register, a physical terminal at the door records a punch, and the platform decides which class that punch belongs to by looking at the room's timetable.
- In the left sidebar under Students, click Attendance.
- At the top of the page you will see four tabs: Sessions, Devices, Classrooms and Staff & Teachers.
- Click Classrooms to manage rooms, or Devices to manage terminals.
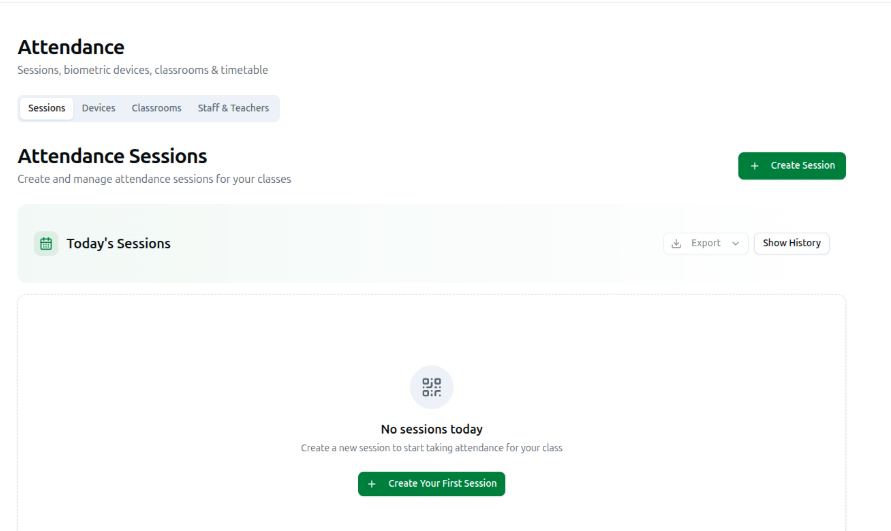
Both screens also exist as full pages of their own. Click Search in the top bar (or press ⌘K / Ctrl+K) and type "Classrooms" or "Attendance Devices" to open them full-screen.
Two things control who sees this:
- The Attendance item appears in the sidebar only for Coaching Center organizations. Other organization types do not get it.
- A moderator also needs Attendance access from your access-control settings. Organization owners always see it.
2. What a Classroom Record Is
A classroom is a physical room in your centre — Room 101, Lab 2, Main Hall. On its own it does nothing. It becomes useful once you do two things with it:
- Bind a device to it, so the platform knows where a punch happened.
- Give it a timetable, so the platform knows which batch is meeting in that room at that moment.
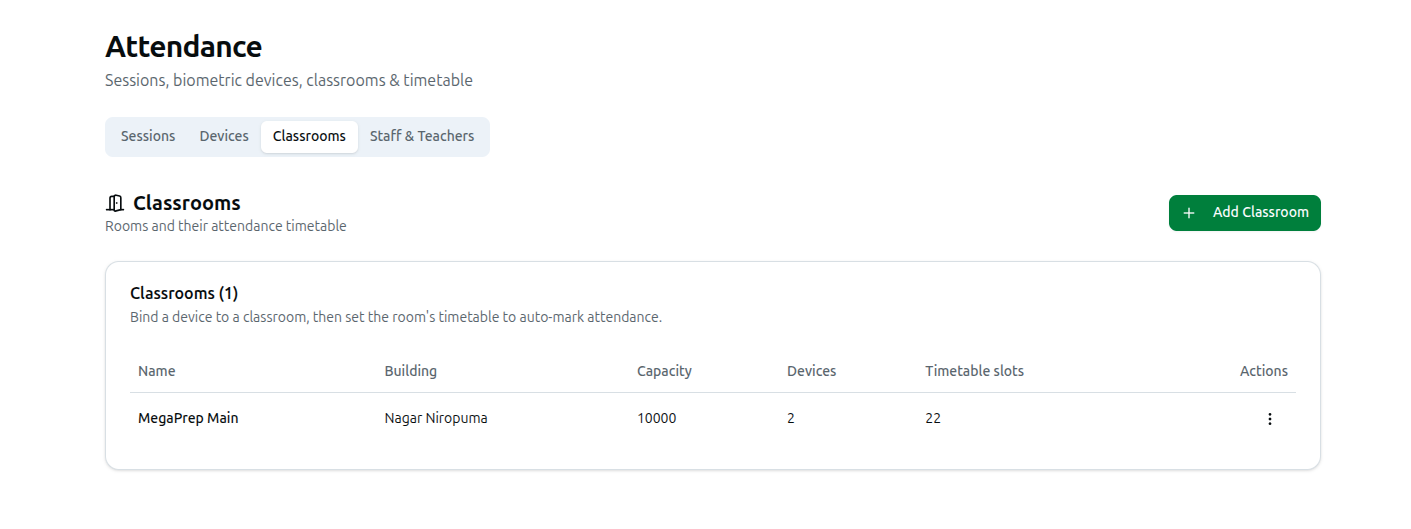
The Classrooms screen shows a table headed Classrooms (count) with these columns:
- Name: The room's label.
- Building: The block or branch the room sits in, if you filled it in.
- Capacity: How many seats the room has, if you filled it in.
- Devices: How many attendance terminals are currently bound to this room.
- Timetable slots: How many weekly class slots have been set for this room.
- Actions: The three-dot menu holding Timetable, Edit and Delete.
If you have not added anything yet, the table simply reads No classrooms yet.
3. Creating or Editing a Classroom
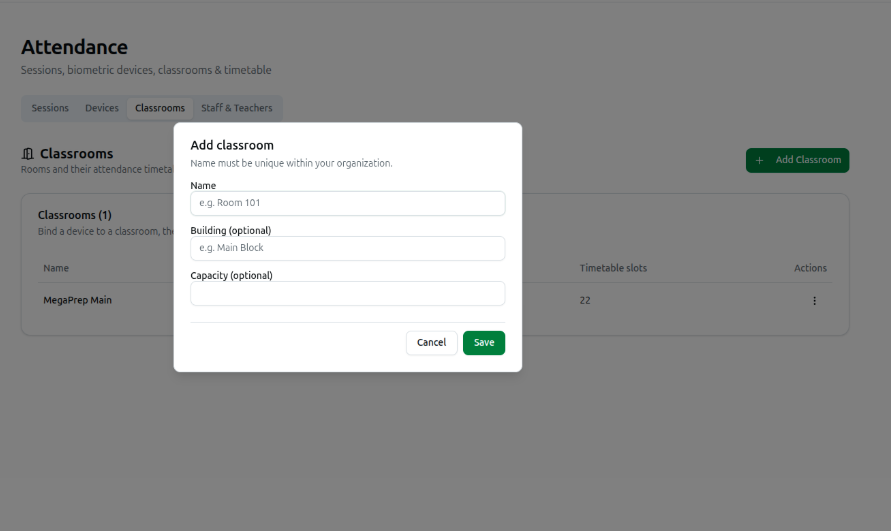
- Click the Add Classroom button at the top right.
- Fill in the Add classroom dialog:
- Name: Required. e.g. Room 101. The name must be unique inside your organization — you cannot have two rooms called the same thing.
- Building (optional): e.g. Main Block. Use this to separate branches or blocks when one organization runs several sites.
- Capacity (optional): A number — how many students the room seats.
- Click Save. You will see a Classroom added confirmation and the row appears in the table.
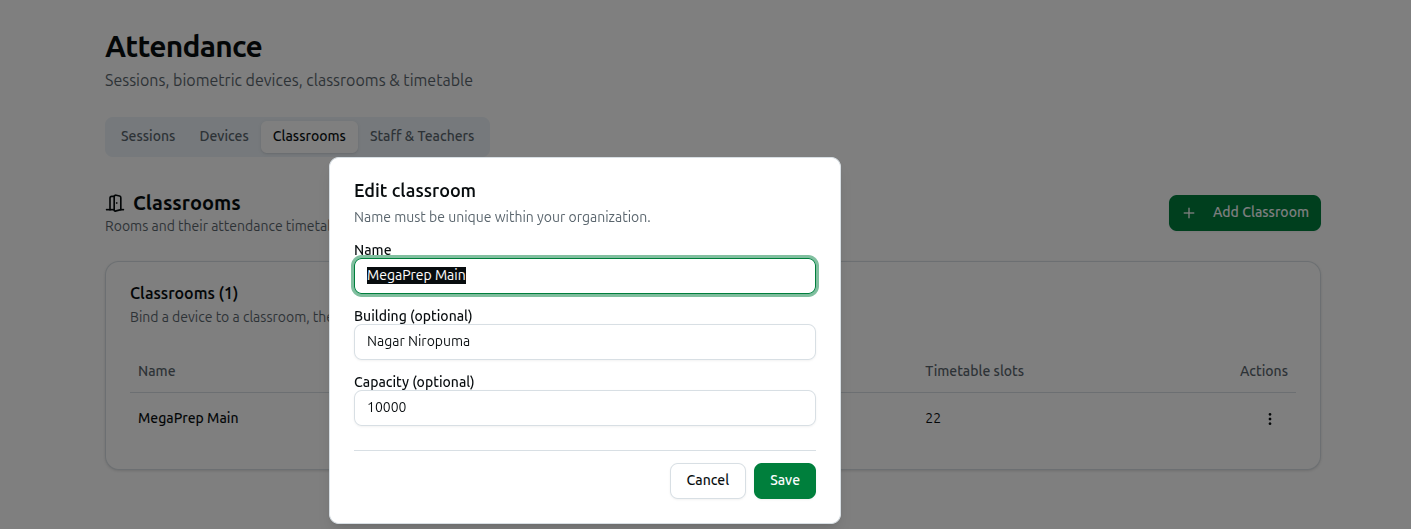
To change a room later, open its three-dot menu and click Edit. The same dialog opens with the existing values filled in; the title changes to Edit classroom. Clearing Building or Capacity and saving removes those values.
4. Setting a Classroom Timetable
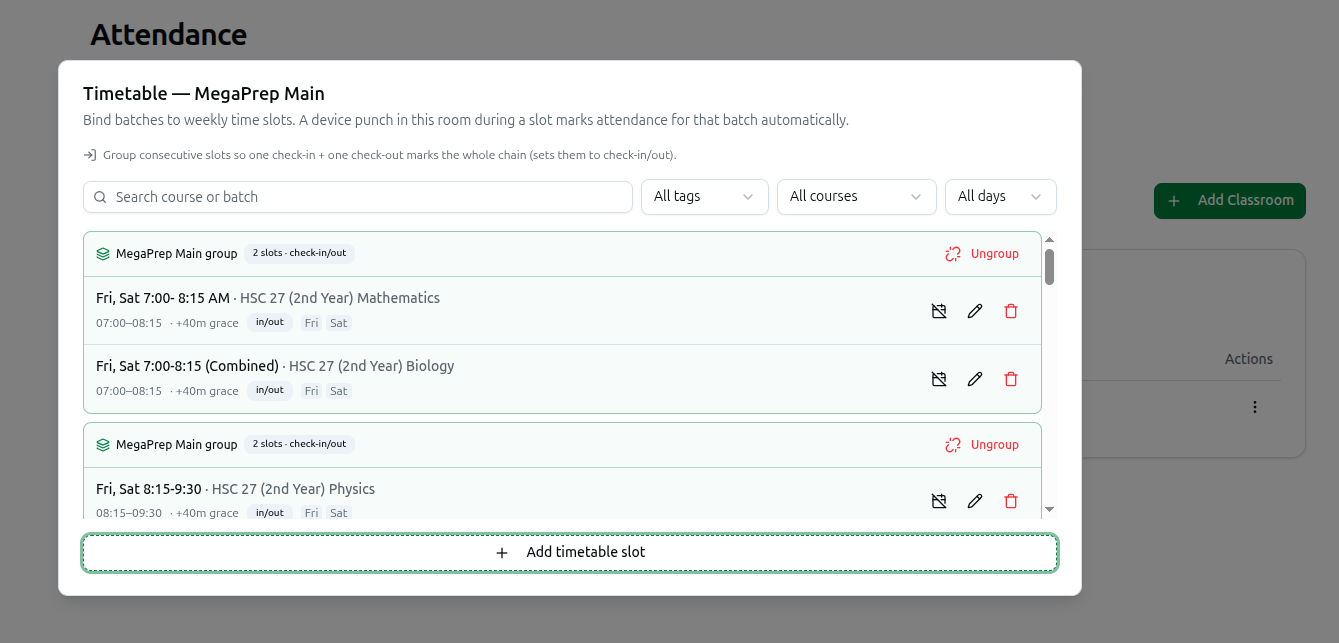
The timetable is what turns a punch into attendance. Open the room's three-dot menu and click Timetable. A window titled Timetable — room name opens.
Adding a slot
- Click Add timetable slot.
- Choose the class that meets in this room:
- Tag: Narrow the course list by tag, or leave it on All tags.
- Course: Pick the course.
- Batch: Pick the batch that actually sits in this room.
- Set the timing:
- Start and End: The wall-clock window of the class. The end time must be after the start time.
- Grace (min): How many minutes after the start time a student is still counted on time rather than late.
- Strategy: Single scan means one punch marks the student present. Check-in & out means the first punch is the arrival and the last punch is the departure.
- Days: Click the day buttons — Mon, Tue, Wed, Thu, Fri, Sat, Sun — to select which weekdays the slot repeats on.
- Extra class on one date: Pick a date here and the slot stops being weekly — it runs only on that single date, as a one-off extra class. Clear the date with the small ✕ to make it weekly again.
- Click Add slot. When you are editing an existing slot the button reads Update slot instead.
Reading a slot row
Each saved slot shows the batch and course name, the time range, the grace minutes (+15m grace), a single or in/out badge, and the weekday chips it runs on. One-off dates show an extra class badge instead of weekday chips.
Cancelling one day of class
Click the calendar icon on a slot, then pick a date under Cancel class on. Punches on that day will not mark attendance for that class. The cancelled date appears struck through on the slot — click it to restore that class.
Grouping back-to-back slots
If a batch has several consecutive periods in one room, you can group them so a single check-in and a single check-out cover the whole chain.
- Click Group slots, tick at least two slots, type a Group name, then click Group.
- When the platform notices slots on the same days sitting back-to-back, it offers them under Suggested groups — same days, back-to-back times. Click Group n on a suggestion, or Group all to accept every suggestion at once.
- Click Ungroup on a group to break it apart; the slots revert to individual scans.
Grouping switches the slots involved to check-in/out.
Finding a slot
Above the list you can search by course or batch, and filter by All tags, All courses and All days. A small clear button resets the filters.
5. Deleting a Classroom
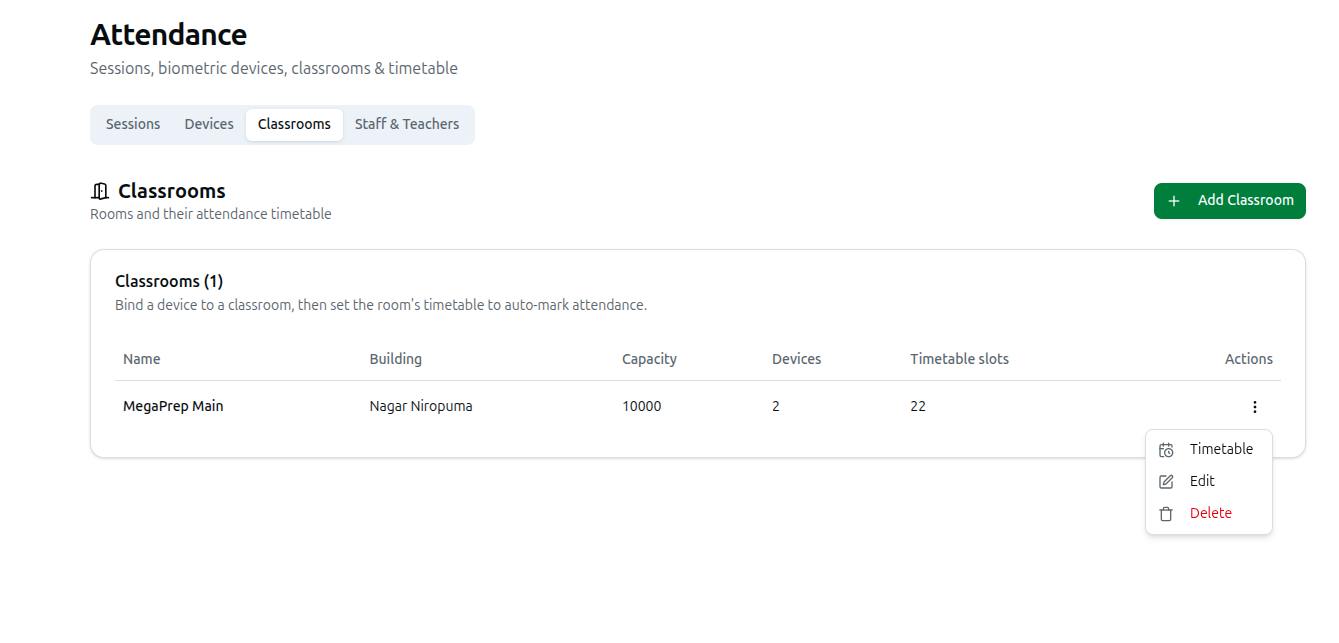
Open the room's three-dot menu and click Delete. A confirmation asks: Delete this classroom? Its devices become unassigned and its timetable is removed.
That is exactly what happens — the devices themselves are not deleted, they simply fall back to Unassigned and stop resolving punches to a timetable until you point them at another room. The room's timetable slots are gone for good.
6. What an Attendance Device Is
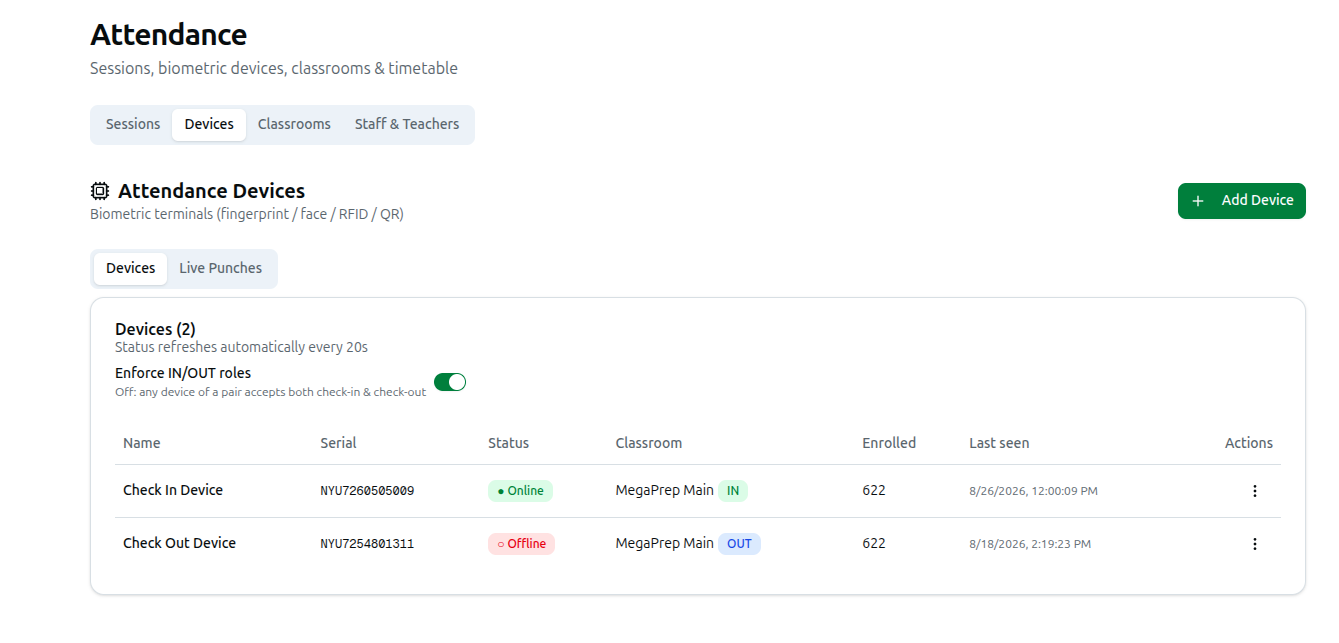
On the Devices tab you will see the heading Attendance Devices and, under it, the line Biometric terminals (fingerprint / face / RFID / QR). That is what a device is: a physical wall-mounted terminal at a door or gate that identifies a person and reports the punch to Course37.
A terminal can recognise a person in several ways, and each recorded punch tells you which one was used — fingerprint, face, RFID card, password, or a QR code read by the terminal's camera. Which of these your particular terminal supports depends on the hardware you bought.
The devices table has these columns:
- Name: Your own label for the terminal. e.g. Gate A SenseFace.
- Serial: The serial number printed on the terminal. This is how the platform recognises the machine.
- Status: ● Online, ○ Offline or Disabled.
- Classroom: The room the device is bound to, with an IN or OUT badge if you gave it a direction.
- Enrolled: How many students are currently enrolled on that terminal.
- Last seen: When the terminal last contacted the platform, or never if it has not made contact yet.
- Actions: The three-dot menu with Manage enrollments, Edit, Disable / Enable and Delete.
The card note reads Status refreshes automatically every 20s — you do not need to reload the page to watch a terminal come online.
7. Registering a Device
- Click the Add Device button at the top right.
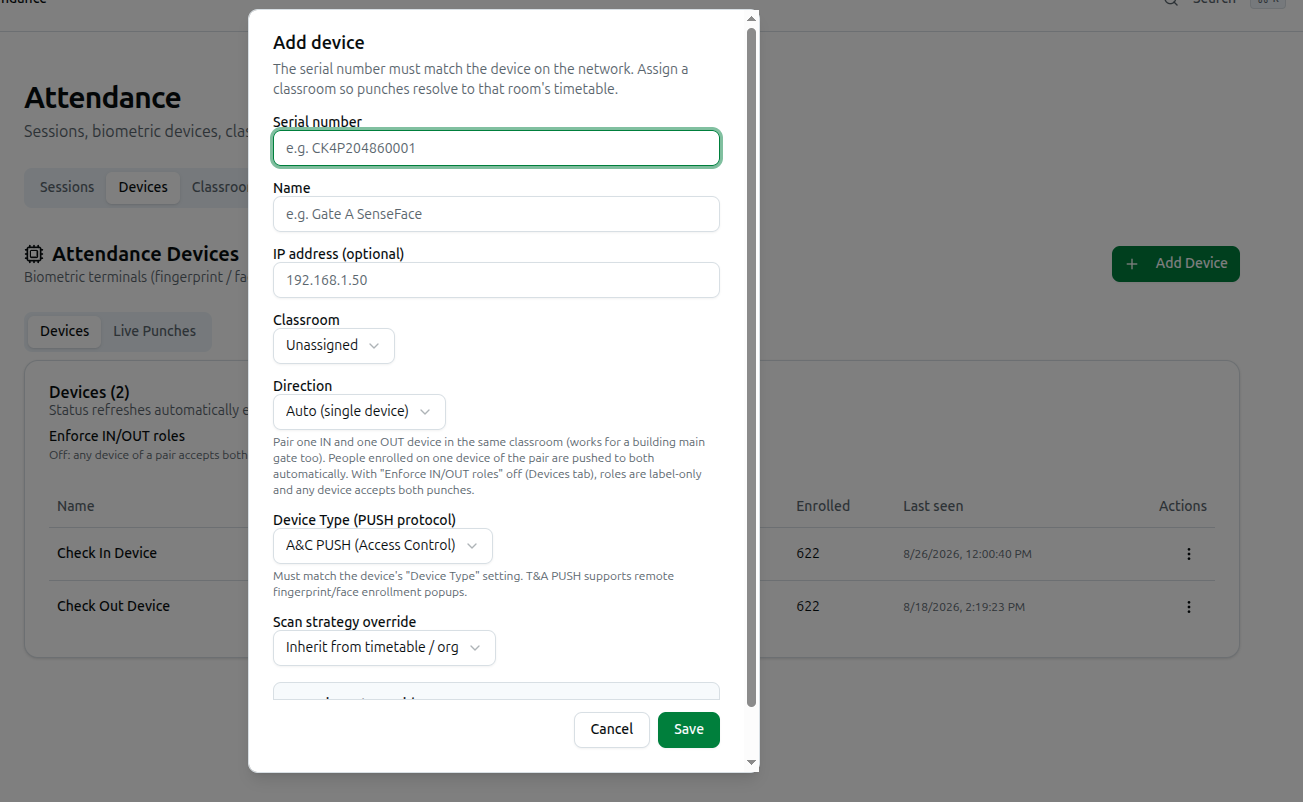
- Fill in the Add device dialog:
- Serial number: Required. Type the serial exactly as it appears on the terminal. e.g. CK4P204860001. Each serial can only be registered once — if it is already in the system you will be told A device with this serial number already exists. Once saved, the serial cannot be changed; the field is locked when you re-open the dialog to edit.
- Name: Required. A human label so staff can tell terminals apart. e.g. Gate A SenseFace.
- IP address (optional): The terminal's address on your local network. e.g. 192.168.1.50.
- Classroom: Choose the room this terminal sits in, or leave it on Unassigned.
- Direction: Auto (single device), Check-IN device or Check-OUT device.
- Device Type (PUSH protocol): A&C PUSH (Access Control) or T&A PUSH (Time & Attendance). This must match the Device Type setting on the terminal itself. T&A PUSH is preferred for attendance because it supports the remote fingerprint and face enrollment prompts.
- Scan strategy override: Leave on Inherit from timetable / org unless this one terminal must behave differently. The alternatives are Single scan = present and Check-in & check-out.
- Click Save.
The built-in setup guide
Inside the same dialog there is a collapsible Device setup guide. Expand it before you walk over to the terminal — it lists the exact values to punch into the machine:
- Cloud Server / ADMS settings: On the terminal go to Menu → Comm. → Cloud Server Setting (or ADMS) and set Server Mode to ADMS, then enter the Server Address and Server Port shown in the guide, with HTTPS on and Enable Proxy off. The guide also tells you whether Enable Domain Name should be on or off for your setup.
- Device Type: Set the terminal's own Device Type to whichever option you picked in the dropdown above. A&C PUSH terminals cannot receive remote fingerprint or face enrollment prompts, so biometrics have to be captured on the machine itself.
- Register: Enter the serial above, save, then add people under Manage enrollments. Punches then resolve against the assigned classroom's timetable.
Read these values off the guide in your own dashboard rather than copying them from anywhere else — they are filled in for your installation.
8. Pairing Two Devices for IN and OUT
Where you have two terminals at one door — one to enter, one to leave — set one to Check-IN device and the other to Check-OUT device, and give both the same Classroom. This also works for a building main gate.
- People you enrol on one device of the pair are pushed to the other one automatically, so you never have to register a fingerprint twice.
- Moving a device into a classroom that already has enrolled terminals copies those people onto the new device as well.
- On the Devices tab there is a switch labelled Enforce IN/OUT roles, described as Off: any device of a pair accepts both check-in & check-out. Leave it on to make the IN terminal accept only arrivals and the OUT terminal only departures. Turn it off and the IN/OUT labels become cosmetic — either terminal will accept both punches. You will see a confirmation reading either IN/OUT device roles enforced or Any device now accepts both check-in and check-out.
A single terminal in a room should be left on Auto (single device).
9. Enrolling People on a Device
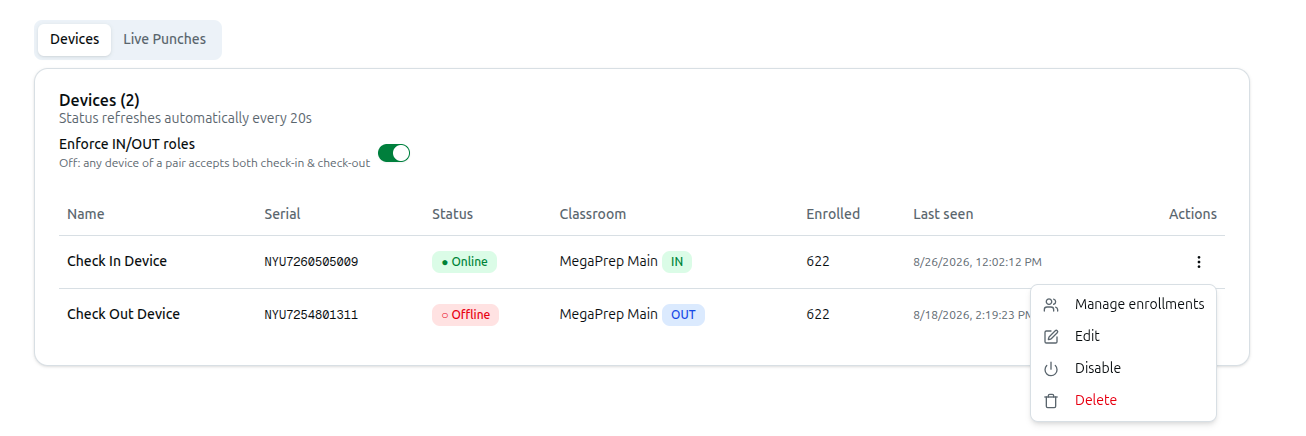
Registering the terminal is only half the job — the people who will punch on it have to be pushed to it too. Open the device's three-dot menu and click Manage enrollments. A window titled Enrollments — device name opens, with a Students tab and a Staff & Teachers tab.
Adding students
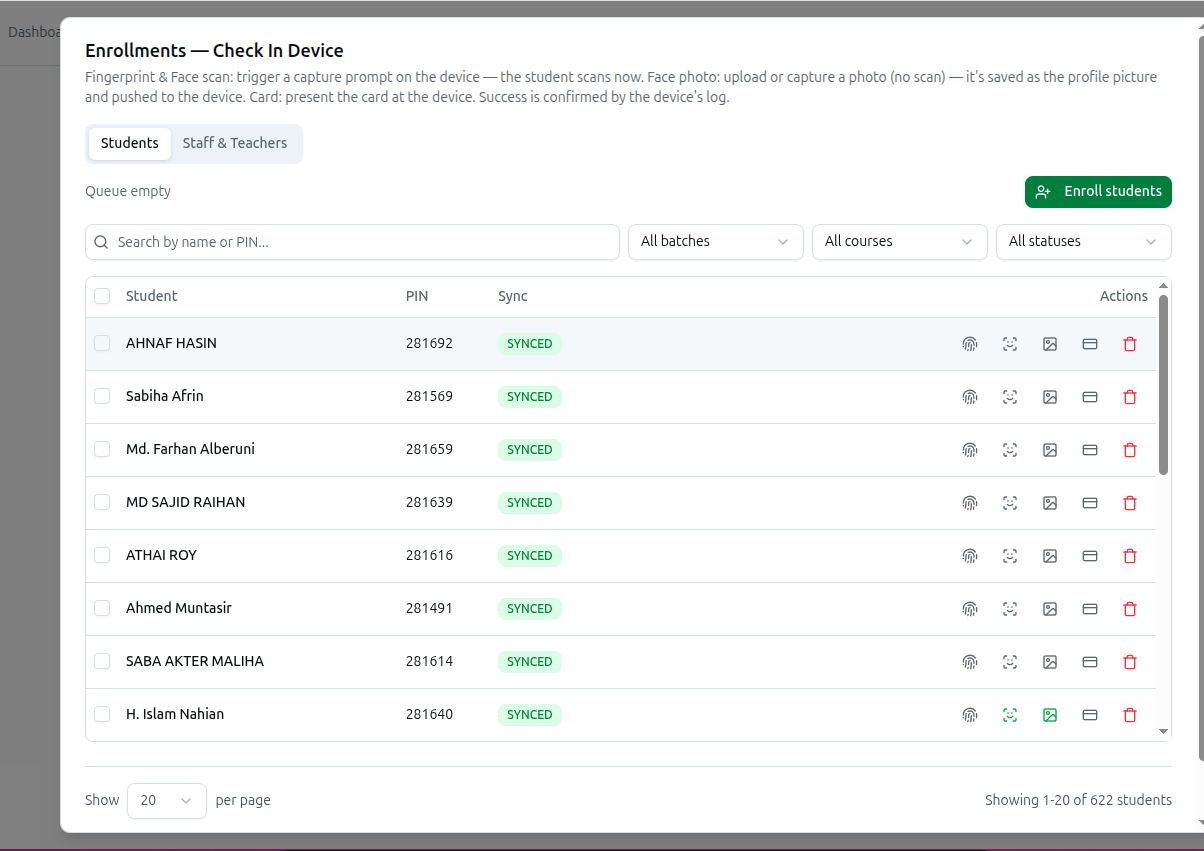
- Click Enroll students.
- Narrow the list using the tag chips, the course dropdown and the batch dropdown, or type in Search students....
- Tick individual students, or use Mark all to take everyone in the filtered list.
- Click Enroll. The students' PIN (their roll or ID number), name and card number are pushed to the terminal on its next sync.
Watching the sync
Back in the enrollments list each person shows a Sync badge: PENDING while queued, SYNCED once the terminal confirms, FAILED if something went wrong, or REMOVED after a deletion. A failure shows the reason underneath the badge. Above the table you will see either Queue empty or n command(s) queued — sent to the device one per poll (~2s each), with a Clear queue button to drop everything still waiting.
Filter the list with Search by name or PIN..., All batches, All courses and the status filter (All statuses, Synced, Pending, Failed, Removed).
Capturing biometrics
Each row carries small action buttons. The first four stay greyed out until that person's record has actually reached the terminal (Wait until the student is synced to the device):
- Fingerprint: Sends a capture prompt to the terminal — the student must go and scan their finger now. The icon turns green once enrolled.
- Face: Same idea, but the student captures their face at the terminal.
- Face photo: Upload a picture or capture one from your webcam instead — no trip to the terminal needed. The device builds a face template from it. A tick box, Also set as the student's profile picture, is there if you want it used as their profile photo too.
- Card: Opens Register card. Tap the card on the terminal, read the number off its screen, type it into Card number (from the device screen) (e.g. 1970656) and click Link card. Try device prompt asks the terminal to pop the prompt up instead. Unlink takes a linked card off again.
- Remove from device: Deletes that person from the terminal.
Tick several rows and a bar appears offering Re-sync, Fingerprint, Face and Remove for the whole selection at once.
Staff and teachers
The Staff & Teachers tab works the same way with an Enroll personnel button. As the empty state explains, their punches record a daily check-in and check-out and no timetable is needed — teachers and staff are not tied to a classroom slot the way students are.
10. Mapping a Device to a Room or a Branch
Mapping is done from the device side. Open the device's three-dot menu, click Edit, and pick a room from the Classroom dropdown, then Save. The dialog explains why: Assign a classroom so punches resolve to that room's timetable.
- A device left on Unassigned still records punches, but they cannot be matched to a class.
- Classrooms and devices are not tied to your organization's branches. If you run more than one site or block, put the site name in the classroom's Building field and assign devices to rooms in that building.
- The Devices count on the Classrooms table is the quickest way to check that every room actually has a terminal, and the Classroom column on the Devices table tells you which terminals are still floating.
11. Watching Live Punches
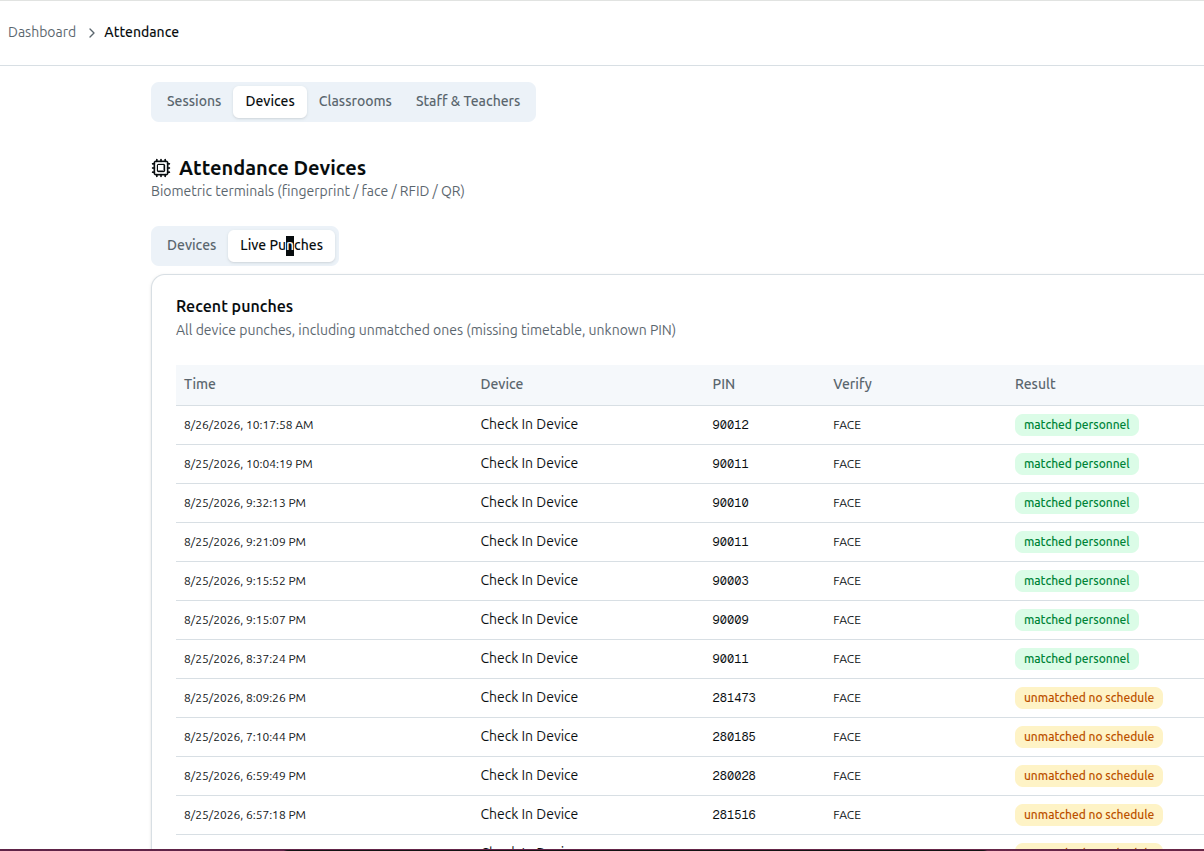
The Live Punches tab next to Devices shows Recent punches — All device punches, including unmatched ones (missing timetable, unknown PIN). It is the single most useful screen when something is not working, and it refreshes on its own.
Columns are Time, Device, PIN, Verify (how the person was recognised) and Result. The Result badge tells you what the platform did with that punch:
- matched: Resolved to a class and a student — attendance was written.
- matched personnel: Resolved to a teacher or staff member — their daily row was written.
- unmatched no schedule: The device is fine, but no timetable slot covers that room at that time.
- unmatched no student: The PIN or card on the terminal does not belong to anybody in your organization.
- unmatched not in batch: The person was recognised, but they are not in the batch scheduled at that moment.
- duplicate debounced: The same person punched again within moments — the repeat was ignored on purpose.
- ignored: The device is unknown or disabled, or the event was not a person at all.
12. Troubleshooting an Offline Device

A device shows ● Online only while it has contacted the platform very recently — roughly the last minute and a half. Miss that window and it flips to ○ Offline. Work through this list:
- Read the Last seen column first. A recent timestamp with an Offline badge means the terminal was working and has just dropped off — usually power or network. never means the terminal has never reached the platform at all, so the problem is in the initial setup.
- Check the status is not Disabled. A Disabled badge means somebody switched the device off from this dashboard, not that it is unplugged. Open the three-dot menu and click Enable to bring it back; punches from a disabled device are ignored.
- Wait 20 seconds before panicking. The list refreshes itself every 20 seconds — power-cycling a terminal takes longer than that to show up.
- Confirm the serial matches. The Serial column must match the serial on the physical terminal character for character. A typo here means the terminal talks to the platform and is turned away every time.
- Re-check the terminal's server settings. Open Edit on the device, expand the Device setup guide, and compare every value against the terminal: Server Mode, Server Address, Server Port, HTTPS, Enable Proxy and Enable Domain Name. A wrong port or a proxy left on is the most common cause of never.
- Confirm the Device Type matches. If the terminal is set to A&C PUSH but the Device Type (PUSH protocol) dropdown says T&A PUSH (or the other way round), the terminal may connect while enrollments and prompts silently fail.
- Check the network itself. The terminal needs to reach the internet from wherever it is mounted — a switched-off router, an unplugged LAN cable or a Wi-Fi password change will all show as Offline.
If the device shows Online but attendance is still not being recorded, the problem is not the device — go to Live Punches and read the Result column. unmatched no schedule points at a missing timetable slot on the classroom, unmatched no student points at somebody who was never enrolled, and a stuck PENDING count under Manage enrollments points at commands still queued.
13. Disabling and Deleting a Device
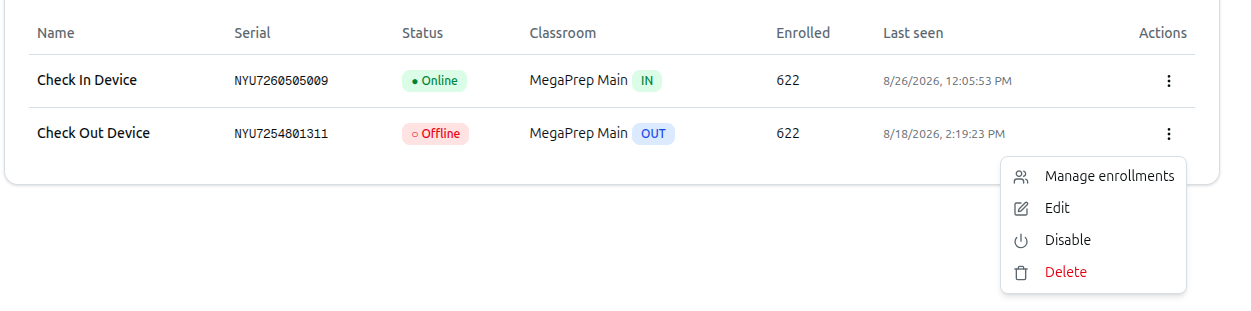
- Disable: Open the three-dot menu and click Disable. The badge changes to Disabled and punches from that terminal are ignored — useful when a room is out of use or a terminal is being serviced. Click Enable on the same menu to switch it back on.
- Delete: Open the three-dot menu and click Delete. You will be asked to confirm: Delete this device? Its enrollments and punch history are removed. This is permanent — the record of who was enrolled on that terminal and every punch it ever reported go with it. Prefer Disable unless the hardware is genuinely gone.