
1. Finding the Assignments List
In the left sidebar under Assessment, click Resources, then click Assignments. The Resources page also carries its own tab row across the top — All Items, Videos, Exams, Live Classes, Assignments, PDFs, Questions and AI Chats — so you can move between resource types without going back to the sidebar.
Every assignment in your organization is listed here, whichever course it belongs to. Each row shows:
- Name: the title students see. An Inactive badge sits beside it when the assignment is hidden from students.
- Course and Module: where the assignment lives. Every assignment belongs to exactly one module.
- Due Date: date and time together. A deadline that has already passed is shown in red.
- Marks: the total marks of the assignment, or a dash when none is set.
- Submissions: how many students have handed something in so far.
- Created: the day the assignment was added.
- Actions: the three-dot menu at the end of the row.
Click anywhere on a row to open that assignment's own page.
At the bottom you get a count such as 1–20 of 47, a page-size selector offering 10 / page, 20 / page, 50 / page and 100 / page (20 / page is the default), and arrows to step between pages.
Before you add anything the page shows No assignments found with an Add Assignment button and a Read Docs button. If filters are hiding everything you get No assignments match your current filters. instead.
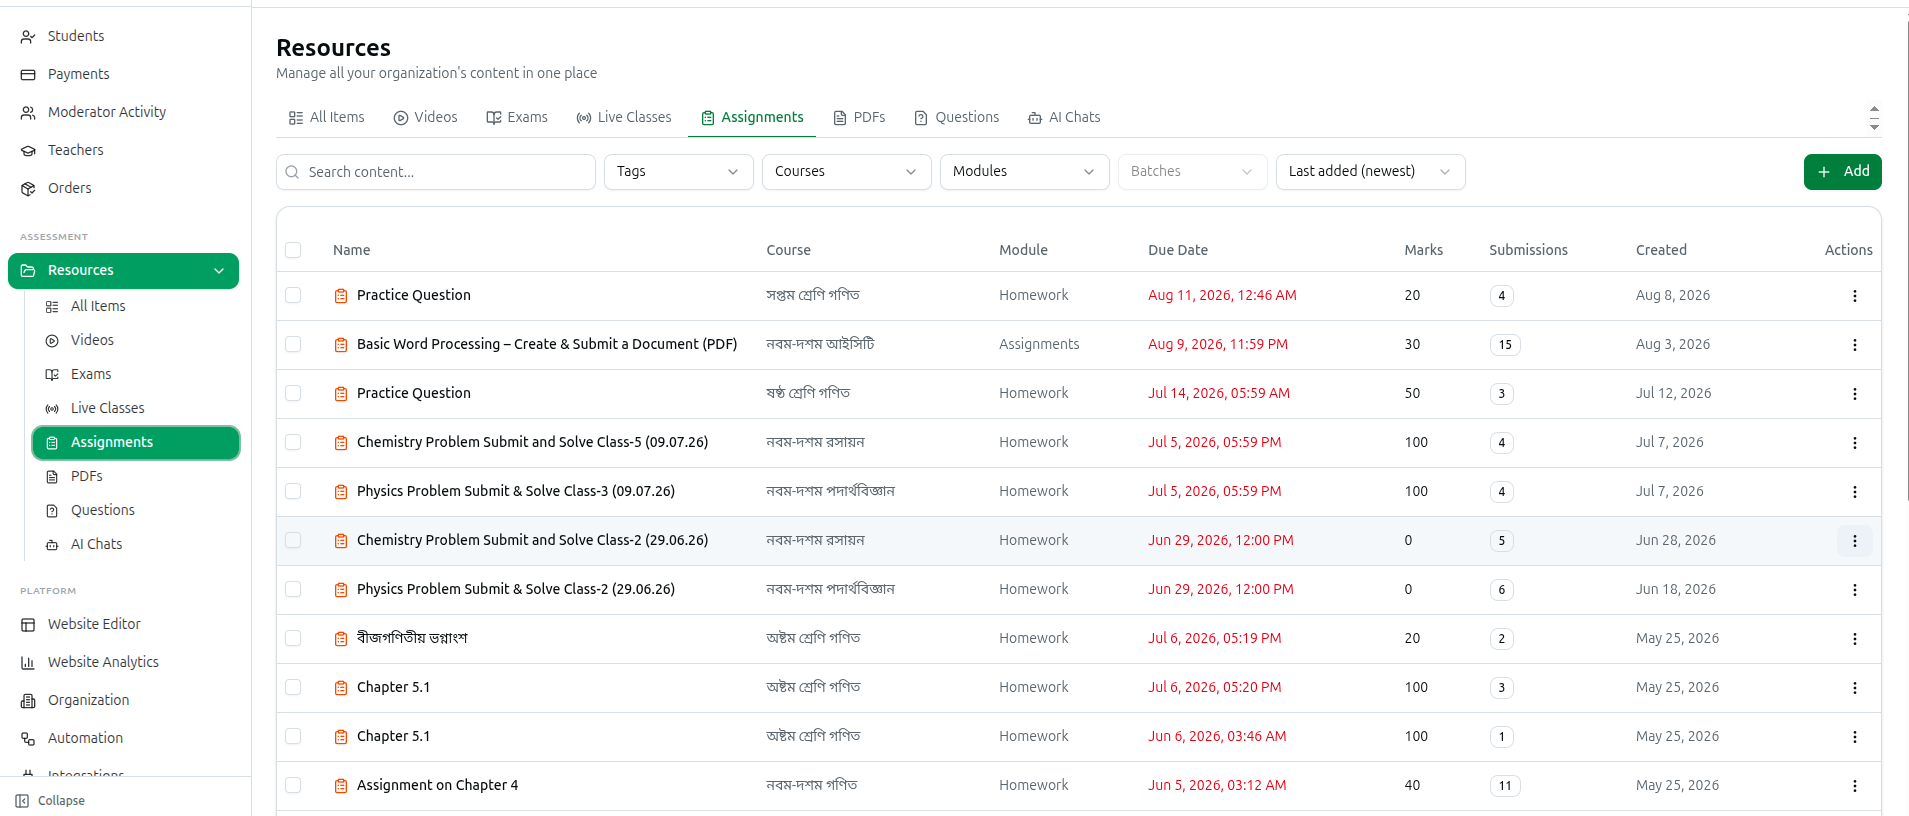
Due dates show in red once they have passed, and the Submissions badge shows how many came in — so a red date next to a low count is the row that needs chasing.
2. Searching, Filtering and Sorting
The filter row sits above the table and works across the whole library, not just the page in front of you.
- Search content...: matches the assignment name. The list waits until you stop typing before it refreshes.
- Tags: narrows the Courses dropdown — and therefore the list — to courses carrying the tags you pick.
- Courses: one or more courses.
- Modules: narrowed to the courses you selected.
- Batches: stays switched off until you pick a course first (Select a course first).
- The last dropdown in the row sorts the list. It starts on Last added (newest) and also offers Last added (oldest), Due date (soonest), Due date (latest), Name (A–Z), Name (Z–A), Total marks (high to low) and Total marks (low to high).
A Clear button appears as soon as anything is active and resets every filter and the sort together. On a narrow screen the dropdowns collapse behind a Filters button carrying a badge with the number of active filters.
There is deliberately no Subject / Chapter / Topic cascade on this tab — assignments are not filed against your curriculum, so those filters would never match anything.
Your filters live in the page address, so a filtered view can be bookmarked or sent to a colleague.
3. Creating an Assignment
Every assignment has to sit inside a course module, so the first thing you choose is where it goes.
- Click Add at the top right.
- The Where should this content go? window appears. Choose a Tag (optional — it only narrows the course list), then a Course, then a Module, and click Continue.
- The Add Module Content window opens with the Assignment tab already selected.
Now work down the form:
- Assignment Name *: required. It is the only field you cannot leave blank.
- Description: a rich-text box. Whatever you write here is saved as the assignment's instructions as well, so put the whole brief in it — what to do, what to hand in, and how it will be marked.
- Question Source: Cloud Storage (the default) or Google Drive. Switching the source clears anything you already attached.
- Question Files: shown for Cloud Storage. Click Select Question Files and pick one or more documents. The on-screen note reads Select question files (PDF, DOC, DOCX, JPG, PNG, TXT) up to 30MB each. Each file is listed with its size in MB; Add More adds to the list and the bin icon removes one.
- Question Files URL: shown for Google Drive instead. Fill in Google Drive URL and File Title (both required — the button stays greyed out until they are filled), optionally File Description (Optional), then click Add Question File. Repeat as often as you need; the links build up under Added Files, each with its own bin icon.
- Due Date: a date-and-time picker. Leave it empty for an assignment with no deadline.
- Total Marks: what the assignment is out of (for example 100).
- Order: the position of this assignment inside its module — lower numbers appear first. Leave it at 0 if the order does not matter.
- Announce to students: a checkbox at the bottom left, ticked by default. It posts a course announcement and sends a notification and a push message to the students who can see this content. Untick it to add the assignment quietly.
Click Create Assignment to save. Cancel discards everything.
Two panels on this tab are drawn but do nothing for an assignment: Assign to Batches (Optional) and Educational Classification (Optional). Neither choice is stored. Who can reach the work is decided by where you put it — the module you picked in step 2, and the batches attached to that module.
If your curriculum has not been set up yet, an amber Curriculum Not Set Up notice appears at the top of the window with a Set Up Curriculum button that opens the curriculum screen in a new tab. You can ignore it while adding an assignment.
What Course37 fills in for you. The creation form is deliberately short, so three settings are chosen for you:
- The submission type is set to File upload, so students hand in files. This one is fixed — there is nowhere to change it afterwards.
- Passing Marks is set to 40% of the total marks you typed. Change it on the assignment's own page.
- Late submissions are switched off, with no penalty. Both are changed on the assignment's own page.
4. Adding an Assignment from Inside a Course
You can also start from the course. In the left sidebar under Content, click Courses, open the course and go to its Modules tab. Every module row carries a green Add Content button; click it and the same Add Module Content window opens, already pointing at that module. When the module's own type is Assignment, the window lands on the Assignment tab for you.
It is exactly the form described in section 3 — the only difference is that the course and module are already decided, so the Where should this content go? step is skipped.
5. The Assignment Page
Clicking a row — or View Details in its three-dot menu — opens the assignment's own page.
The header shows the assignment name with a badge for its submission type (File upload, Text submission, Link submission or Mixed), plus an Inactive badge while it is hidden, a Past due badge once the deadline has gone, and a Late allowed badge when late work is accepted. The course and module names sit underneath. On the left is Back to Assignments; on the right, View on website (only when your organization has a public site) and Edit Assignment.
The Assignment Information card holds the settings, and its subtitle tells you how they work: Double-click any field to edit. Double-click a value, type the new one, then press Enter or click the green tick; Escape or the red cross cancels.
- Assignment Name: the title students see.
- Total Marks: what the assignment is out of.
- Passing Marks: the pass threshold.
- Late Penalty (%): the percentage cut applied to work handed in after the deadline.
- Due Date: the label carries your organization's timezone (for example Asia/Dhaka), so the time you type is the time your students see.
Course, Module and Submissions sit next to them for reference and cannot be edited here.
Below the fields are two switches:
- Visible to students: on means Students can see this assignment and submit their work; off means Students cannot see or submit this assignment. This is the safe alternative to deleting.
- Allow late submissions: off means submissions close at the due date. On means late work is accepted with the Late Penalty (%) applied.
6. Editing an Assignment
There are two ways in.
From the list. Open the three-dot menu on a row and click Update. The Edit Content window opens on the Assignment tab with the current values loaded, and the save button reads Update Assignment. Five things are saved from here: Assignment Name, Description, Due Date, Total Marks and Order. There is no Announce to students checkbox when editing — updates are never announced.
From the assignment page. Double-click any field in the Assignment Information card, or click Edit Assignment to open the same window. The page is the only place to change Passing Marks, Late Penalty (%), Visible to students and Allow late submissions.
Question files cannot be swapped from the edit window. To publish a different question paper, create a new assignment and remove the old one.
If an assignment is not attached to any module, Update refuses to open and tells you This assignment is not attached to a module and cannot be edited here.
7. Deleting an Assignment
Open the three-dot menu on a row and click Delete. The confirmation reads Are you sure you want to delete "name"? This action cannot be undone. Assignments that already have submissions cannot be deleted.
That last sentence is a hard rule rather than advice. As soon as one student has submitted, Course37 refuses and shows Cannot delete assignment with existing submissions. Consider archiving instead. Switch Visible to students off on the assignment page instead — the work and its grades stay intact, and students stop seeing it.
8. Working on Several Assignments at Once
Tick the checkbox at the start of any row and a selection strip appears above the table showing N selected, four buttons and a Clear link.
- Move: opens Move to another Module — choose a Target Module and the selected assignments move there.
- Copy: copies the selected assignments into another course's module.
- Set Hierarchy: always greyed out for assignments. Hover it and the tooltip explains why: Assignments have no subject/chapter/topic.
- Delete: opens Delete N Items?, which lists everything selected. The submissions rule from section 7 still protects each one.
The checkbox in the table header selects only the rows on the page you are looking at. Selections survive paging forwards and back, but they clear the moment you change a filter, so you can never act on rows you can no longer see.
9. Sending Students to an Assignment
When your organization has a public website, the three-dot menu adds two sharing actions:
- View on website: opens the assignment exactly as a student sees it, in a new tab.
- Copy Student Link: copies that address to your clipboard, ready to paste into a message or an announcement.
10. Where Submissions Are Reviewed
Everything to do with student work lives further down the assignment's own page — there is no separate submissions screen, and an old bookmark to an assignment's submissions page lands here too.
Two tabs sit above the results, with a Refresh button on the right:
- Submissions (N): every student who has handed something in.
- Not Submitted (N): enrolled students with nothing handed in.
The Submissions tab opens with an Assignment Statistics card holding six tiles — Enrolled, Submitted, Graded, Late, Missing and Average (the average only appears once something has been graded) — above a green participation bar reading N submitted and N missing.
Under it the Submissions table lists Merit, Student, Status, Submitted At, Score, Files and Actions. Status is one of Submitted, Graded, Returned, Late or Draft, with a separate yellow Late flag on work that arrived after the deadline. The Merit column ranks graded submissions by score, equal scores share a position, and the earlier submission wins a tie.
Three controls narrow the list:
- Search by student name or email.
- A status dropdown, which starts on All Status and also offers Submitted, Graded, Returned, Late Submitted, Draft, Late (flag) and Not Graded.
- A sort dropdown, which starts on Merit position and also offers Score (high to low), Score (low to high), Submitted (newest), Submitted (oldest) and Student name (A–Z).
Page sizes here are 20 / page, 50 / page, 100 / page and All.
11. Grading One Student at a Time
Click Grade on a row. The grading view opens on that student, with Back to list at the top left and Prev Student / Next Student on the right showing Student 3 of 40, so you can work down the class without going back to the table.
If the student handed in a PDF, a PDF Marking panel appears above the grading form. Its toolbar is a row of icon buttons — select, pen, eraser, arrow, rectangle, circle and text — followed by a colour row, a Size slider, zoom - / + / Reset, an undo arrow and a red Clear Page. A page slider showing Page 3 / 12 steps through the document, and when a student uploaded more than one file, Prev File and Next File move between them. A typed answer appears instead in its own Text Submission card.
The Grading card is where the mark is set:
- Score: a number, with Out of N marks underneath and the live percentage beside it.
- Feedback: free text the student reads with their result.
- Request Revision: a switch. Turning it on adds Revision Note (explain what needs to be revised) and Revision Deadline (a date), sending the work back to the student instead of closing it off.
Click Save Grade. Anything you drew on the PDF is stored with the grade, so reopening the submission brings your marking back.
12. Grading Many Students at Once
The buttons above the Submissions table handle the whole class.
- Assign Marks: opens a marks sheet listing every enrolled student, including those who never submitted — a No submission badge tells them apart, and typing a score for one creates their submission already graded. Search by name, roll or contact, or type a number and click Fill N shown to apply it to everyone currently listed. The footer counts N row(s) edited; click Save Marks. The window warns that the late penalty is not applied to marks typed here.
- Bulk Grade (N), under the More menu: applies one Score (out of N) and one shared Feedback (optional) to every non-draft submission you ticked, via Apply to N. Drafts are skipped, so a selection of drafts alone leaves the item greyed out. Late submissions still get the assignment's late penalty on top.
- Export: downloads the filtered results as a spreadsheet. Tick rows first to export only those — the button then reads Export (N).
- Merit List: downloads a ranked spreadsheet with merit position, roll number, student ID, name, score, max score and percentage. It stays greyed out until something has been graded.
- Merit PDF: opens the Merit List Exporter, the same poster maker the exam merit lists use, ready to print or share.
- Notify All / Notify (N), under More: opens the messaging window with those students as recipients and the subject already written (Your submission for ...).
- Delete Selected (N), under More: permanently removes the ticked submissions along with their scores, feedback and annotations. The bin icon on a single row does the same for one student. Neither can be undone.
13. Chasing the Students Who Have Not Submitted
Switch to the Not Submitted (N) tab for the list of enrolled students with nothing handed in, showing Student, Email and Mobile. Search by name, email or mobile narrows it.
- Export CSV downloads the list; tick rows first and the button becomes Export CSV (N).
- Notify All — or Notify (N) with rows ticked — opens the messaging window with a reminder subject already written (Reminder: ... is still pending).
When nobody is missing, the tab simply reads Everyone has submitted.