
1. What the Not Enrolled Students View Is For
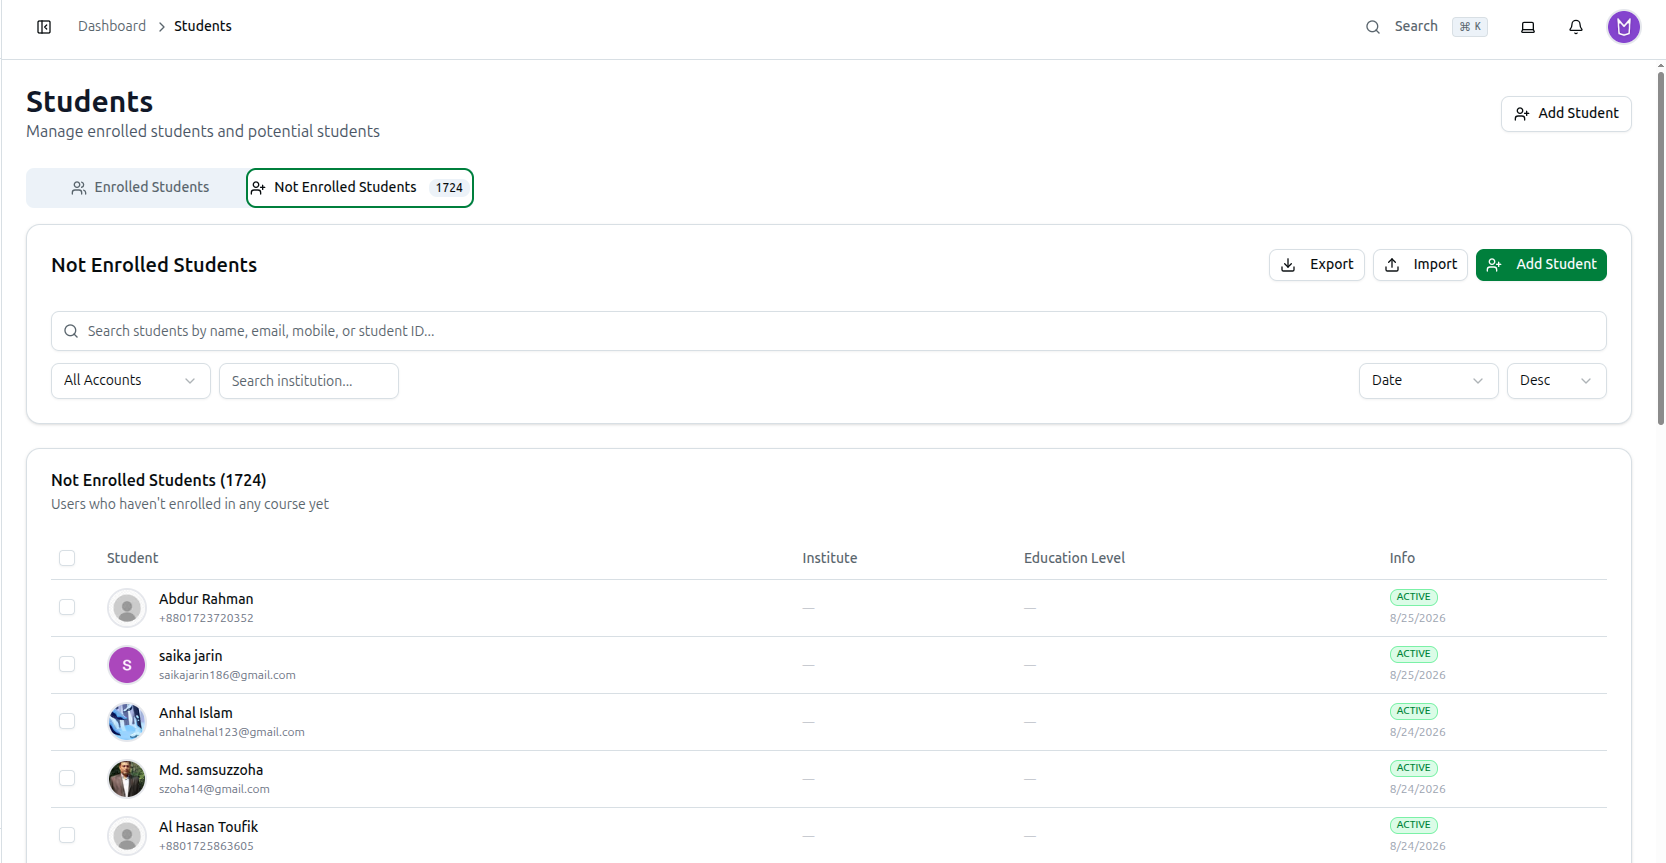
The Not Enrolled Students view lists every student account in your organization that has never been enrolled in a course and has never been given a book or PDF. These are usually people who registered on your website but never bought anything, leads your staff typed in by hand, and students imported from a CSV who were never attached to a course.
Use this list to see who is still waiting for a follow-up call, to clean out dead accounts, and to enrol a student the moment they pay.
2. How to Reach It
- In the left sidebar under Students, click Students.
- The page opens on the Enrolled Students tab. Click the second tab, Not Enrolled Students.
- The small number badge on that tab is the total count of students who have never enrolled.
You can also press Ctrl + K (Cmd + K on Mac) to open the dashboard search box — "Search pages, features, and content..." — type "Students Without Course" and pick it. It opens exactly the same tab.
Every filter you set is kept in the page address, so you can bookmark a filtered follow-up list or send the link to a colleague.
3. What the List Shows
The table card is titled Not Enrolled Students followed by the total in brackets. Below the title you will see either "Users who haven't enrolled in any course yet" or, once you filter, "Filtered results: N students".
Each row has four columns:
- Student: Profile photo, full name, email and mobile number.
- Institute: The school or college saved on the student's profile. A dash (—) means nothing was recorded.
- Education Level: The class or level (for example HSC, Class 10, BSc), or a dash if empty.
- Info: The account status badge plus the date the account was created (the joined date).
The status badge shows the login account state, not a course state: ACTIVE, INACTIVE, SUSPENDED or BLOCKED. Accounts with no status recorded are shown as INACTIVE.
Click anywhere on a row (except a checkbox) to open that student's full profile. The back arrow on the profile brings you straight back to this list with your filters still applied.
If nothing matches, the table shows "No students found matching your filters", or "No students found without course enrollment" when no filters are on.
4. Search, Filters and Sorting
Above the table you get one search box and a row of filter controls:
- Search students by name, email, mobile, or student ID...: Type any part of a name, email address, mobile number or student ID. The list refreshes about half a second after you stop typing.
- Account: Dropdown to filter by account state — All Accounts, Active, Inactive, Suspended or Blocked.
- Search institution...: Type part of a school or college name to keep only students from that institute.
- Sort: Choose Date or Name, then Desc or Asc next to it. The default is Date + Desc, so the newest registrations sit on top.
When any filter is active, a Clear button appears at the top right of the filter card. Clicking it empties the search box, sets Account back to All Accounts, clears the institution box and returns sorting to Date / Desc.
At the bottom of the table you can set Show to 20, 50, 100 or 200 per page. The line beside it reads "Showing 1-20 of 340 students", and you move around with Previous, Next or the numbered page buttons.
5. Selecting Students and Bulk Actions
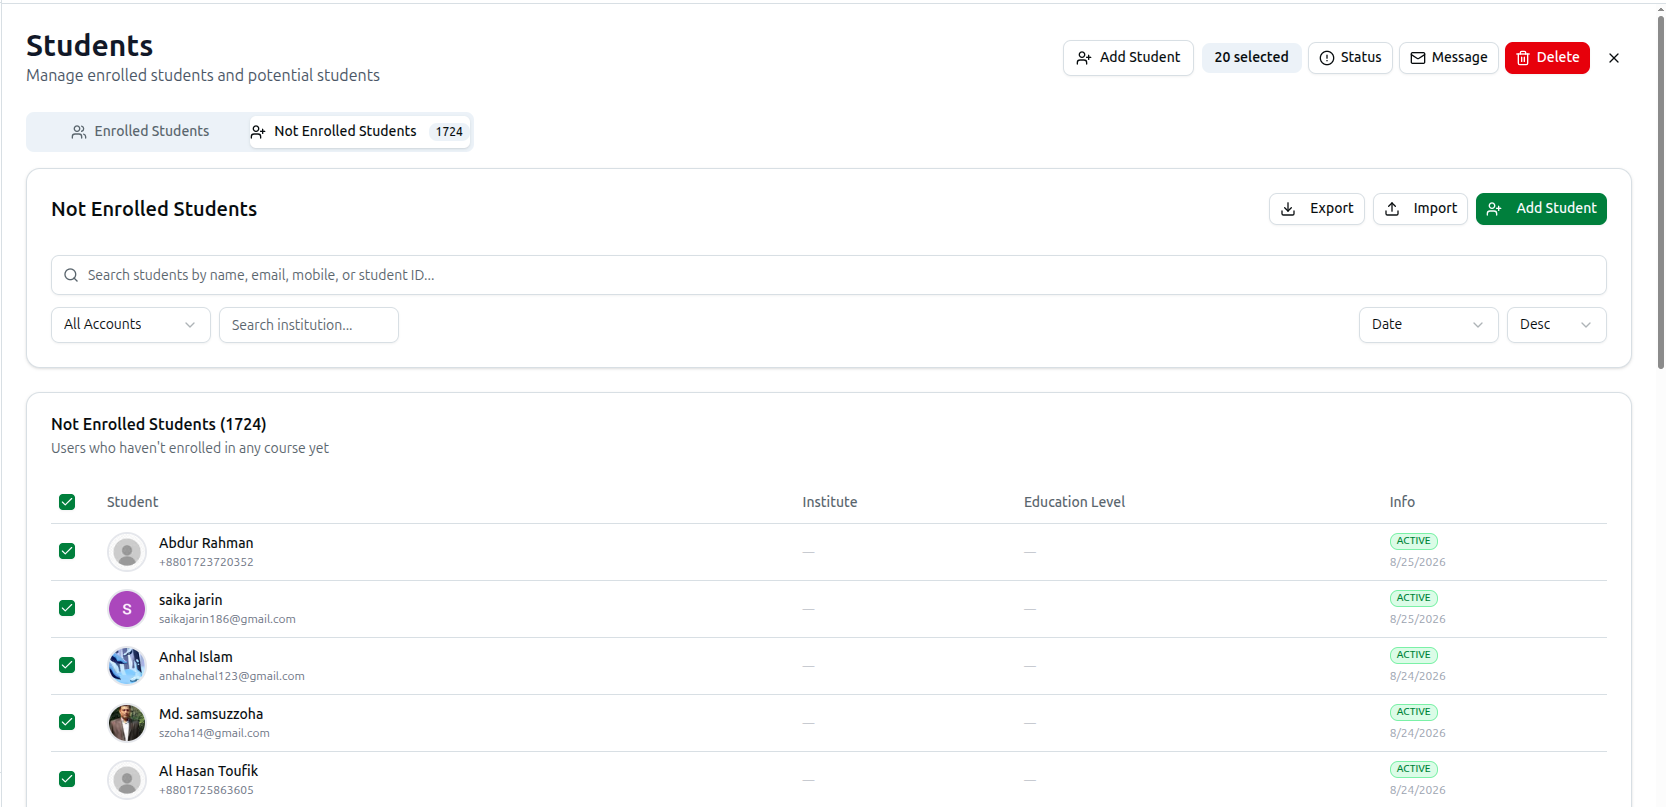
Tick the checkbox at the start of a row to select that student, or the checkbox in the table header to select every student on the page you are currently viewing (it selects the current page only, not the whole filtered list).
As soon as one student is ticked, a N selected badge and a row of bulk buttons appear at the top of the page:
- Status: Changes the account state of everyone selected. For students who are not enrolled, use Active, Inactive or Suspended — these are the account states this list filters on. The remaining choices in the menu (Payment Due, Access Restricted, Graduated, Dropped Out) describe enrolled students and will come back as a failure here.
- Delete: Removes the selected accounts. A warning appears first — "Delete N user(s)?" — with the note that this permanently deletes the users and all their related data. Click Delete in that warning to go ahead, or Cancel. This cannot be undone, so use it only for junk or duplicate registrations.
- X: Clears your selection. Switching tabs clears it as well.
Note: the Message button shown in this bulk bar does not pass the selected not-enrolled students into the message window — it opens with zero recipients. Send bulk email, SMS or push notifications from the Enrolled Students tab instead.
6. Enrolling a Student From This List
There is no bulk enrol button on this tab. A student becomes enrolled when you record a payment for a course, so do it one student at a time:
- Click the student's row to open their profile.
- Open the three-dot More actions menu at the top right and choose Add New Payment.
- Under Customer Information their Full Name, Mobile and Email are already filled in for you. Pick the course, then set the batch, discount and installments as usual.
- Save the payment.
The moment the payment is saved the student counts as enrolled: they drop off Not Enrolled Students and show up on the Enrolled Students tab. Giving a student a book or PDF has the same effect — this list only holds students with no course and no book.
7. Exporting the Follow-Up List
Click Export at the top right of the filter card, next to Import and Add Student, to download an Excel file named not-enrolled-students_ followed by today's date. The button reads Exporting... while the file is being built, and is greyed out when the list is empty.
The file has one row per student with these columns: SL, Name, Mobile, Email, Institution, Education Level, Status and Joined Date.
The export contains the students currently shown on screen — that is, the page you are on with the filters you have applied. Before exporting a big follow-up list, set Show to 200 per page, or narrow the list with a filter first, so everything you need is on one page.
8. Adding More Not Enrolled Students
Two more buttons in that same header let you grow this list without creating any enrolment:
- Add Student: Opens the Add New Student form. Name is required, and you must give either a Mobile (11 to 14 digits) or an Email. The optional fields are Institution, Class / Level, Address, Location / City, Guardian Name and Guardian Contact. Click Add Student to save.
- Import: Opens Import Not Enrolled Students for a bulk CSV upload. Click Sample CSV to get the correct format. Every row needs a name plus either a mobile or an email; institution, education level, address, guardian name, guardian contact and location are optional. After you upload, a preview shows how many rows are valid and how many are invalid (will be skipped), and Import N Students runs the import with a progress bar and a final imported / failed summary.