
1. Opening the Certificate Designer
Certificate templates are designed once for your whole organization, then attached to individual courses. There is no direct link in the left sidebar, so open the designer in one of two ways:
- Click Search in the top bar (or press Ctrl + K), type certificate, and pick Certificate Templates from the results.
- Or open a self-paced course, go to its Certificate tab, and click the Design templates link.
Only an Admin can open this page — teachers and moderators cannot design or issue certificates.
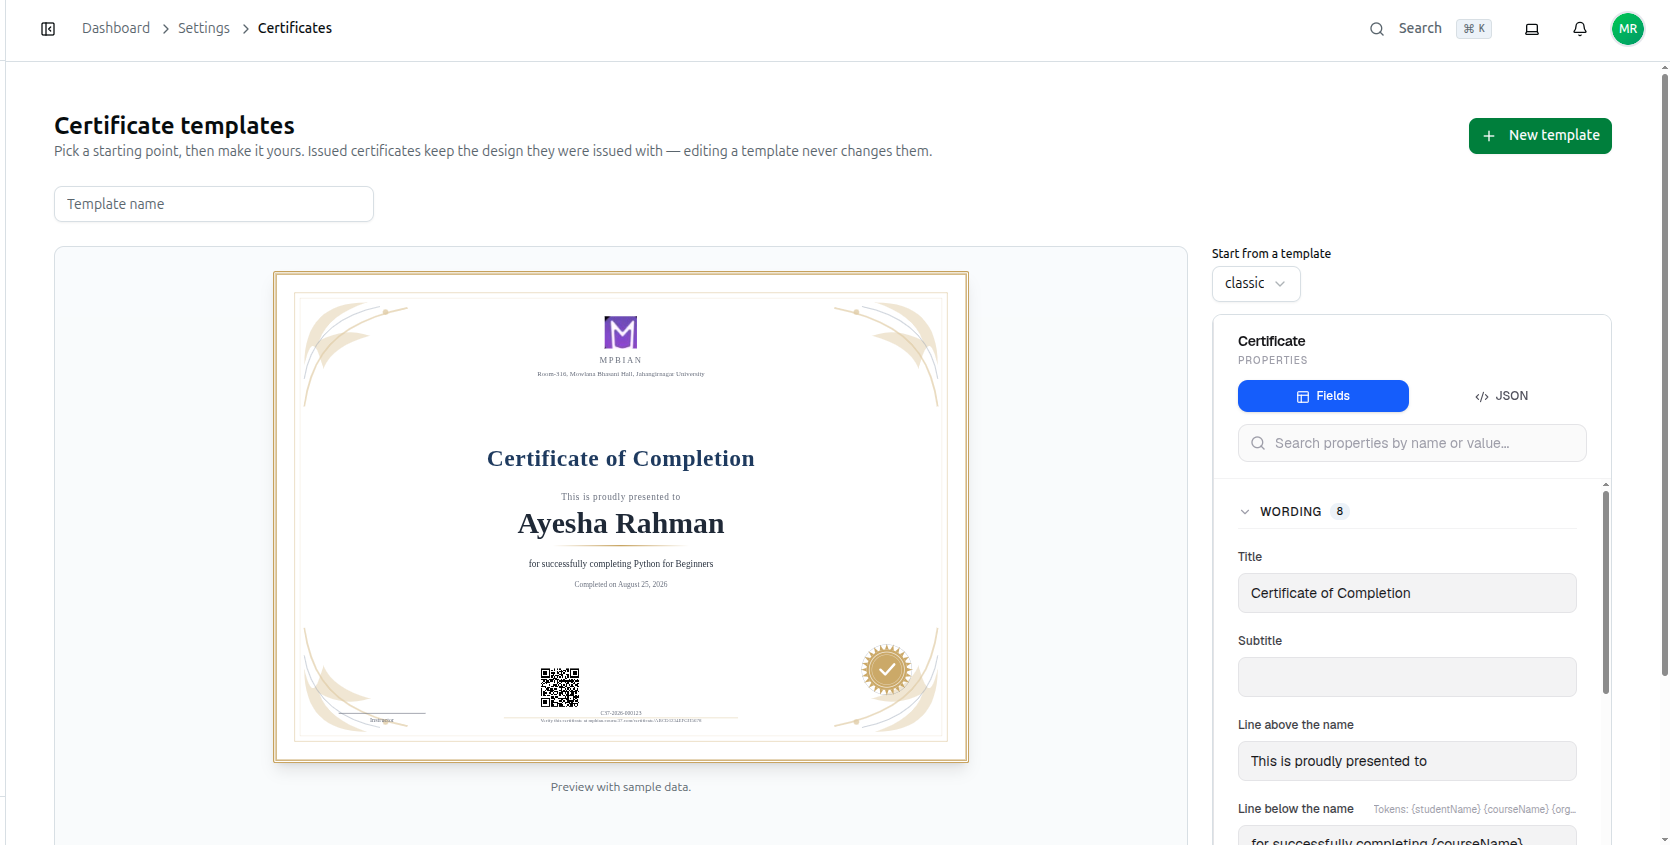
The page header reads Certificate templates and reminds you of the most important rule: issued certificates keep the design they were issued with — editing a template never changes them.
2. The Page at a Glance
The page has four parts, top to bottom:
- New template: The button in the top-right corner. It clears the editor and starts a fresh design from the classic look.
- The template row: Every saved template appears as a small chip. Click a template's name to load it into the editor. A Default badge marks the one used when a course does not name its own. The star icon (Make default) promotes a template; the red bin icon (Delete) removes it.
- Template name: A single text box (placeholder Template name). Give every template a name — names must be unique inside your organization, and can be up to 120 characters.
- The editor: A live preview on the left and the properties panel plus Save template on the right.
You can keep up to 20 certificate templates. A template that has already issued certificates cannot be deleted — you will see a message telling you how many certificates it has issued.
3. Starting From a Ready-Made Design
Above the properties panel is the Start from a template dropdown. Six starting points are built in:
- Classic: Navy and gold, double border, classic diploma corner flourishes and a gold seal. Titled Certificate of Completion.
- Elegant: Deep maroon with an ornate border, a medallion background and the subtitle Awarded in recognition of dedication and accomplishment.
- Modern: Blue, rounded corners, corner brackets, diagonal ribbons and no seal.
- Minimal: Plain black on white, thin single border, no background art, no seal and no QR code.
- Ornate: Purple, thick ornate border and a crest-and-bands background.
- Bengali: The classic look with every line already written in Bangla (সমাপনী সনদপত্র), a Bangla font and Bengali dates.
When you pick a starting point, your organization's primary and accent brand colours are layered on top automatically, so the certificate matches your branding without any extra work.
Careful: Choosing a different starting point replaces everything in the editor with that design. Pick your starting point first, then customise.
4. The Live Preview
The left half of the editor is the certificate itself, drawn at a reduced size and captioned Preview with sample data. It redraws instantly with every change you make.
The sample student is Ayesha Rahman, the sample course is Python for Beginners and the sample serial is C37-2026-000123. Everything about your organization, however, is real — the preview pulls your actual logo, name, address and website domain, so what you see is what your students will receive.
This is not a drag-and-drop canvas. Every element sits in a fixed, professionally balanced position, and you control whether it appears and how it looks rather than where it sits:
- Top: logo, organization name, organization address, website domain.
- Middle: title, subtitle, the line above the name, the student's name on its own large line, a decorative rule, the line below the name, and the completion date.
- Bottom-left: signature 1.
- Bottom-centre: the QR code, the serial number and the verification line.
- Bottom-right: signature 2 — and the gold seal, which sits in the same corner.
5. The Properties Panel
The right-hand panel is where every change is made. It has two tabs:
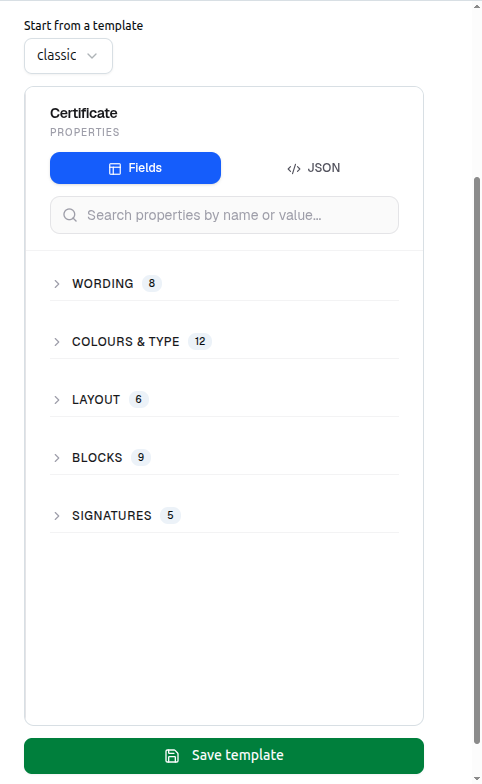
- Fields: The normal way to edit — a form with a search box (Search properties by name or value...) and five collapsible groups: Wording, Colours & type, Layout, Blocks and Signatures. Each group header shows how many settings it contains; the first one is open when the page loads.
- JSON: The same settings in raw form, for advanced use. It also has a Copy AI Prompt button, which copies a complete description of the certificate to your clipboard — you can paste it into any AI assistant, ask for a redesign, and paste the reply back into this tab.
Some settings only appear once the thing they control is switched on. For example, the Background opacity slider stays hidden until you have chosen a background image.
6. Wording and Merge Fields
Open the Wording group to write the certificate's text:
- Title: The big heading. Certificate of Completion by default.
- Subtitle: An optional line under the title.
- Line above the name: This is proudly presented to, or whatever you prefer.
- Line below the name: The main sentence, written in a larger text box. for successfully completing {courseName} by default.
- Organisation name override: Leave it blank to use your registered organization name. Fill it in to show a different name — most useful for printing your Bangla name on a Bangla certificate. Only appears when Show organisation name is on.
- Date label: The words in front of the date, Completed on by default. Only appears when Show completion date is on.
- Verify text: The words in front of the verification link, Verify this certificate at by default. Only appears when Show verify URL is on.
- Date language: Controls the month names and digits on the completion date — Automatic (viewer), English, or বাংলা (Bengali), which prints dates like ১৬ জুলাই, ২০২৬.
Merge fields. The title, the subtitle, both lines around the name, the date label and the verify text accept these placeholders, which are replaced with real values at the moment the certificate is issued:
- {studentName} — the student's full name
- {courseName} — the course name
- {orgName} — your organization's name
- {date} — the completion date
- {serialNumber} — the certificate's serial number
Type them exactly as shown, inside your own sentence. For example: "has successfully completed {courseName} on {date}".
The student's name is always printed on its own large centred line. Do not also put {studentName} into the line above or below it, or the name will appear twice.
7. Colours, Background and Type
Open the Colours & type group:
- Primary colour: Used for the title and the heavier background art. Pick with the colour swatch or type a hex code.
- Accent colour: Used for the border details, the rule under the name, the seal and the website line.
- Background: The paper colour of the certificate.
- Text: The main body text colour.
- Muted text: The colour of the smaller supporting lines (organization name, date, serial, signature titles).
- Background art: Built-in decoration drawn from your own two colours, so nothing needs uploading — None (plain), Flourish (classic diploma), Medallion, Waves, Diagonal ribbons (modern) or Crest & bands.
- Gold seal: Adds an embossed gold starburst seal at the bottom right. It sits exactly where signature 2 goes, so use one or the other.
- Background image: An optional picture of your own, layered over the built-in art (see the next section).
- Background opacity: A slider from 0 to 1 controlling how faint your uploaded image is. Only appears after an image is chosen.
- Font: Thirteen choices. Latin-only serif and sans families — Georgia, Times New Roman, Playfair Display, EB Garamond, Merriweather, Inter, Poppins, System — plus five Bangla families that display Bengali correctly: Hind Siliguri, Noto Sans Bengali, Tiro Bangla, Anek Bangla and Baloo Da 2.
- Title size: 14 to 60.
- Name size: 16 to 72 — the student's name is normally the largest thing on the sheet.
- Body size: 8 to 24. The smaller supporting lines scale from this.
8. Layout and Border
Open the Layout group:
- Orientation: Landscape or Portrait.
- Width (mm) and Height (mm): The physical paper size, from 100 to 420 millimetres each. A4 landscape is 297 x 210, the default.
- Border: None, Solid, Double, Ornate or Corner brackets.
- Border width: 0 to 20.
- Corner radius: 0 to 40, for rounded corners.
9. Turning Blocks On and Off
Open the Blocks group. Each of these is a simple on/off switch, and the preview updates the moment you flip one:
- Show logo: Prints your organization logo at the top.
- Logo override: Upload a different logo just for this certificate. Blank uses your organization's logo. Only appears when Show logo is on.
- Show organisation name: Prints your organization's name under the logo. If your logo is a lettering (wordmark) logo, this line hides itself automatically so the name is not printed twice.
- Show organisation address: Prints the address from your organization profile.
- Show website domain: Prints your custom domain, or your yourschool.course37.com address.
- Show completion date: Prints the date the student finished the course.
- Show serial number: Prints the running serial (C37-2026-000123 style) under the QR code.
- Show verify URL: Prints the public verification link.
- Show QR code: Prints a QR code that opens the public verification page for that exact certificate.
10. Signatures
Open the Signatures group. Two signature blocks are available, one at each bottom corner:
- Signature 1: Switch on the left-hand signature block. On by default, titled Instructor.
- Signature image: Upload a scanned signature. Leave it empty for a blank ruled line to sign by hand.
- Name: The signatory's printed name, shown above the title.
- Title: Their role, for example Principal or Course Director.
- Signature 2: The same four settings for the right-hand corner, titled Director by default. Off by default.
Signature 2 and the Gold seal occupy the same bottom-right spot. Turn the seal off if you want a second signature there.
11. Uploading Images
The Background image, Logo override and both Signature image fields all use the same picker. When the field is empty you get three buttons:
- Upload Image: Choose a file from your computer. Source files must be under 10MB.
- Library: Opens Select Image from Library, a searchable, paged grid of everything already uploaded to your organization.
- URL: Paste a direct link to an image hosted elsewhere, then click Add.
After you choose a file the Crop Image window opens. Drag to set the visible area, then click Crop & Upload, or Skip Crop & Upload to keep the whole picture, or Cancel to back out. Uploads are automatically compressed to 512KB or less, so a heavy photo will not slow down printing.
Once an image is set you can see a thumbnail, copy its address, or remove it with the small red X in its corner.
12. Saving the Template
- Type a name into the Template name box at the top of the page.
- Click Save template at the bottom of the right-hand column.
- A Template saved message confirms it, and the template appears as a chip in the row at the top.
Saving while a template chip is selected updates that template. To create a second design instead, click New template first, which clears the selection and starts fresh.
Your very first template automatically becomes the Default. To change which one is the default later, click the star icon on any other template chip and confirm the Default template set message.
13. Switching Certificates On for a Course
Designing a template does not issue anything. You must switch certificates on course by course:
- In the left sidebar under Content, click Courses and open the course. The Certificate tab only exists on self-paced courses.
- Open the Certificate tab.
- Turn on Issue a certificate.
- Choose your design in the Template dropdown. The organization default is pre-selected and marked (default).
- Set the completion rules:
- Require all lessons complete: On by default. The certificate is only issued once every published lesson in the course is finished.
- Require approval: Off by default. When on, finished students land in a PENDING queue and an admin must approve each one before the student can see it.
- Click Save certificate settings.
If you turn certificates on without any template existing, you will be told to pick a certificate template first, or create one in the designer.
14. How and When a Student Gets Their Certificate
Issuance is automatic — there is no "send certificate" button.
- The moment a student finishes the last lesson that satisfies your rule, a certificate is created for them. It is also created the first time an already-finished student opens the certificate area of the course, so nobody is left behind.
- Each certificate gets a unique serial number (C37-2026-000123) and a private 26-character verification code. The QR code and the verification link on the sheet both point to that code.
- The student receives a You earned a certificate notification, and can then view the certificate inside the course, click Download PDF (which opens their browser's print dialog, so the text stays sharp), or click Share to pass on the verification link.
- Anyone — an employer, a parent — can open that link and see whether the certificate is valid, without logging in.
Below the settings on the same Certificate tab is the Issued certificates list, showing each student's name, serial number, issue date and a status badge:
- PENDING: Waiting for approval. Click Approve to release it to the student.
- ISSUED: Live and downloadable. Click Revoke to withdraw it — you will be asked to confirm, and the student immediately loses access.
- REVOKED: Withdrawn. The verification link stays alive and openly reports the certificate as revoked, rather than pretending it never existed. Click Reinstate to restore it.
Use Backfill eligible to issue certificates in one go for students who completed the course before you switched certificates on — they would otherwise never receive one. It is safe to press more than once; nobody gets a duplicate, and the message tells you how many were issued.
Finally, remember the rule from the top of the designer: every issued certificate stores its own frozen copy of the design and the student's details. You can redesign a template freely without ever changing a certificate that is already in a student's hands.