
Two things decide how an OMR sheet looks and reads: the language its labels and numerals are printed in, and the colours of its bubbles and table lines. Both live in the template editor's properties panel.
Language Settings
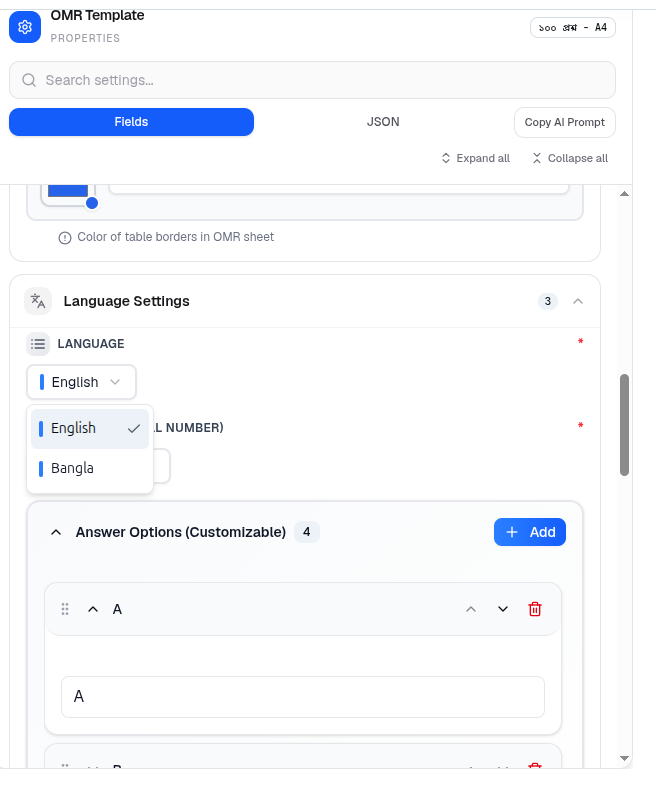
Three settings, and they are more independent than they first appear.
Language (required) — English or Bangla. This sets the language of the printed labels: the roll number heading, the set column, the student fields and the instructions.
Digit Type (Roll Number) (required) — which numerals appear inside the roll number grid:
| Option | Numerals |
|---|---|
| English (0-9) | 0 1 2 3 4 5 6 7 8 9 |
| Bangla (০-৯) | ০ ১ ২ ৩ ৪ ৫ ৬ ৭ ৮ ৯ |
| Custom (User Defined) | Whatever you define |
Language and Digit Type are separate on purpose. You can print Bangla labels with English numerals, which is common where students are used to Latin digits on official forms. The rule that matters: the digits printed must be the ones students expect to shade, because the scanner reads grid positions, not the glyphs.
Answer Options (Customizable) (required) — the option labels down each answer row. By default A, B, C, D, but the list is fully editable:
- + Add appends another option — a fifth choice, if your papers use one.
- Each row has a text box to rename the label.
- Up and down arrows and a drag handle reorder them.
- The trash icon removes one.
Changing the option count changes the sheet's geometry. Going from four options to five adds a bubble to every question row, which needs space. If saving then fails coordinate validation, the layout no longer fits — reduce the question count or move to a larger paper size.
Rename options to ক খ গ ঘ for a Bangla paper, or to 1 2 3 4 if that is your house style. Whatever you choose is what prints on the sheet and what students see in the instructions.
Bubble and Colour Styling
Bubble Styling controls Bubble Color — the colour of the empty circles students fill in.
Table Border Color — described in the panel as Color of table borders in OMR sheet — sets the lines around the roll number grid, the answer grid and the field boxes.
Keep both dark and print in black and white. These are scanning targets, not decoration. A pale bubble outline may look elegant on screen and vanish on a photocopy, and a colour print that gets duplicated in mono can lose contrast entirely. If you change either, print a test sheet, photocopy it once, and check the result still reads cleanly.
The JSON View
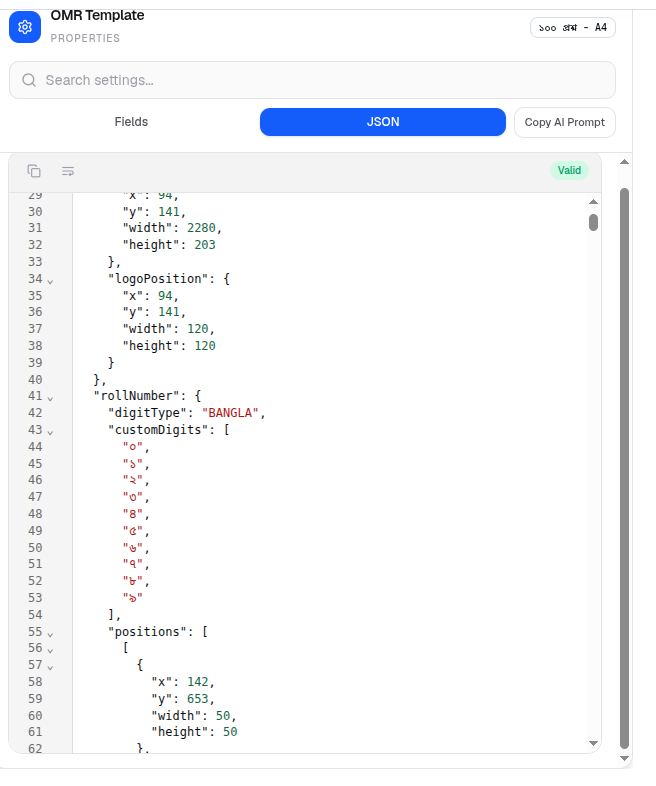
The JSON tab shows the same template as raw configuration. A green Valid badge confirms the structure is sound, and two small buttons let you copy the whole thing or reformat it.
It is worth knowing for three reasons:
- Copying a template between organizations — copy the JSON, paste it into a new template.
- Reading every value at once rather than opening fifteen sections.
- Seeing what the form cannot show — the generated coordinates.
The extract above shows what is stored: a logoPosition with x, y, width and height; rollNumber.digitType set to "BANGLA" with a customDigits array holding ০ ১ ২ ৩ ৪ ৫ ৬ ৭ ৮ ৯; and a positions array giving every bubble an exact x, y, width and height.
Those position numbers are what the scanner actually uses. They are generated for you when you save — you never type them. This is also why a sheet printed at anything other than 100% fails: the paper no longer matches the coordinates.
Edit the Fields tab unless you have a specific reason to work in JSON. The form keeps values within valid ranges; raw JSON does not.
Detection Settings
Alongside the visual settings sit the scanner's tolerances, which decide how much ink counts as a filled bubble:
| Setting | Range |
|---|---|
| Min Fill % (Marked) | 30–80 |
| Max Fill % (Valid) | 70–100 |
| Confidence Threshold % | 50–100 |
Leave these alone unless a batch scans badly. They are calibrated for normal pencil shading. Lower the minimum fill and light marks get counted — along with stray smudges. Raise it and genuine but light answers get missed. Change one value at a time and re-process a handful of sheets rather than the whole batch.
Troubleshooting
| What you see | What it means |
|---|---|
| Labels print in the wrong language | Change Language — it is separate from digit type |
| Roll number shows the wrong numerals | Change Digit Type (Roll Number) |
| You need a fifth answer option | Use + Add under Answer Options, then re-save and check coordinates still validate |
| Saving fails after adding an option | The extra bubble per row no longer fits. Fewer questions, or larger paper |
| Bubbles are faint on the printed sheet | Darken Bubble Color and print a test copy |
| Grid lines disappear when photocopied | Darken Table Border Color |
| The JSON tab shows an error instead of Valid | Something you edited by hand broke the structure. Switch to Fields and correct it there |
| Light marks are being missed | Adjust Min Fill % slightly, then re-process a few sheets to test |
Related: Paper and Basic Settings · Create and Preview Templates · OMR Processing