
The top third of an OMR sheet identifies who sat the paper: your branding, the roll number grid, and the boxes students write their details in. This guide covers those sections of the properties panel.
Header Information
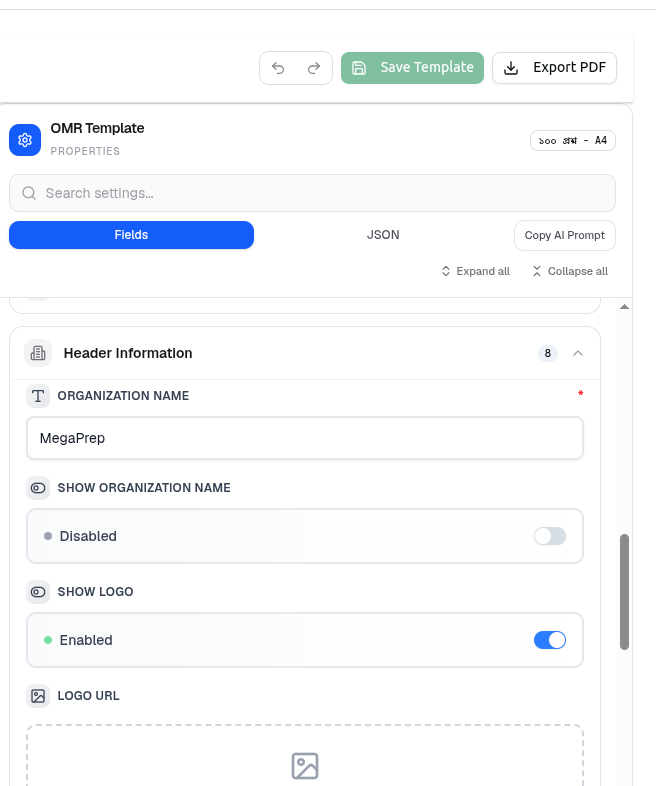
Eight settings control the strip across the top of the sheet.
| Field | What it does |
|---|---|
| Organization Name (required) | Your institution's name, such as MegaPrep |
| Show Organization Name | Whether that name prints as text |
| Show Logo | Whether your logo prints |
| Logo URL | The logo image itself |
| Logo Size | Small, Medium, Big or Biggest |
| Contact email in the header | |
| Phone | Contact phone |
| Address | Institution address |
Show Organization Name and Show Logo are separate toggles, and that combination is the point. In the screenshot above, the name is Disabled while the logo is Enabled — because that logo already contains the word MegaPrep. Printing both would repeat it. If your logo is a wordmark, turn the text off; if it is just a symbol, leave both on.
Organization Name stays required even when hidden, since it is used elsewhere in the template.
Logo Size is worth a test print. Biggest eats vertical space that the answer grid needs, and on a quarter-page template that space is scarce.
The Student Field Sections
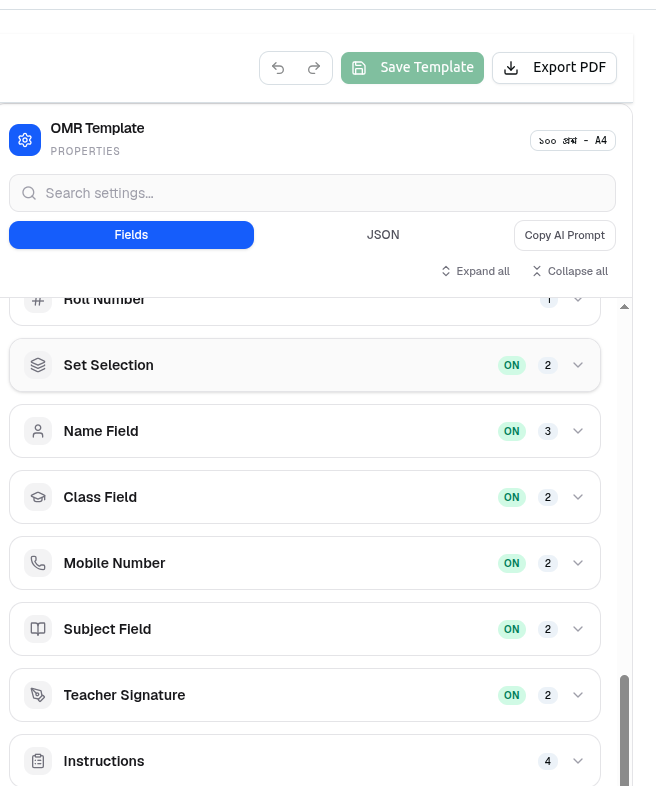
Below the header sit seven sections, each a block on the printed sheet.
| Section | Fields | Can be switched off? |
|---|---|---|
| Roll Number | 1 | No |
| Set Selection | 2 | Yes |
| Name Field | 3 | Yes |
| Class Field | 2 | Yes |
| Mobile Number | 2 | Yes |
| Subject Field | 2 | Yes |
| Teacher Signature | 2 | Yes |
Roll Number has no ON toggle, and that is deliberate. It is how a scanned sheet is matched to a student. Everything else is optional; without a roll number grid the scanner has nothing to identify the paper by, and results arrive as Unknown Student.
Roll Number
One setting: Roll Number Label — the heading printed above the grid, such as রোল নম্বর or Roll No.
The numerals inside the grid come from Digit Type (Roll Number) under Language Settings, and the number of digit columns from the roll number configuration itself. Make sure there are enough columns for your longest roll number — a five-digit roll cannot be shaded on a four-column grid.
Full guide: Visuals and Language Settings
Set Selection
Two settings: Enable Set Selection and Set Label.
This is the small column where students shade A, B, C or D to say which version of the paper they sat.
Turn this on whenever you print more than one question set. The shaded set code is what routes each sheet to the right answer key at scan time. Print A/B/C/D variants without a set column and every sheet is marked against one key — silently, and wrongly. If everyone sits the same paper, switch it off to save space.
Full guide: Question Sets & Answer Keys
The Written Fields
Four optional blocks, each with an Enable toggle and a Label you can rename into your own language:
- Name Field — with a third setting, Number of Letter Boxes, from 10 to 30. One box per letter.
- Class Field
- Mobile Number
- Subject Field
Set Number of Letter Boxes to fit your longest student name. Too few and students run out of space, writing over the edge and confusing the scan; too many and you waste width the answer grid could use. Around 20 suits most Bangla and English names.
These are handwritten fields, read by a person, not by the scanner. Their value is having something legible on the paper when a roll number is misread and you need to identify the sheet by hand.
Teacher Signature
Enable Teacher Signature and Teacher Signature Label add a signature and date line — the invigilator's confirmation that the paper was sat under supervision.
Nothing about it is scanned. Turn it off if your process does not need it.
Deciding What to Include
Every block you enable costs space that the answer grid needs, so include only what you use:
- Always — Roll Number.
- When using multiple papers — Set Selection.
- Usually — Name, so misread sheets can be identified by hand.
- If relevant — Class, Mobile, Subject.
- If your process requires it — Teacher Signature.
On A4 Half Page or A4 Quarter Page templates this matters most, since each copy has a fraction of the room.
Troubleshooting
| What you see | What it means |
|---|---|
| Your organization name prints twice | The logo is a wordmark and Show Organization Name is also on. Turn the text off |
| The logo pushes the answer grid down the page | Reduce Logo Size |
| A block is missing from the sheet | Its section is switched OFF in the panel |
| No ON toggle on Roll Number | Correct — it cannot be disabled, since scanning depends on it |
| Results come back as Unknown Student | Roll numbers were misread or shaded wrongly. The written name field helps identify those sheets |
| Every sheet marked against the same key | Set Selection was off, or students did not shade it |
| Students run out of room writing their name | Increase Number of Letter Boxes, up to 30 |
| Labels are in the wrong language | Each section's Label is free text — rename it directly |
Related: Paper and Basic Settings · Visuals and Language · OMR Processing