
1. Opening the Videos Tab
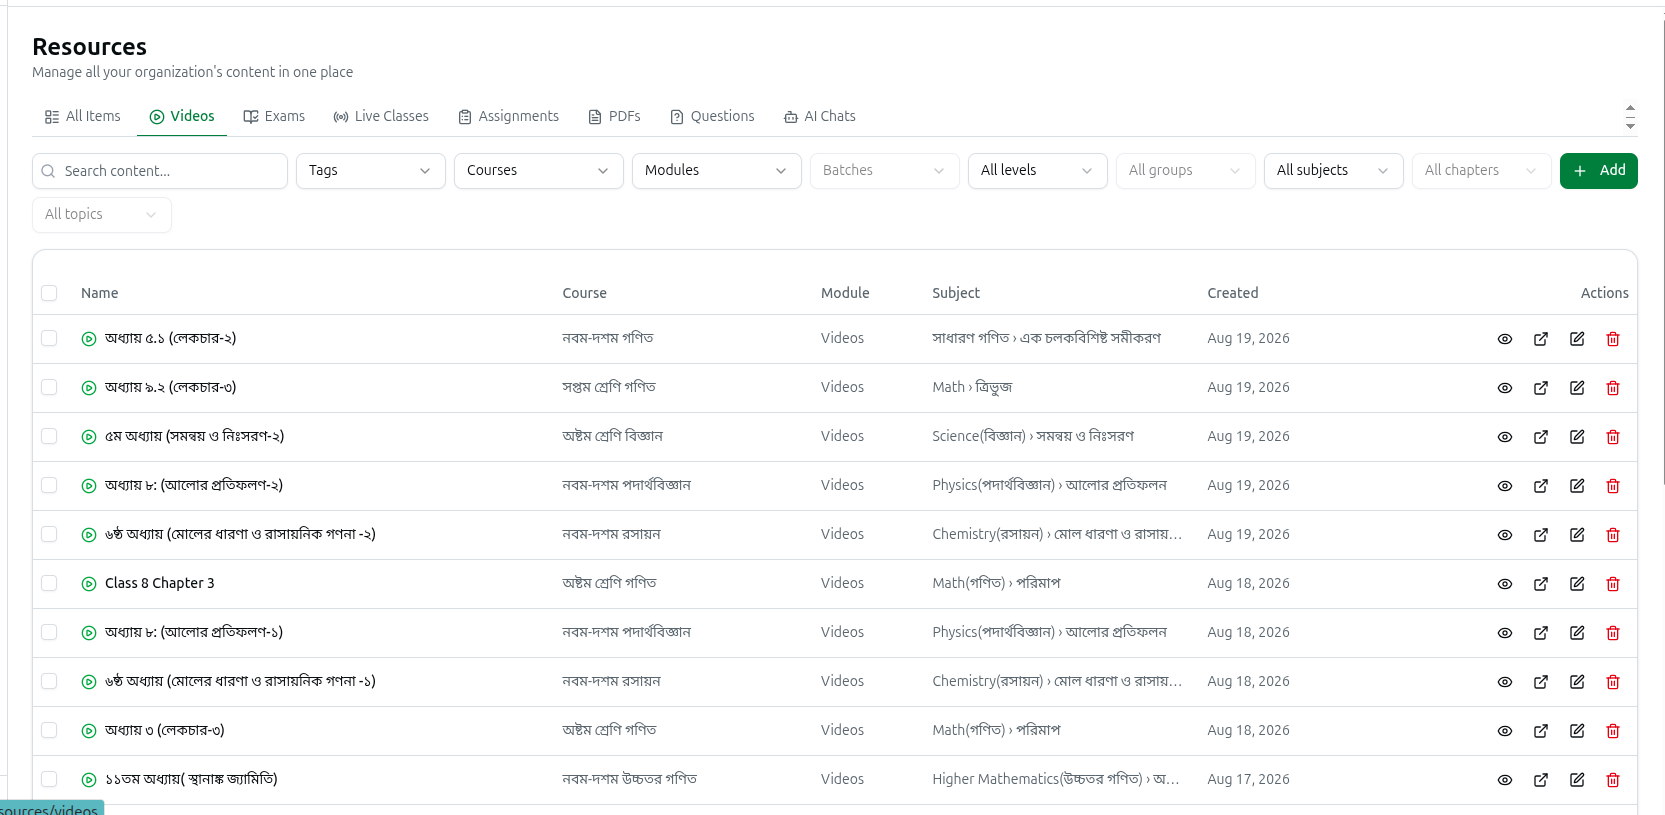
In the left sidebar under Assessment, click Resources, then click Videos. The page header reads Resources — Manage all your organization's content in one place — with a row of tabs across the top: All Items, Videos, Exams, Live Classes, Assignments, PDFs, Questions and AI Chats.
The Videos tab lists every video in your organization, no matter which course it belongs to. The table shows:
- Name: the video title, with a green play icon beside it.
- Course: the course the video sits under.
- Module: the module inside that course.
- Subject: the subject and chapter it is classified under, shown as Subject › Chapter.
- Created: the date the video was added.
The last column holds the row actions, and a checkbox sits at the far left of every row for bulk work.
2. Searching and Filtering the List
The filter row sits directly above the table. On a phone the dropdowns hide behind a Filters button that shows a count badge when filters are active.
- Search content...: type any part of a video title.
- Tags: narrows the Courses and Modules dropdowns to courses carrying those tags.
- Courses and Modules: pick one or many.
- Batches: stays greyed out until you select a course, because the batch choices come from the courses you picked.
- Level, Group, Subject, Chapter, Topic: the curriculum cascade. Group stays locked until you choose a Level, Chapter until you choose a Subject and Topic until you choose a Chapter, and changing one level clears everything below it. Subject also offers an Unassigned choice so you can find videos that were never classified.
- Clear: appears as soon as any filter is set and resets everything.
Your filter choices are stored in the page address, so switching to another Resources tab and coming back keeps them, and you can bookmark or share a filtered view.
At the bottom you get a count such as 1–20 of 137, a page-size dropdown offering 10 / page, 20 / page, 50 / page and 100 / page, and arrow buttons to step through pages.
3. Starting a New Video
- Click the Add button at the top right of the list.
- The Where should this content go? dialog opens — Pick the course and module the new content belongs to.
- Optionally choose a Tag to shorten the course list.
- Choose the Course, then the Module (the module dropdown stays locked until a course is picked).
- Click Continue.
Every video must live inside a module — this is how the video gets attached to a course. If the course you want has no modules yet, the dropdown says No modules in this course and you will need to create one on the course page first.
The Add Module Content dialog then opens with the Video tab already selected. The other tabs — Live, Quiz, Assignment, PDF and Embed — remain available if you picked the wrong type.
If your organization has no curriculum set up yet, an amber Curriculum Not Set Up notice appears at the top with a Set Up Curriculum shortcut. You can ignore it and continue.
4. Choosing the Video Source
Step 1 Choose Video Source offers three cards. Click one and a tick mark appears in its corner.
- YouTube — Paste a YouTube link. A YouTube URL box appears. Paste the link and click the red Import Info button to pull in the title, description and thumbnail automatically. A preview card then shows the thumbnail with a green Video Imported confirmation and a View on YouTube link; the small X clears it and lets you start again. Watch, live, short and youtu.be links are all understood.
- Upload File — Upload from device. A dashed box invites you to Click to select a video file. The on-screen guidance is MP4, WebM, MOV - encoded to adaptive HLS on our servers, and a line underneath confirms Encoded to adaptive HLS (480p/720p/1080p) on Cloudflare R2 — meaning students automatically get the quality their connection can handle. Once a file is chosen the box shows its name and size in MB, with an X to swap it for another.
- External URL — Link to any video. A Video URL field takes a direct link to video file (MP4, WebM, etc.) or streaming URL, for example https://example.com/video.mp4.
5. Uploading a File: Progress and Processing
When you save an Upload File video, the file box is replaced by a live progress panel:
- Uploading video... with N% complete and a filling progress bar while the file transfers from your computer.
- Processing video... — Transcoding to HLS on our servers — the file has landed and is being converted into the multiple quality levels students will stream.
- Upload complete! with a green tick, followed by the message Video uploaded successfully! It may take a few minutes to process.
The upload runs in one go — it cannot be paused or resumed. Keep the dialog open and stay on the page until the bar finishes; if you close it, lose connection, or the upload fails, you must select the file and start over.
Processing continues on the servers after the dialog closes, so you can carry on working. The video appears in the list straight away, and its Status — shown in the details panel, see section 10 — reads ready once the conversion has finished. There is no duration field anywhere in the form for you to fill in.
6. Naming the Video and Setting Its Type
Step 2 Video Details applies to all three sources.
- Quick fill from JSON (optional, collapsed): paste a small block of JSON to auto-fill the title, URL or YouTube link, and lecture notes in one go — handy when you are importing a list of lectures.
- Video Type: choose VOD (Video on Demand), Live, Live Recording or YouTube. This is set for you based on the source card you picked, so only change it if you know you need to.
- Live Session: a switch reading Not Live / Live — Mark as live session recording.
- Video Title *: required. If you picked a file, the file name is used as a starting point.
- Description (Optional): a rich text editor for what students will learn.
7. Advanced Options
Expand the collapsible Advanced Options section — Thumbnail, Order, Notes & More.
- Custom Thumbnail: upload your own cover image with Upload Image, reuse one from your media Library, or paste a link with URL. A 16:9 crop window opens; you can crop precisely or click Skip Crop & Upload. Images are compressed automatically to 2048KB or less. Leave this empty and a YouTube link keeps the thumbnail that Import Info brought in.
- Lecture Notes URL: a link to supplementary material such as PDF notes, slides or other resources. The video’s details panel then shows an Open link for it.
- AI Caption: paste a transcript to give the AI assistant context about this video. Leave it empty and captions are fetched from YouTube automatically when a student asks the AI about the video.
- Display Order: the position of this video inside its module.
- Video Source: Auto-detect, YouTube, Vimeo or Other.
8. Access and Classification
Expand Access & Classification — Batches, Subject, Chapter.
- Assign to Batches: Restrict access to specific batches. Leave empty for all students. Pick one or more batches of the chosen course. If the course has none, you will see No batches available for this course.
- Educational Classification: set Education Level, Group, Subject, Chapter and Topic. This is what powers the Subject column and the curriculum filters on this page, so filling it in makes the video far easier to find later.
When you reopen an existing video, a blue Currently assigned: panel lists its present batches, and any change you make is previewed as a green + Adding: and red − Removing: summary before you save.
9. Announcing and Saving
At the bottom of the dialog:
- Announce to students: ticked by default — Posts a course announcement and sends a notification + push to students who can see this content. Untick it to add the video quietly.
- Cancel closes without saving.
- Create Video saves it. (For an uploaded file, the announcement is held back and only goes out once processing finishes, so students are never told about a video that cannot play yet.)
When you reopen a video the same dialog is titled Edit Content and the button reads Update Video; the Announce to students option is not offered on edits.
10. Previewing a Video and Its Statistics
Click anywhere on a row — or the eye icon in the actions column — to open the video's details panel. It shows:
- View on website: opens the student-facing page for this video in a new tab, which is where you actually watch it back. It only appears once your organization has a public website address.
- The description, as students see it.
- Four stat tiles: Viewers, Watch time, Completion and Comments.
- A detail block with Type, Status, Lecture notes (an Open link when one is set), Created and Updated.
- A Comments list showing up to five student comments with the author, date and reply count. The small trash icon beside a comment deletes it after a confirmation.
The actions column also carries an external-link icon that jumps straight to the same website page without opening the panel first.
11. Editing a Video
Click the pencil icon on the row. The content dialog reopens as Edit Content with every field filled in, and you can change the title, description, YouTube or external link, Video Type, thumbnail, lecture notes, AI caption, display order, batches and classification. Click Update Video to save.
The uploaded media file itself cannot be swapped out from here — to replace the actual footage of an uploaded video, delete it and upload the new file. Changing a YouTube link, by contrast, repoints the video and refreshes its thumbnail automatically.
If a video is not attached to any module, the pencil shows the message "This item is not attached to a module and cannot be edited here" instead of opening the dialog.
12. Moving, Copying and Deleting Videos
Tick the checkbox on one or more rows and a selection strip appears above the table showing N selected, with four buttons:
- Move: opens Move to another Module. Pick a Target Module from any course in your organization and click Move N Items — this is how you re-attach an existing video to a different module.
- Copy: opens Copy to another Course. Filter by tag, choose the target course and module, then click Copy N Items. Videos are duplicated, so the original stays where it is.
- Set Hierarchy: opens Bulk Update Educational Hierarchy to stamp the same education level, group, subject, chapter and topic on everything selected. This overwrites the current values.
- Delete: opens a Delete N Items? confirmation. This cannot be undone.
Clear drops the selection, and changing any filter clears it too so you never act on rows you can no longer see.
To remove a single video, click the red trash icon on its row. The Delete Video confirmation asks Are you sure you want to delete "…"? This action cannot be undone. Click Delete to confirm.