
1. Finding the Question Bank
In the left sidebar under Assessment, click Resources, then open the Questions tab in the tab strip at the top of the page (the strip also holds All Items, Videos, Exams, Live Classes, Assignments, PDFs and AI Chats).
The Questions tab is your organization's entire question bank in one table. A question stored here does not belong to a single exam — the same question can be pulled into as many exams as you need, and its answer statistics keep building up across all of them.
If nothing has been created yet you will see No questions found with the note "You don't have any questions yet. Create your first MCQ, CQ, or SQ to get started.", plus the Create Many Questions and Create Question buttons and a Read Docs button. Once you have questions but a filter hides them all, the same panel instead reads "No questions match your filters."
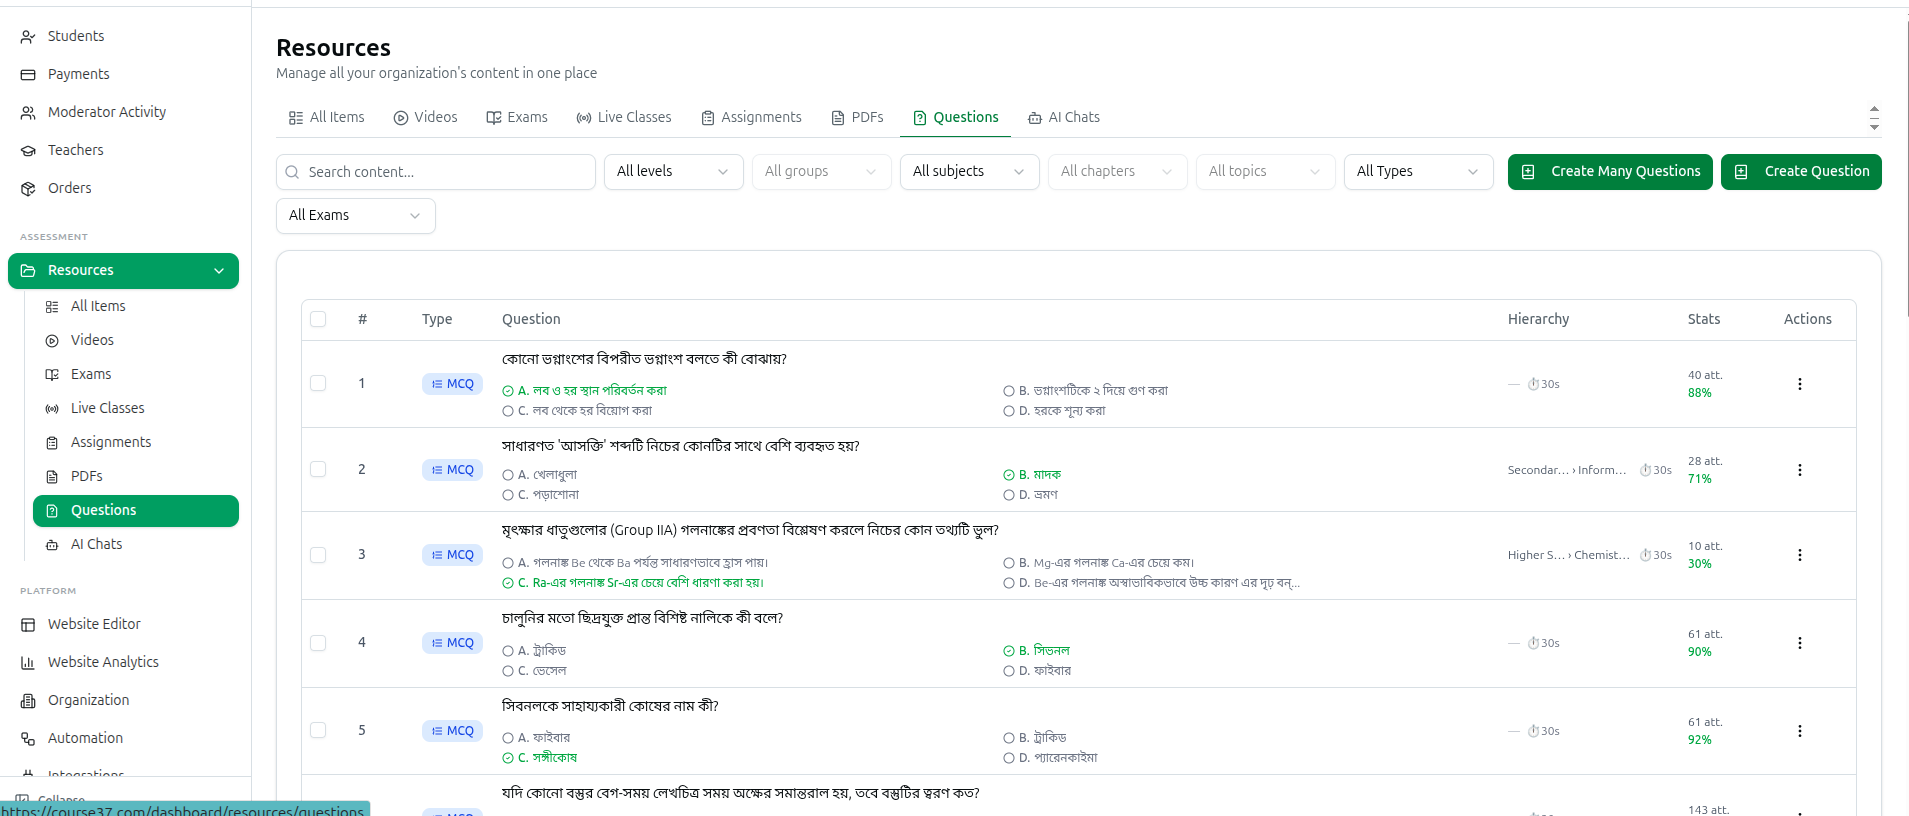
2. Reading the Question Table
Each row is one question, numbered continuously across pages. The columns are #, Type, Question, Hierarchy, Stats and Actions, with a tick box on the far left.
- Type: a colour-coded badge showing which of the three question types this is — MCQ (blue), Short (green, for short/written questions) or CQ (purple, for comprehensive passage questions).
- Question: the first two lines of the question text. For an MCQ the four options appear underneath as A, B, C and D, and the correct one is shown in green with a tick while the rest stay grey — so you can confirm the answer key without opening anything. For a CQ you get a purple summary line such as 3 sub-questions • Total: 10 marks. For a Short question you get its mark value in green.
- Hierarchy: a compact trail such as HSC › Physics › Motion. Hover over it to read the full names. If the question has a time limit it sits beside the trail as ⏱30s. A dash means the question has not been filed under any subject.
- Stats: how many times students have attempted the question (shown as "att.") and what percentage answered it correctly. A dash means it has never been attempted.
- Actions: the three-dot menu, holding Update and Delete.
3. Searching and Filtering
The search box at the top left is labelled Search content.... It looks inside the question text, all four MCQ options, the explanation and the expected answer, and the list narrows as you type.
To the right of it sits the filter row. On a phone these collapse behind a Filters button that carries a small number badge showing how many filters are switched on.
- Level: the education level (defaults to All levels).
- Group: stays locked until you pick a level.
- Subject: the subject the question is filed under.
- Chapter: stays locked until you pick a subject.
- Topic: stays locked until you pick a chapter.
- Type: All Types, MCQ - Multiple Choice, Short Question or Comprehensive Question. These three are the only question types the bank stores.
- Exam: All Exams, or the name of one exam to see only the questions already attached to it.
The five curriculum dropdowns work as a chain — changing one clears everything below it, so switching subject wipes the chapter and topic you had chosen. When any filter is on, a Clear button appears at the end of the row and resets the whole set in one click.
The page address updates as you filter, so a filtered view can be bookmarked or pasted to a colleague and it will open exactly the same way.
4. Moving Through Pages
Under the table, the left side tells you which slice you are looking at (for example "1–20 of 340"). On the right you get a page-size dropdown offering 10 / page, 20 / page, 50 / page and 100 / page (20 is the default), then the back and forward arrows with the current position between them (for example "2 / 17").
5. Opening, Previewing and Editing a Question
Click anywhere on a row — or open the three-dot menu and choose Update — to open the Edit Question window. Everything about the question is visible and editable here.
The window has three tabs: Basic Information, Educational Hierarchy and Topics Management.
Basic Information
- Question Type: three cards — MCQ (4 options · one correct answer), SQ (Written answer response) and CQ (Paragraph + sub-questions).
- Marks: the value of the question. For a CQ this box is locked and reads Auto-calculated from sub-questions.
- Time (seconds): the per-question timer, from 1 to 300 seconds.
- Order: where the question sits when a fixed order is used.
- Question: the main text editor. For a CQ this label becomes Passage/Paragraph.
- Answer key (MCQ only): choose One correct answer, Several answers accepted (any ticked option earns full marks) or Trap — no answer is correct (answering is always wrong; leaving it blank is the only correct response).
- Options A–D (MCQ only): each option is a small editor card. The chosen answer turns green and is labelled ✓ Accepted answer; the others read Mark as correct until you select them.
- Expected Answer (SQ only): the model answer, used as the reference for whoever grades the paper.
- Sub-Questions (CQ only): click Add Sub-Question to attach parts, each with its own Question, Answer and Marks. The question's total marks are added up from these.
- Explanation: an optional note shown with the answer.
Inside Basic Information there are also two sub-tabs, Default Language and Translation. On Translation you pick a Translation Language — English, Bengali, Hindi, Spanish, French, German, Arabic, Chinese, Japanese or Korean — and retype the question, options, answer and explanation in that language. For an MCQ the translated options carry their own correct-answer pick, shown as ✓ Correct Answer on the one you choose and Mark as correct on the rest. A Copy @ Format button copies the question out in the plain text format described below.
Educational Hierarchy is where you file the question: Education Level, Group, Subject, Chapter and Topic. An Edit Hierarchy button opens the curriculum page in a new tab if something is missing from the dropdowns.
Topics Management lets you create a missing topic without leaving the window. Pick a chapter first (otherwise it just says "Please select a chapter first to manage topics"), then type a Topic Name and optional Description and click Create Topic. The Existing Topics list below lets you select or remove topics for that chapter.
Finish with Update Question at the bottom, or Cancel to close without saving.
A shortcut worth knowing: the Show Quick Load (@-Format) button at the top of the window opens a box where you can paste a whole question in one line — Question @ Option1 @ Option2 @ Option3 @ Option4 @ CorrectAnswer(A/B/C/D) @ Explanation — and click Load Question Above to have every field filled in for you.
6. Math, Images and Formatting Inside a Question
Every question, option, answer and explanation box is a rich text editor, so questions are not limited to plain text.
- Equations: the equation button on the toolbar opens Insert LaTeX Equation. Tick Inline to place the formula inside a line of text, or untick it for a formula on its own line. Type into the LaTeX Equation box and watch the live Preview (it warns "Invalid LaTeX syntax" if something is wrong), then click Insert Equation. Common Examples gives one-click starters: Quadratic Formula, Einstein's E=mc², Pythagorean Theorem, Integral, Sum, Fraction, Square Root and Matrix. Pasted text that contains formulas wrapped in dollar signs is converted into proper equations automatically.
- Images: the image button opens Insert Image, where you can Upload Image from your computer, choose Library to reuse a picture already uploaded (Select Image from Library), or paste a direct URL. Uploads are auto-compressed to 2048KB or less. Once an image is placed, selecting it and clicking Edit Selected Image opens Edit Image, where you can set the Scale and the Alt Text.
- Text formatting: headings, Quote, Code Block, Bold, Italic, Underline, Strikethrough, Bullet List, Numbered List, alignment, and Insert Table with buttons to add or delete rows and columns and a Table Layout Settings window for column widths.
- Bangla text: the Unicode to Ansi and Ansi to Unicode buttons convert Bangla typed in the older ANSI layout, which is useful when pasting from old question papers.
7. Deleting a Single Question
Open the three-dot menu on the row and click Delete. A confirmation appears titled Are you absolutely sure? warning that "This action cannot be undone. This will permanently delete the question." Choose Cancel to back out or Delete to confirm.
Deleting removes the question from the bank and from every exam it was part of. If you only want it out of one exam, remove it from that exam instead — see section 10.
8. Bulk Actions on Many Questions at Once
- Tick the box at the left of each question you want to act on. The tick box in the table header selects every question on the page you are currently viewing.
- A grey strip appears above the table showing N selected, followed by the available actions and a Clear button.
- Update Hierarchy opens Bulk Update Education Hierarchy. Set any combination of Education Level, Group, Subject, Chapter and Topic — only the fields you actually choose are written, so you can re-file a hundred questions under a new chapter without touching their subject. Confirm with Update N Questions.
- Delete opens Delete N Questions?, which warns that this permanently deletes the selected questions and removes them from any exams they were attached to. Confirm with Delete N Questions.
Two behaviours are worth remembering: your ticks are kept when you move to another page, so you can collect questions across several pages before acting; but changing any filter or the search text clears the selection, because those questions are no longer on screen.
9. Adding New Questions to the Bank
Two buttons sit at the top right of the tab.
- Create Question opens the same window described in section 5, in create mode, and finishes with Create Question.
- Create Many Questions opens Create Multiple Questions for adding a batch in one go.
In the bulk window you first set the Education Hierarchy at the top — every question in the batch inherits it, and until a subject is chosen the save button is accompanied by the warning Select a subject above to create questions. Then load your questions one of these ways:
- Import Questions from Raw JSON: paste a JSON array and click Parse JSON Questions. Copy JSON Prompt for LLM copies a ready-made instruction you can hand to any AI chat tool, and Clear JSON empties the box. This box preserves LaTeX better than the rich text editor.
- Enter Questions (@ Format): type or paste questions in the form Question @ Option1 @ Option2 @ Option3 @ Option4 @ CorrectAnswer(A/B/C/D) @ Explanation, separating questions with blank lines or numbering (1., 2., …), then click Parse Questions.
- Generate with AI: opens AI Question Generator. Pick the Question Type, then open Education Hierarchy and choose at least a subject, chapter or topic — the generate button stays switched off until you do, because that is the only clue the AI gets about what to write. Choose a Difficulty Level of easy, medium or hard, set the Number of Questions (up to 50, or 20 for CQ), set Sub-questions per CQ (2 to 10) if you chose CQ, add free-text Instructions (Optional), then press the generate button — its label spells out what you asked for, such as Generate 10 MCQ Questions.
Whichever route you take, the questions land in a Parsed Questions review list first. Each card previews the question with its options, the correct answer, time and marks, and carries a pencil icon to edit it and a bin icon to drop it. Add More Questions appends another batch, Clear All empties the list. Nothing is saved until you click Create N Question(s) at the bottom.
Difficulty is only an instruction passed to the AI while it writes. It is not stored on the finished question, so there is no difficulty filter on the question list.
10. Reusing Bank Questions When You Build an Exam
Questions in this bank are the supply that exams draw from.
- Open the exam you are building and go to its Questions tab.
- Click Import Question. The Import Questions from Question Bank window opens with its own Question Bank search panel.
- Narrow the list with the search box *(Search questions by problem, options, or explanation...)* and the dropdowns: All Types, All Levels, All Groups, All Subjects, All Chapters, All Topics, All Exams and Sort By (Latest First, Oldest First or By Order). A Clear All button appears once filters are active, and the header shows how many are on.
- Tick Show only questions not assigned to any exam to hide anything already in use elsewhere.
- Tick the questions you want under Available Questions, then click Add N to Exam.
Back on the exam's Questions tab you can drag rows to reorder them and click a question to edit it. The Select button turns on bulk mode, where Remove from Exam detaches the selected questions (they stay in the bank for other exams), Update Hierarchy re-files them, and Delete erases them from the bank entirely. Outside bulk mode each row carries its own icon buttons, named on hover as Edit question, Remove from exam (keeps the question) and Delete question permanently.
Because a question can sit in several exams at once, always prefer Remove from Exam over Delete unless you truly want the question gone from your organization. And back on the Questions tab, the Exam filter is the quick way to check which questions a given exam is already using before you import more.