
1. Finding the PDF Library
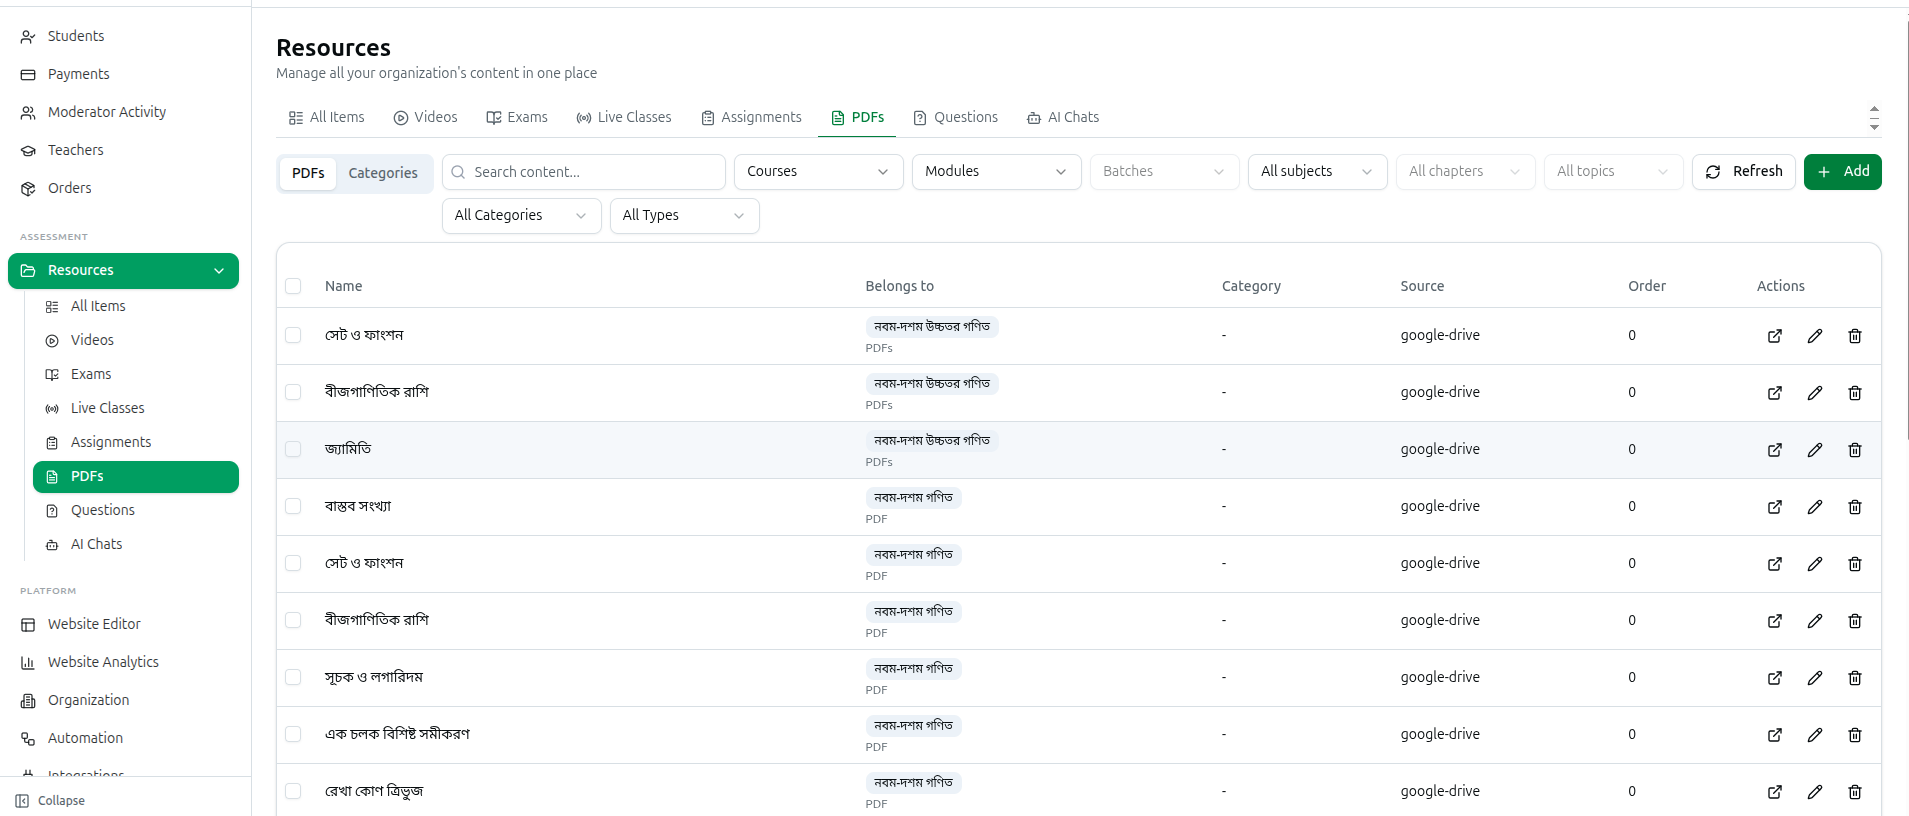
In the left sidebar under Assessment, click Resources, then click PDFs. The Resources page also carries its own tab row across the top — All Items, Videos, Exams, Live Classes, Assignments, PDFs, Questions and AI Chats — so you can hop straight to PDFs from any other resource list.
The page opens with two sub-tabs on the left of the control row:
- PDFs: every PDF document in your organization, wherever it is attached.
- Categories: the sections used to group those PDFs.
On the right sit the action buttons. Refresh reloads both the PDF list and the category list.
2. Reading the PDF List
Each row in the table shows one document:
- Name: the title students see.
- Belongs to: where the PDF lives. A course-module PDF shows a badge with the course name and the module name underneath it; a book PDF shows the book's name; other material shows its type. A dash means nothing is recorded against the PDF.
- Category: the section the PDF is filed under, or a dash if none.
- Source: whatever was recorded in the PDF Source field, or a dash if it is blank.
- Order: the display position of the PDF inside its module or book — lower numbers appear first.
- Actions: three icon buttons — open, edit (pencil) and delete (bin).
At the bottom you get a count such as 1–20 of 143, a page-size selector offering 10 / page, 20 / page, 50 / page and 100 / page (20 / page is the default), and arrows to step between pages.
If nothing matches you will see either No PDFs found. or No PDFs match your filters.
3. Searching and Filtering
The filter row sits beside the sub-tabs and works on the whole library, not just the page you are looking at.
- Search content... — matches the PDF name and description. The list waits until you stop typing before it refreshes.
- Courses — pick one or more courses.
- Modules — narrowed to the courses you selected.
- Batches — stays switched off until you pick a course first (Select a course first).
- Subject, Chapter and Topic — the curriculum cascade. Subject also offers Unassigned for PDFs that were never classified.
- Category — All Categories plus every section you have created; subsections carry a branch mark so you can tell them from top-level ones.
- Type — All Types, Book, Course module, Exam prep or Standalone.
A Clear button appears as soon as any filter is active and resets all of them at once. On a narrow screen the selectors collapse behind a Filters button that carries a badge with the number of active filters.
Your filters are kept in the page address, so a filtered view can be bookmarked or pasted to a colleague.
4. Adding a PDF from the PDFs Tab
Every PDF added from this tab is attached to a course module, so the first thing you choose is where it goes.
- Click Add at the top right.
- The Where should this content go? window appears. Choose a Tag (optional, it only narrows the course list), then a Course, then a Module, and click Continue.
- The Add Module Content window opens with the PDF tab already selected.
Now fill in the form, field by field:
- PDF Name *: required. If you pick a file before typing anything here, the file name (without the .pdf ending) is filled in for you.
- Source *: required. Choose Google Drive, Cloud Storage or Other. This choice decides which field appears next.
- PDF File *: shown only when the source is Cloud Storage. Click Select PDF File and pick the document from your computer. Only .pdf files are accepted and the file must be under 30MB. Once chosen, the file name and its size in MB are shown; the X button removes it so you can pick another.
- PDF URL *: shown for Google Drive and Other. Paste the web address of the document, for example https://example.com/file.pdf.
- Description: a rich-text box for a short summary students read next to the file.
- Order: a number that sets the position of this PDF inside the module. Leave it at 0 if you do not care about ordering.
- Assign to Batches (Optional): the on-screen note reads Select which batches can access this PDF. Leave empty for all batches. If the course has no batches yet, you will see No batches available for this course.
- Educational Classification (Optional): the five curriculum dropdowns — Education Level, Group, Subject, Chapter and Topic. Group waits for Education Level, Chapter waits for Subject, and Topic waits for Chapter. Classifying a PDF here is what makes it findable later through the Subject / Chapter / Topic filters.
- Announce to students: a checkbox at the bottom left, ticked by default. It posts a course announcement and sends a notification and a push message to the students who can see this content. Untick it to add the file quietly.
Click Create Pdf to save. While the file is going up the button reads Uploading PDF... — do not close the window. Cancel discards everything.
If your curriculum has not been set up yet, an amber Curriculum Not Set Up notice appears at the top of the window with a Set Up Curriculum button that opens the curriculum screen in a new tab.
5. Editing a PDF
Click the pencil icon on any row. Course37 opens the right editor for that PDF automatically.
Course-module PDFs open in the Edit Content window on the PDF tab. You can change PDF Name, Source, Description, Order and the Educational Classification, then click Update Pdf. The file itself is not swapped from this screen — to publish a different document, add a new PDF and delete the old one.
Book, exam prep and standalone PDFs open in the Edit PDF window instead:
- PDF Name: required.
- PDF Source: two tabs. Upload PDF shows the upload box with the current file, a View button and an X to remove it. Hard Copy URL shows an External PDF URL field for a document hosted somewhere else.
- Source: an optional free-text note about where the file came from.
- Order: the display position.
- Description: an optional summary.
- Sections: click Select a section... to search your PDF categories and file the document under one of them.
- Education Hierarchy: the same Education Level, Group, Subject, Chapter and Topic dropdowns.
Click Update to save, or Cancel to close. The save button stays greyed out until the window holds a file or a URL.
6. Opening and Previewing a PDF
The first icon in the Actions column opens the document in a new browser tab, where you can read it, print it or save it with your browser's own controls. Inside the upload box of the Edit PDF window there is also a View button that does the same thing.
There is no separate download switch on a PDF. Who can reach a document is decided by where you put it — the course module, and the batches attached to that module — rather than by a setting on the file itself. Students only ever see the PDFs of modules and batches they are enrolled in.
7. Working on Several PDFs at Once
Tick the checkbox at the start of any row and a selection strip appears above the table showing N selected together with four buttons and a Clear link.
- Move: opens Move to another Module. Choose a Target Module and click Move N Items.
- Copy: opens Copy to another Course. Narrow the list with Filter by Tag, pick a Target Course and a Target Module, then click Copy N Items. Note the wording in the window: PDFs are shared, not duplicated — the same document becomes attached to both modules, so editing it later changes it in both places.
- Set Hierarchy: opens Bulk Update Educational Hierarchy. Set Education Level, Group, Subject, Chapter and Topic once and click Update N Items. This overwrites whatever those PDFs had before.
- Delete: opens Delete N Items?, which lists everything selected and warns that it cannot be undone.
The checkbox in the table header selects only the rows on the page you are looking at. Selections survive when you page forwards and back, but they are cleared as soon as you change a filter, so you can never delete rows you can no longer see.
8. Deleting a Single PDF
Click the bin icon on a row. A confirmation asks Delete PDF "name"? This cannot be undone. Confirming removes the document from the library and from every module or book it was attached to.
9. Managing Categories
Click the Categories sub-tab to see the sections used to group PDFs. The table shows:
- Name: subsections are indented under their parent.
- Level: 0 for a top-level section, 1 for a subsection, and so on.
- PDF Count: how many documents are currently filed under it.
- Order: its display position.
- Actions: pencil to edit, bin to delete.
The pencil opens Edit Category, which has two fields — Category Name and Display Order — and an Update button. The bin asks Delete category "name" and its subcategories?
To remove several at once, tick their checkboxes and use the Delete (N) button at the top right — it replaces the Add button while you are on this tab — then confirm Delete N categories and their subcategories? Deleting a parent also deletes everything beneath it.
New sections are not created from this tab. You create them from a book's PDFs tab, described next.
10. Attaching PDFs to a Book
In the left sidebar under Content, click Products and open a book. A PDFs tab appears next to Overview and Recipients whenever the product has a digital side — that is, it is marked PDF-only, it has a PDF price above zero, or it already carries downloadable files.
The tab has two cards.
The PDFs card lists the book's documents with Name, Source, Order and Category columns. Click Add PDF to open the Upload New PDF window (its subtitle reminds you: max file size 30MB). The three-dot menu at the end of each row offers View, Edit and Delete.
The Upload New PDF form, field by field:
- PDF Name: required, the title students see.
- PDF Source: two tabs. Upload PDF gives you a drop area reading Click to upload PDF file with Max size: 30MB underneath; while the file goes up you see a progress bar and a percentage, and afterwards a card with the file name, a View button and an X to remove it. Hard Copy URL instead shows an External PDF URL box for a document hosted elsewhere.
- Source: optional free text describing where the file came from.
- Order: the display position within the book.
- Description: an optional summary.
- Sections: click Select a section... to search your categories and file the PDF under one. This is the same section list you manage on the Categories tab of the PDF library.
- Education Hierarchy: Education Level, Group, Subject, Chapter and Topic.
Click Upload & Create to save, or Cancel to abandon. A standing notice inside the upload box reminds you that PDF files are tracked against your organization's storage quota.
The PDF Section card on the right is where sections are created. Click Add Section to open Create New Category, fill in Category Name and Display Order, and click Create. Each section in the list has three icons: + adds a subsection beneath it, the pencil renames it, and the bin deletes it. Sections with children show an arrow you can click to expand them.
11. File Limits Worth Remembering
- One PDF may be up to 30MB. Larger files are rejected with a message before anything is uploaded.
- The file picker accepts .pdf files only; anything else is refused.
- Uploaded PDFs count against your organization's storage quota — the upload box says so itself — so large scanned books eat into your available space.